Android Adapter Tutorial With Example In Android Studio is the topic of the day.
Android adapters are the bridges between the core data source and the android UI views like ListView, GridView or Spinner.
To quickly understand the basic functionality of android adapter, see the below image
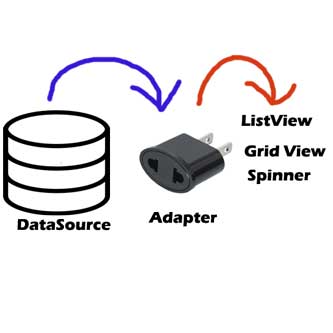
Let us go from Left to Right.
First of all, UI view like ListView, GridView or Spinner will request the data from the adapter.
Then adapter will fetch the data from the data source as per the blue arrow.
Now, adapter will pass this data to the ListView, GridView or Spinner which have requested the data as per the Orange arrow.
We can compare the mechanism of android adapter with the Electricity (data source) , Mobile (ListView etc.) and electric adapter.
Mobile device need electricity which it consumes via electric adapter.
You can say that mobile device is listview, electricity is a data source and electric adapter is the android adapter.
Methods of the Adapter
Following are the methods which are helping in the transportation of the data.
1. getCount()
How many items are in the data set represented by this Adapter.
It will return the number of items in the dataset.
For example, number of rows in the ListView.
2. getItem(int position)
Get the data item associated with the specified position in the data set.
3. getItemId(int position)
Get the row id associated with the specified position in the list.
4. getItemViewType(int position)
Get the type of View that will be created by getView(int, View, ViewGroup) for the specified item.
integer parameter is the position of the data set.
5. getView(int position, View convertView, ViewGroup parent)
Get a View that displays the data at the specified position in the data set.
6. getViewTypeCount()
Returns the number of types of Views that will be created by getView(int, View, ViewGroup).
7. hasStableIds()
Indicates whether the item ids are stable across changes to the underlying data.
8. registerDataSetObserver(DataSetObserver observer)
Register an observer that is called when changes happen to the data used by this adapter.
9. unregisterDataSetObserver(DataSetObserver observer)
Unregister an observer that has previously been registered with this adapter via registerDataSetObserver(DataSetObserver).
Types of Adapters
- ArrayAdapter
- CustomArrayAdapter
- BaseAdapter
- SimpleAdapter
- CustomSimpleAdapter
- Cursor Adapter
ArrayAdapter
Whenever the data source is in the form of the ArrayList, this type of adapter is the best suitable option to use for ListView, GridView or Spinner.
By default, the array adapter creates a view by calling Object.toString() on each data object in the collection you provide, and places the result in a TextView.
You may also customize what type of view is used for the data object in the collection.
To customize what type of view is used for the data object, override getView(int, View, ViewGroup) and inflate a view resource.
Below is the sample usage of the Arrayadapter
ArrayAdapter<String> arrayAdapter = new ArrayAdapter<String>(this, R.layout.activity_list_view, R.id.tv, cityList);
This adapter will use the String array as the data source.
Second parameter is the XML layout file which represent the every view of the ListView.
Third one is the id of textview which is in the every row of ListView.
cityList is the string array. (Data Source)
ArrayAdapter can have below types of constructors as per the requirements.
1. ArrayAdapter(Context context,
2. ArrayAdapter(Context context,
3. ArrayAdapter(Context context,
4. ArrayAdapter(Context context,
5. ArrayAdapter(Context context,
6. ArrayAdapter(Context context,
Custom ArrayAdapter
When we want to add multiple UI widget like TextView, ImageView etc. in the listview, we need to use custom Arrayadapter.
To make Custom ArrayAdapter, we need to make one JAVA class, which extends the ArrayAdapter.
Arrayadapter can override all the methods of the Base Adapter.
Code example of custom arrayadapter is as the below
public class CustomAdapter extends ArrayAdapter {

    public CustomAdapter(Context context, int resource, int tvResourceId, List objects) {
       super(context, resource, tvResourceId, objects);
     }
    @Override
    public Object getItem(int i) {
      return null;
    }

    @Override
    public long getItemId(int i) {
        return 0;
    }
    @Override
    public int getCount() {
         return super.getCount();
   }

   @Override
   public View getView(int position, View convertView, ViewGroup parent) {
        return super.getView(position, convertView, parent);
   }
}
Base Adapter
As the name suggests, it is the common class which other adapters can use or extend.
Whenever the complex customization in needed in the ListView, GridView or Spinner, base adapter helps us to make our custom adapter with it’s methods.
Following is the code sample with the use of Base adapter
public class FoodAdapter extends BaseAdapter {

    private Context context;
    private ArrayList<FoodModel> foodModelArrayList;

    public FoodAdapter(Context context, ArrayList<FoodModel> foodModelArrayList) {

        this.context = context;
        this.foodModelArrayList = foodModelArrayList;
    }

    @Override
    public int getViewTypeCount() {
        return getCount();
    }
    @Override
    public int getItemViewType(int position) {

        return position;
    }

    @Override
    public int getCount() {
        return foodModelArrayList.size();
    }

    @Override
    public Object getItem(int position) {
        return foodModelArrayList.get(position);
    }

    @Override
    public long getItemId(int position) {
        return 0;
    }

    @Override
    public View getView(int position, View convertView, ViewGroup parent) {
        ViewHolder holder;

        if (convertView == null) {
            holder = new ViewHolder();
            LayoutInflater inflater = (LayoutInflater) context
                    .getSystemService(Context.LAYOUT_INFLATER_SERVICE);
            convertView = inflater.inflate(R.layout.list_item, null, true);

            holder.tvProduct = (TextView) convertView.findViewById(R.id.tvProduct);
            holder.tvQty = (TextView) convertView.findViewById(R.id.tvQty);

            convertView.setTag(holder);
        }else {
            // the getTag returns the viewHolder object set as a tag to the view
            holder = (ViewHolder)convertView.getTag();
        }

        holder.tvProduct.setText(foodModelArrayList.get(position).getProduct());
        holder.tvQty.setText(String.valueOf(foodModelArrayList.get(position).getQty()));

        return convertView;
    }

    private class ViewHolder {

        protected TextView tvProduct, tvQty;

    }

}
As you can see that there some methods like getViewTypeCount(), getItemViewType(), getCount(), getItem(), getItemId(), getView() etc.
Custom adapter can override these methods as per the custom requirements.
Simple Adapter
Whenever we have static data that are not updating with time, we can use simple adapter to populate them in listview or others.
Simple Adapter provides easy way to map this static data to XML views in quick time.
You also specify an XML file that defines the views used to display the row, and a mapping from keys in the Map to specific views. Binding data to views occurs in two phases.
Example of implementing simple adapter is as the below
SimpleAdapter adapter = new SimpleAdapter(this, fillMaps, R.layout.grid_item, stringarray, integerarray);
First parameter is the context.
Second is the List of the Hashmaps.
Third one is the reference to the XML layout file which is making view for every row of listview.
Fourth is the string array. Fifth is the integer array.
Following is the definitions of the parameters.
        String[] stringarray = new String[] {"rowid", "col_1", "col_2", "col_3"};
        int[] integerarray = new int[] { R.id.item1, R.id.item2, R.id.item3, R.id.item4 };


        List<HashMap<String, String>> fillMaps = new ArrayList<HashMap<String, String>>();
        for(int i = 0; i < 10; i++){
            HashMap<String, String> map = new HashMap<String, String>();
            map.put("rowid", "" + i);
            map.put("col_1", "col_1_item_" + i);
            map.put("col_2", "col_2_item_" + i);
            map.put("col_3", "col_3_item_" + i);
            fillMaps.add(map);
        }
Custom Simple Adapter
As we have seen, we can use simple adapter when we have static data.
But when there are dynamic data which are updating frequently, then we need to make custom simple adapter.
A JAVA class which extends the simple adapter can be defined as the custom simple adapter.
For making click events of the children of the listview row item, we also require custom simple adapter. Simple adapter can not handle click events.
Following can be the possible implementation of the Custom Simple Adapter
public class CustomAdapter extends SimpleAdapter {

      public CustomAdapter(Context context, List<? extends Map<String, ?>> data, int resource, String[] from, int[] to) {
            super(context, data, resource, from, to);

      }

      @Override
      public int getViewTypeCount() {
          return getCount();
      }
      @Override
      public int getItemViewType(int position) {
          return position;
      }

      @Override
      public View getView(int position, View convertView, ViewGroup parent) {
             return super.getView(position, convertView, parent);
      }

      @Override
      public int getCount() {
            return super.getCount();
      }
}
You can read that JAVA class is extending the SimpleAdapter.
Here, you can override all the methods of Base Adapter for particular requirements.
Cursor Adapter
We need to use Cursor Adapter when we want to display the data from an SQLite database query.
A CursorAdapter makes it easy to use when the resource of a listview is coming from database and you can have more control over the binding of data values to layout controls.
Following is the code example for Cursor adapter.
public class NewCursorAdapter extends CursorAdapter {

    // Default constructor
    public NewCursorAdapter(Context context, Cursor cursor, int flags) {

    }

    public void bindView(View view, Context context, Cursor cursor) {

    }

    public View newView(Context context, Cursor cursor, ViewGroup parent) {

        return null;
    }
}
In the newView() method, you simply inflate the view and return it. This view is the XML layout file for listview row item.
In the bindView() method, you set the elements of your view. You can set the text to textview or set imageview in this method.
Example of Adapter
Now let us make a listview example to actually see, how does adapter provides data to listview from the data source.
Make a new android studio project with empty activity as a first activity.
In the activity_main.xml file, add the below source code
<?xml version="1.0" encoding="utf-8"?>
<RelativeLayout xmlns:android="http://schemas.android.com/apk/res/android"
    xmlns:tools="http://schemas.android.com/tools"
    android:layout_width="match_parent"
    android:layout_height="match_parent">

    <ListView
        android:layout_width="wrap_content"
        android:layout_height="wrap_content"
        android:id="@+id/listView"
        android:divider="@null"
        />
</RelativeLayout>
There is only one listview in the main XML file.
Make a new file in the res->layout directory and give it a name lv_item.xml
Write down the following coding lines in lv_item.xml file
<?xml version="1.0" encoding="utf-8"?>
<LinearLayout xmlns:android="http://schemas.android.com/apk/res/android"
    android:layout_width="match_parent"
    android:layout_height="match_parent"
    android:orientation="vertical">

    <LinearLayout
        android:layout_width="match_parent"
        android:layout_height="wrap_content"
        android:orientation="horizontal">

        <ImageView
            android:id="@+id/imgView"
            android:layout_width="100dp"
            android:layout_height="100dp"
            android:layout_marginLeft="10dp"
            android:layout_marginTop="10dp" />

        <TextView
            android:id="@+id/name"
            android:layout_width="match_parent"
            android:layout_height="110dp"
            android:gravity="center_vertical"
            android:textAppearance="?android:attr/textAppearanceMedium"
            android:paddingLeft="10dp"
            android:text="Name" />

    </LinearLayout>

    <View
        android:layout_width="match_parent"
        android:layout_height="1dp"
        android:layout_marginTop="10dp"
        android:layout_marginLeft="10dp"
        android:layout_marginRight="10dp"
        android:background="@color/colorAccent"/>

</LinearLayout>
This file will generate the view layout for every single row of the listview.
This is a common file and listview will use while creating every child row.
One textview and one imageview are present in this file.
Time to add images to the res->drawable directory.
Download the images by clicking the below link
Add these images into res->drawable directory.
Following is the code for MainActivity.java file
import android.support.v7.app.AppCompatActivity;
import android.os.Bundle;
import android.widget.ListView;
import android.widget.SimpleAdapter;
import java.util.ArrayList;
import java.util.HashMap;
import java.util.List;

public class MainActivity extends AppCompatActivity {

   private ListView lv;
   private int[] myImageList = new int[]{R.drawable.benz, R.drawable.bike,
            R.drawable.car,R.drawable.carrera
            ,R.drawable.ferrari,R.drawable.harly,
            R.drawable.lamborghini,R.drawable.silver};
   private String[] myImageNameList = new String[]{"Benz", "Bike",
            "Car","Carrera"
            ,"Ferrari","Harly",
            "Lamborghini","Silver"};

    @Override
   protected void onCreate(Bundle savedInstanceState) {
        super.onCreate(savedInstanceState);
        setContentView(R.layout.activity_main);
        lv = (ListView) findViewById(R.id.listView);

        List<HashMap<String, String>> fillMaps = new ArrayList<HashMap<String, String>>();
        for(int i = 0; i < 8; i++){
            HashMap<String, String> map = new HashMap<String, String>();
            map.put("name",myImageNameList[i]);
            map.put("image",myImageList[i]+"");
            fillMaps.add(map);
        }

        String[] namesString = {"name","image"};//string array
        int[] imagesIds = {R.id.name,R.id.imgView};//int array of views id's

        SimpleAdapter simpleAdapter = new SimpleAdapter(this,fillMaps,R.layout.lv_item,namesString,imagesIds);//Create object and set the parameters for simpleAdapter
        lv.setAdapter(simpleAdapter);//sets the adapter for listView

    }
}
First of all, add the required images to the res->drawable folder.
One integer array called myImageList contains the drawable resources to the images.
String array myImageNameLiist contains the names of the images in the string format.
I have used simple adapter in this file to attach it to the listview.
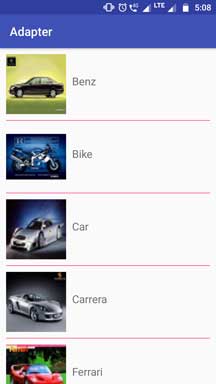
Above example will give you the following output