
Android take screenshot programmatically and share with whatsapp, gmail, facebook etc. platforms.
In this tutorial, we will also take the screenshot of particular layout.
1. Android Take Screenshot Programmatically And Share
2. Android Take Scrollview Screenshot | Whole/Full/Long Activity Page
1. Android Take Screenshot Programmatically And Share
We will take the screenshot of imageview and textview in this Android take screenshot example. You can also take screenshot of other layout like linearlayout, relativelayout, edittext etc. with the source code of this example.
You will also learn how to save the captured screenshot in the internal storage in the JPEG format.
I will teach you to capture screenshot on button click with android studio.
1. Runtime Permissions
We are going to save the screenshot in the internal storage of the android device.
For this purpose, we need following two permissions.
<uses-permission android:name="android.permission.WRITE_EXTERNAL_STORAGE" />
<uses-permission android:name="android.permission.READ_EXTERNAL_STORAGE" />
I have set the target sdk version as 22 but if you want to target greater version than 22, you need to ask for the runtime permissions.
2. Layout And Java Code
In your activity_main.xml file, add following code
<?xml version="1.0" encoding="utf-8"?>
<LinearLayout xmlns:android="http://schemas.android.com/apk/res/android"
    xmlns:app="http://schemas.android.com/apk/res-auto"
    xmlns:tools="http://schemas.android.com/tools"
    android:layout_width="match_parent"
    android:layout_height="match_parent"
    android:orientation="vertical"
    tools:context=".MainActivity">

    <TextView
        android:layout_width="match_parent"
        android:layout_height="wrap_content"
        android:gravity="center"
        android:textSize="25sp"
        android:layout_marginTop="10dp"
        android:text="Take Screenshot Programmatically"/>

    <LinearLayout
        android:layout_width="match_parent"
        android:layout_height="match_parent"
        android:orientation="vertical"
        android:gravity="center">

        <ImageView
            android:layout_width="270dp"
            android:layout_height="0dp"
            android:id="@+id/iv"
            android:background="@color/colorAccent"
            android:scaleType="fitXY"
            android:layout_weight="1"
            android:layout_marginTop="10dp"/>

        <Button
            android:layout_width="wrap_content"
            android:layout_height="wrap_content"
            android:id="@+id/btnSS"
            android:layout_marginTop="10dp"
            android:text="Take Screenshot"/>
        <Button
            android:layout_width="wrap_content"
            android:layout_height="wrap_content"
            android:id="@+id/btnShare"
            android:layout_marginTop="10dp"
            android:text="Share"/>
        <Button
            android:layout_width="wrap_content"
            android:layout_height="wrap_content"
            android:id="@+id/btnPL"
            android:layout_marginTop="10dp"
            android:text="SS of Particular Layout"/>

    </LinearLayout>
</LinearLayout>
I have taken one imageview and three buttons in the above layout file.
Above file will generate the below output
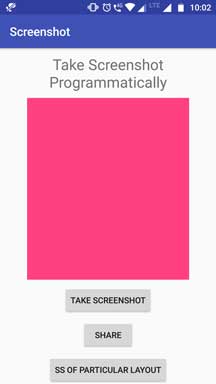
Captured screenshot will be previewed in this Imageview (PINK BACKGROUND). One button (TAKE SCREENSHOT) will take the screenshot on it’s click event.
Share button will enable the user to share the screenshot with different apps like whatsapp, gmail, facebook etc.
Now copy and paste below source code into the MainActivity.java file
import android.content.Intent;
import android.graphics.Bitmap;
import android.graphics.BitmapFactory;
import android.net.Uri;
import android.os.Environment;
import android.support.v7.app.AppCompatActivity;
import android.os.Bundle;
import android.util.Log;
import android.view.View;
import android.widget.Button;
import android.widget.ImageView;
import java.io.File;
import java.io.FileOutputStream;
import java.util.Date;

public class MainActivity extends AppCompatActivity {

    private Button btnSS, btnshare, btnPL;
    private ImageView iv;
    private String sharePath="no";

    @Override
    protected void onCreate(Bundle savedInstanceState) {
        super.onCreate(savedInstanceState);
        setContentView(R.layout.activity_main);

        btnSS = findViewById(R.id.btnSS);
        btnshare = findViewById(R.id.btnShare);
        btnPL = findViewById(R.id.btnPL);

        iv = findViewById(R.id.iv);

        btnSS.setOnClickListener(new View.OnClickListener() {
            @Override
            public void onClick(View v) {
                takeScreenshot();
            }
        });

        btnshare.setOnClickListener(new View.OnClickListener() {
            @Override
            public void onClick(View v) {
                if (!sharePath.equals("no")) {
                    share(sharePath);
                }
            }
        });

        btnPL.setOnClickListener(new View.OnClickListener() {
            @Override
            public void onClick(View v) {
                Intent intent = new Intent(MainActivity.this,ParticularLayoutActivity.class);
                startActivity(intent);
            }
        });
    }

    private void takeScreenshot() {
        Date now = new Date();
        android.text.format.DateFormat.format("yyyy-MM-dd_hh:mm:ss", now);

        try {
            // image naming and path  to include sd card  appending name you choose for file
            String mPath = Environment.getExternalStorageDirectory().toString() + "/" + now + ".jpeg";

            // create bitmap screen capture
            View v1 = getWindow().getDecorView().getRootView();
            v1.setDrawingCacheEnabled(true);
            Bitmap bitmap = Bitmap.createBitmap(v1.getDrawingCache());
            v1.setDrawingCacheEnabled(false);

            File imageFile = new File(mPath);

            FileOutputStream outputStream = new FileOutputStream(imageFile);
            int quality = 100;
            bitmap.compress(Bitmap.CompressFormat.JPEG, quality, outputStream);
            outputStream.flush();
            outputStream.close();

            //setting screenshot in imageview
            String filePath = imageFile.getPath();

            Bitmap ssbitmap = BitmapFactory.decodeFile(imageFile.getAbsolutePath());
            iv.setImageBitmap(ssbitmap);
            sharePath = filePath;

        } catch (Throwable e) {
            // Several error may come out with file handling or DOM
            e.printStackTrace();
        }
    }

    private void share(String sharePath){

        Log.d("ffff",sharePath);
        File file = new File(sharePath);
        Uri uri = Uri.fromFile(file);
        Intent intent = new Intent(Intent.ACTION_SEND);
        intent .setType("image/*");
        intent .putExtra(Intent.EXTRA_STREAM, uri);
        startActivity(intent );

    }
}
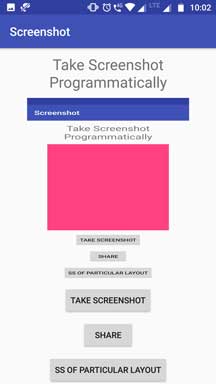
As you have seen in the above image, Take Screenshot button will capture screenshot with below code
 private void takeScreenshot() {
        Date now = new Date();
        android.text.format.DateFormat.format("yyyy-MM-dd_hh:mm:ss", now);

        try {
            // image naming and path  to include sd card  appending name you choose for file
            String mPath = Environment.getExternalStorageDirectory().toString() + "/" + now + ".jpeg";

            // create bitmap screen capture
            View v1 = getWindow().getDecorView().getRootView();
            v1.setDrawingCacheEnabled(true);
            Bitmap bitmap = Bitmap.createBitmap(v1.getDrawingCache());
            v1.setDrawingCacheEnabled(false);

            File imageFile = new File(mPath);

            FileOutputStream outputStream = new FileOutputStream(imageFile);
            int quality = 100;
            bitmap.compress(Bitmap.CompressFormat.JPEG, quality, outputStream);
            outputStream.flush();
            outputStream.close();

            //setting screenshot in imageview
            String filePath = imageFile.getPath();

            Bitmap ssbitmap = BitmapFactory.decodeFile(imageFile.getAbsolutePath());
            iv.setImageBitmap(ssbitmap);
            sharePath = filePath;

        } catch (Throwable e) {
            // Several error may come out with file handling or DOM
            e.printStackTrace();
        }
    }
Above method will also save the screenshot in the internal storage.
After saving the image, we will preview it in the imageview.
See the below image which shows the output generated when the screenshot is captured successfully.
User will click the share button to share the screenshot.
Following method will do this task for us.
 private void share(String sharePath){

        Log.d("ffff",sharePath);
        File file = new File(sharePath);
        Uri uri = Uri.fromFile(file);
        Intent intent = new Intent(Intent.ACTION_SEND);
        intent .setType("image/*");
        intent .putExtra(Intent.EXTRA_STREAM, uri);
        startActivity(intent );

    }
I have just called above method on the button click.
Share Intent is used to share the image. Intent will use the URI of the image to share it with various apps.
You will get following screen when this method is executed by the system
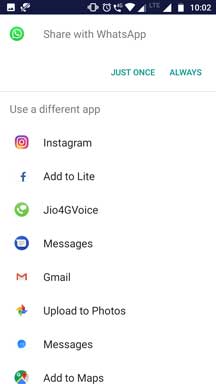
As you can see that system will allow user to choose from various apps to share the screenshot
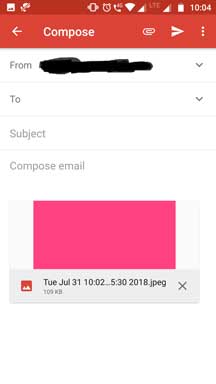
If user choose gmail here, then it will open the gmail app and will attach our screenshot
Similarly, you can share with other apps like whatspp, facebook, instagram etc.
Android take screenshot tutorial will also guide you to capture specific layout including imageview.
Now, when the user clicks on the third button (SS of particular layout), compiler will open new activity.
3. Screenshot of Particular Layout
Create one new activity and give it a name “ParticularLayoutActivity“.
In your activity_particular_layout.xml file, add following code
<?xml version="1.0" encoding="utf-8"?>
<LinearLayout xmlns:android="http://schemas.android.com/apk/res/android"
    xmlns:app="http://schemas.android.com/apk/res-auto"
    xmlns:tools="http://schemas.android.com/tools"
    android:layout_width="match_parent"
    android:layout_height="match_parent"
    android:orientation="vertical"
    tools:context=".ParticularLayoutActivity">

    <ImageView
        android:layout_width="170dp"
        android:layout_height="150dp"
        android:id="@+id/ivpl"
        android:layout_marginLeft="30dp"
        android:background="@color/colorAccent"
        android:layout_marginTop="10dp"/>

    <Button
        android:layout_width="wrap_content"
        android:layout_height="wrap_content"
        android:id="@+id/btnim"
        android:layout_marginTop="10dp"
        android:text="Take SS of below Image"/>

    <ImageView
        android:layout_width="100dp"
        android:layout_height="100dp"
        android:id="@+id/image"
        android:scaleType="fitXY"
        android:layout_marginTop="10dp"
        android:layout_marginLeft="10dp"
        android:src="@drawable/ferrari"/>

    <Button
        android:layout_width="wrap_content"
        android:layout_height="wrap_content"
        android:id="@+id/btntx"
        android:text="Take SS of below TextView"/>

    <TextView
        android:layout_width="180dp"
        android:layout_height="50dp"
        android:id="@+id/tx"
        android:gravity="center"
        android:background="#1be94e"
        android:textColor="#000"
        android:text="I'm textview, Take My SS "/>

</LinearLayout>
In this file, I have taken an Imageview, which will preview the screenshot same as in the previous scenario.
Write the below source code into ParticularLayoutActivity.java file
import android.graphics.Bitmap;
import android.graphics.BitmapFactory;
import android.os.Environment;
import android.support.v7.app.AppCompatActivity;
import android.os.Bundle;
import android.view.View;
import android.widget.Button;
import android.widget.ImageView;
import android.widget.TextView;
import java.io.File;
import java.io.FileOutputStream;
import java.util.Date;

public class ParticularLayoutActivity extends AppCompatActivity {

    private Button btnIm, btntx;
    private ImageView imageView, ivpl;
    private TextView tv;

    @Override
    protected void onCreate(Bundle savedInstanceState) {
        super.onCreate(savedInstanceState);
        setContentView(R.layout.activity_particular_layout);

        btnIm = findViewById(R.id.btnim);
        btntx = findViewById(R.id.btntx);
        tv = findViewById(R.id.tx);
        imageView = findViewById(R.id.image);
        ivpl = findViewById(R.id.ivpl);

        btnIm.setOnClickListener(new View.OnClickListener() {
            @Override
            public void onClick(View v) {
                takeSS(imageView);

            }

        });

        btntx.setOnClickListener(new View.OnClickListener() {
            @Override
            public void onClick(View v) {
                takeSS(tv);
            }

        });
    }

    private void takeSS(View v){
        Date now = new Date();
        android.text.format.DateFormat.format("yyyy-MM-dd_hh:mm:ss", now);

        try {
            // image naming and path  to include sd card  appending name you choose for file
            String mPath = Environment.getExternalStorageDirectory().toString() + "/" + now + ".jpeg";

            // create bitmap screen capture
            v.setDrawingCacheEnabled(true);
            Bitmap bitmap = Bitmap.createBitmap(v.getDrawingCache());
            v.setDrawingCacheEnabled(false);

            File imageFile = new File(mPath);

            FileOutputStream outputStream = new FileOutputStream(imageFile);
            int quality = 100;
            bitmap.compress(Bitmap.CompressFormat.JPEG, quality, outputStream);
            outputStream.flush();
            outputStream.close();

            //setting screenshot in imageview
            String filePath = imageFile.getPath();

            Bitmap ssbitmap = BitmapFactory.decodeFile(imageFile.getAbsolutePath());
            ivpl.setImageBitmap(ssbitmap);
            //sharePath = filePath;

        } catch (Throwable e) {
            // Several error may come out with file handling or DOM
            e.printStackTrace();
        }
    }
}
In this activity we will take the screenshots of two different and particular layouts – Imageview and Textview.
Consider below image
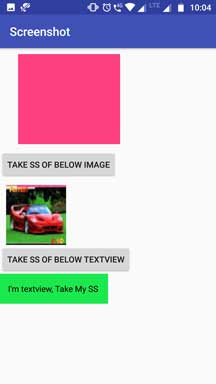
As you can see in the above image, we have one image of car and one textview with green background.
There are two buttons above both views.
You can download the image of the car by
[sociallocker]Click here to download car image[/sociallocker]
Following method will take the screenshot of both the views.
private void takeSS(View v){
        Date now = new Date();
        android.text.format.DateFormat.format("yyyy-MM-dd_hh:mm:ss", now);

        try {
            // image naming and path  to include sd card  appending name you choose for file
            String mPath = Environment.getExternalStorageDirectory().toString() + "/" + now + ".jpeg";

            // create bitmap screen capture
            v.setDrawingCacheEnabled(true);
            Bitmap bitmap = Bitmap.createBitmap(v.getDrawingCache());
            v.setDrawingCacheEnabled(false);

            File imageFile = new File(mPath);

            FileOutputStream outputStream = new FileOutputStream(imageFile);
            int quality = 100;
            bitmap.compress(Bitmap.CompressFormat.JPEG, quality, outputStream);
            outputStream.flush();
            outputStream.close();

            //setting screenshot in imageview
            String filePath = imageFile.getPath();

            Bitmap ssbitmap = BitmapFactory.decodeFile(imageFile.getAbsolutePath());
            ivpl.setImageBitmap(ssbitmap);
            //sharePath = filePath;

        } catch (Throwable e) {
            // Several error may come out with file handling or DOM
            e.printStackTrace();
        }
    }
This method will also save the screenshot in the internal storage.
Below code will take the screenshot of Car Image.
 btnIm.setOnClickListener(new View.OnClickListener() {
            @Override
            public void onClick(View v) {
                takeSS(imageView);

            }

 });
In the takeSS() method, we need to pass the layout of which we want to capture the screenshot as a parameter.
Here, I have passed the imageview.
Below method will take the screenshot of textview.
 btntx.setOnClickListener(new View.OnClickListener() {
            @Override
            public void onClick(View v) {
                takeSS(tv);
            }

        });
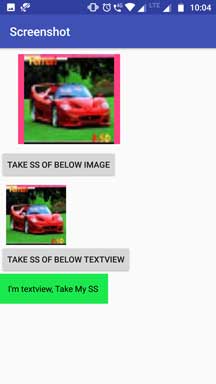
Below output is generated when the user takes the screenshot of the car image.
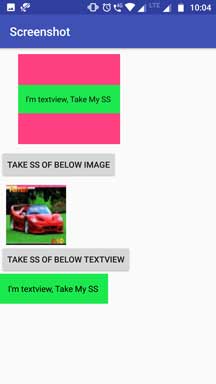
Following image shows the screenshot of the textview.
So it was all the handy information about android take screenshot tutorial.
2. Android Take Scrollview Screenshot | Whole/Full/Long Activity Page
Android Take Scrollview Screenshot Tutorial with Example is your today’s guide.
When the screen size is limited but information on the single screen in large, we will simply use scrollview. But when you want to take the screenshot of the whole screen, some problems arise.
It is easy to take the screenshot of current screen but it is little tough when the screen have the scrollview with it.
With the simple and usual techniques, system will not capture the whole scrollview.
In this example, we will capture the whole scrollview programmatically even if it is double or more longer than the screen of the android device.
Normally, the pages having information about the person or school or organisation have more height than the average android device screen size. You must use scrollview in this scenarios.
In these cases, this tutorial will help you a lot and will save your time and efforts.
Output Video
After completion of all above code stuff, you should get output like following video
1. All Required Permissions
In this tutorial, you need to ask for required permissions.
Below are these permissions
<uses-permission android:name="android.permission.WRITE_EXTERNAL_STORAGE" />
<uses-permission android:name="android.permission.READ_EXTERNAL_STORAGE" />
I have set the target sdk version as 22, so no need for runtime permission here.
2. Setting up the scrollview
Update your activity_main.xml file with below source code
<?xml version="1.0" encoding="utf-8"?>
<LinearLayout xmlns:android="http://schemas.android.com/apk/res/android"
    xmlns:app="http://schemas.android.com/apk/res-auto"
    xmlns:tools="http://schemas.android.com/tools"
    android:layout_width="match_parent"
    android:layout_height="match_parent"
    android:orientation="vertical"
    tools:context=".MainActivity">

    <Button
        android:layout_width="wrap_content"
        android:layout_height="wrap_content"
        android:id="@+id/btn"
        android:text="Take Screenshot of below scrollview!"
        android:textSize="20sp" />

    <ScrollView
        android:layout_width="match_parent"
        android:layout_height="match_parent"
        android:id="@+id/scroll">


        <LinearLayout
            android:layout_width="match_parent"
            android:layout_height="match_parent"
            android:id="@+id/ll"
            android:layout_marginTop="10dp"
            android:orientation="vertical">

            <TextView
                android:layout_width="match_parent"
                android:layout_height="80dp"
                android:gravity="center"
                android:text="First Text!!"
                android:textSize="30sp"
                android:textColor="#fff"
                android:background="#205dd7"/>

            <ImageView
                android:layout_width="match_parent"
                android:layout_height="180dp"
                android:layout_marginTop="10dp"
                android:src="@drawable/benz"
                android:scaleType="fitXY"/>

            <TextView
                android:layout_width="match_parent"
                android:layout_height="80dp"
                android:layout_marginTop="10dp"
                android:gravity="center"
                android:text="Second Text!!"
                android:textSize="30sp"
                android:textColor="#fff"
                android:background="#de0f39"/>

            <ImageView
                android:layout_width="match_parent"
                android:layout_height="180dp"
                android:layout_marginTop="10dp"
                android:src="@drawable/bike"
                android:scaleType="fitXY"/>

            <TextView
                android:layout_width="match_parent"
                android:layout_height="80dp"
                android:layout_marginTop="10dp"
                android:gravity="center"
                android:text="Third Text!!"
                android:textSize="30sp"
                android:textColor="#fff"
                android:background="#09e936"/>

            <ImageView
                android:layout_width="match_parent"
                android:layout_height="180dp"
                android:layout_marginTop="10dp"
                android:src="@drawable/silver"
                android:scaleType="fitXY"/>


        </LinearLayout>

    </ScrollView>

</LinearLayout>
I have taken scrollview with six child views in it.
On the button click, system will capture the screenshot of the scrollview.
I have set three different images in above code. Download them by clicking below link.
[sociallocker]Download Required Images[/sociallocker]
Add following code into the MainActivity.java file
import android.content.Intent;
import android.graphics.Bitmap;
import android.graphics.Canvas;
import android.graphics.Color;
import android.graphics.drawable.Drawable;
import android.os.Environment;
import android.support.v7.app.AppCompatActivity;
import android.os.Bundle;
import android.util.Log;
import android.view.View;
import android.widget.Button;
import android.widget.ScrollView;
import android.widget.Toast;
import java.io.File;
import java.io.FileNotFoundException;
import java.io.FileOutputStream;
import java.io.IOException;
import java.util.Date;

public class MainActivity extends AppCompatActivity {

    private ScrollView scrollView;
    private Button btn;
    public static Bitmap bitScroll;

    @Override
    protected void onCreate(Bundle savedInstanceState) {
        super.onCreate(savedInstanceState);
        setContentView(R.layout.activity_main);

        scrollView = findViewById(R.id.scroll);
        btn = findViewById(R.id.btn);

        btn.setOnClickListener(new View.OnClickListener() {
            @Override
            public void onClick(View v) {

                bitScroll = getBitmapFromView(scrollView, scrollView.getChildAt(0).getHeight(), scrollView.getChildAt(0).getWidth());
                saveBitmap(bitScroll);
                Intent intent = new Intent(MainActivity.this,PreviewActivity.class);
                startActivity(intent);
            }
        });

    }

    //create bitmap from the ScrollView
    private Bitmap getBitmapFromView(View view, int height, int width) {
        Bitmap bitmap = Bitmap.createBitmap(width, height, Bitmap.Config.ARGB_8888);
        Canvas canvas = new Canvas(bitmap);
        Drawable bgDrawable = view.getBackground();
        if (bgDrawable != null)
            bgDrawable.draw(canvas);
        else
            canvas.drawColor(Color.WHITE);
        view.draw(canvas);
        return bitmap;
    }

    public void saveBitmap(Bitmap bitmap) {

        Date now = new Date();
        android.text.format.DateFormat.format("yyyy-MM-dd_hh:mm:ss", now);
        String mPath = Environment.getExternalStorageDirectory().toString() + "/" + now + ".jpeg";
        File imagePath = new File(mPath);

        FileOutputStream fos;
        try {
            fos = new FileOutputStream(imagePath);
            bitmap.compress(Bitmap.CompressFormat.PNG, 100, fos);
            fos.flush();
            fos.close();
            Toast.makeText(getApplicationContext(),imagePath.getAbsolutePath()+"", Toast.LENGTH_LONG).show();
            Log.e("ImageSave", "Saveimage");
        } catch (FileNotFoundException e) {
            Log.e("GREC", e.getMessage(), e);
        } catch (IOException e) {
            Log.e("GREC", e.getMessage(), e);
        }
    }

}
Consider the below code
 btn.setOnClickListener(new View.OnClickListener() {
            @Override
            public void onClick(View v) {

                bitScroll = getBitmapFromView(scrollView, scrollView.getChildAt(0).getHeight(), scrollView.getChildAt(0).getWidth());
                saveBitmap(bitScroll);
                Intent intent = new Intent(MainActivity.this,PreviewActivity.class);
                startActivity(intent);
            }
        });
This is the code for the button click.
When the user will click the button, system will capture the screenshot of the scrollview.
A method named getBitmapFromView() will be executed here. We need to provide scrollview, it’s height and it’s length in the parameters of the getBitmapFromView() method.
Below is the code for getBitmapFromView() method.
 //create bitmap from the ScrollView
    private Bitmap getBitmapFromView(View view, int height, int width) {
        Bitmap bitmap = Bitmap.createBitmap(width, height, Bitmap.Config.ARGB_8888);
        Canvas canvas = new Canvas(bitmap);
        Drawable bgDrawable = view.getBackground();
        if (bgDrawable != null)
            bgDrawable.draw(canvas);
        else
            canvas.drawColor(Color.WHITE);
        view.draw(canvas);
        return bitmap;
    }
It will create the bitmap from the view object of the scrollview, scrollview’s height and length.
getBitmapFromView() method will return the bitmap of the scrollview.
This bitmap can be used easily to store the image in the internal storage.
Saving the image
Following method will save the screenshot of the scrollview using the bitmap.
public void saveBitmap(Bitmap bitmap) {

        Date now = new Date();
        android.text.format.DateFormat.format("yyyy-MM-dd_hh:mm:ss", now);
        String mPath = Environment.getExternalStorageDirectory().toString() + "/" + now + ".jpeg";
        File imagePath = new File(mPath);

        FileOutputStream fos;
        try {
            fos = new FileOutputStream(imagePath);
            bitmap.compress(Bitmap.CompressFormat.PNG, 100, fos);
            fos.flush();
            fos.close();
            Toast.makeText(getApplicationContext(),imagePath.getAbsolutePath()+"", Toast.LENGTH_LONG).show();
            Log.e("ImageSave", "Saveimage");
        } catch (FileNotFoundException e) {
            Log.e("GREC", e.getMessage(), e);
        } catch (IOException e) {
            Log.e("GREC", e.getMessage(), e);
        }
    }
The bitmap returned by the getBitmapFromView() method will be passed as the parameter of the saveBitmap() method.
After saving the screenshot successfully, compiler will run the below coding lines.
Intent intent = new Intent(MainActivity.this,PreviewActivity.class);
startActivity(intent);
This will simply open an activity which will preview the generated screenshot in an imageview.
For this, we need to create a new activity.
3. Previewing the screenshot
Make a new activity and give it a name “PreviewActivity”.
Add below code in activity_preview.xml
<?xml version="1.0" encoding="utf-8"?>
<LinearLayout xmlns:android="http://schemas.android.com/apk/res/android"
    xmlns:tools="http://schemas.android.com/tools"
    android:layout_width="match_parent"
    android:layout_height="match_parent"
    android:orientation="vertical"
    tools:context=".PreviewActivity">

    <ScrollView
        android:layout_width="match_parent"
        android:layout_height="match_parent">

        <LinearLayout
            android:layout_width="match_parent"
            android:layout_height="match_parent"
            android:orientation="vertical">

            <Button
                android:layout_width="match_parent"
                android:layout_height="80dp"
                android:layout_marginTop="10dp"
                android:gravity="center"
                android:text="Below is your ScreenShot"
                android:textSize="20sp"
                android:layout_marginBottom="20dp"/>

            <ImageView
                android:layout_width="match_parent"
                android:layout_height="match_parent"
                android:src="@drawable/silver"
                android:id="@+id/img"/>

        </LinearLayout>


    </ScrollView>
 </LinearLayout>
Write below code in PreviewActivity.java file
import android.support.v7.app.AppCompatActivity;
import android.os.Bundle;
import android.widget.ImageView;

public class PreviewActivity extends AppCompatActivity {

    private ImageView imageView;

    @Override
    protected void onCreate(Bundle savedInstanceState) {
        super.onCreate(savedInstanceState);
        setContentView(R.layout.activity_preview);

        imageView = findViewById(R.id.img);

        imageView.setImageBitmap(MainActivity.bitScroll);

    }
}
There is one imageview in this activity. This image will show us the screenshot of the whole scrollview.
Screenshot is set into the imageview by below line
imageView.setImageBitmap(MainActivity.bitScroll);
I have declared a bitmap called bitScroll as public static in the Main Activity.
So we can use it in any other activity of our app. Here, I have used that public bitScroll variable to set the image in preview activity.
All the words for android take scrollview screenshot tutorial with example are written completely.