
You will learn Kotlin Video Slider Tutorial with example here.
You can use this video slider or slideshow as an animated app intro also.
We will use the circular dot navigation indicator to tell user which slide is currently being shown.
Generally, user need to show app intro only once when he is opening the app for very first time. We will also use this method.
If you want to implement this example with Java code, then visit video slider animation android example.
If you want to make image slider, then read image slideshow with circular dot navigation example.
Final Output
After implementing all the above steps, you should get output like below video
Step 1. Update the buil.gradle file
Add following lines of code to build.gradle(Module:app) file of your android studio project.
compile('com.github.JakeWharton:ViewPagerIndicator:2.4.1') {
        exclude group: 'com.android.support'
        exclude module: 'appcompat-v7'
        exclude module: 'support-v4'
}
This lines will implement necessary classes from Github Library.
Full code for build.gradle(Module:app) should look like below
apply plugin: 'com.android.application'

apply plugin: 'kotlin-android'

apply plugin: 'kotlin-android-extensions'

android {
    compileSdkVersion 27
    defaultConfig {
        applicationId "com.example.parsaniahardik.kotlin_video_slider"
        minSdkVersion 15
        targetSdkVersion 27
        versionCode 1
        versionName "1.0"
        testInstrumentationRunner "android.support.test.runner.AndroidJUnitRunner"
    }
    buildTypes {
        release {
            minifyEnabled false
            proguardFiles getDefaultProguardFile('proguard-android.txt'), 'proguard-rules.pro'
        }
    }
}

dependencies {
    implementation fileTree(dir: 'libs', include: ['*.jar'])
    implementation "org.jetbrains.kotlin:kotlin-stdlib-jre7:$kotlin_version"
    implementation 'com.android.support:appcompat-v7:27.1.1'
    implementation 'com.android.support.constraint:constraint-layout:1.1.2'
    testImplementation 'junit:junit:4.12'
    androidTestImplementation 'com.android.support.test:runner:1.0.2'
    androidTestImplementation 'com.android.support.test.espresso:espresso-core:3.0.2'

    compile('com.github.JakeWharton:ViewPagerIndicator:2.4.1') {
        exclude group: 'com.android.support'
        exclude module: 'appcompat-v7'
        exclude module: 'support-v4'
    }
}
Step 2. Adding raw directory
We need to add the “raw” folder under the “res” directory. We will add our videos in raw folder.
Steps to create raw directory and add videos to into it.
- Give left click on res directory at left menu side of the android studio.
- One Right click on res directory, various options will open
- From that menu, follow New-> Android resource directory
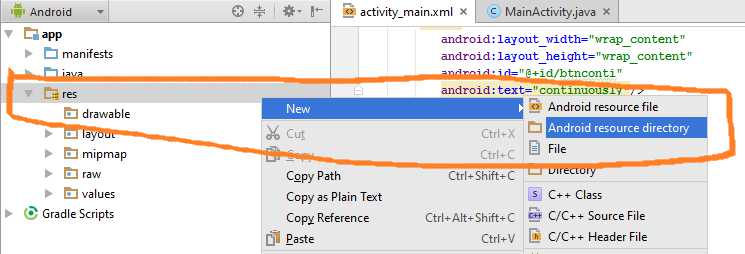
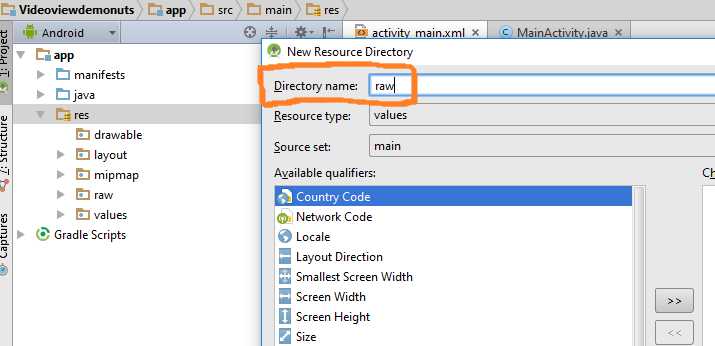
- When you click on Android resource directory, dialog will open as shown in the below image.
- In Directory name, give value as “raw.“
Now save your video in the raw directory.
We have added two videos in this. You can download them by clicking following link.
[sociallocker]Download videos[/sociallocker]
Step 3. Slide Layout
We need to create one layout resource file.
This file will represent the layout for every single slide of the view pager.
Make one layout resource file named swipe_fragment.xml and add below source code
<?xml version="1.0" encoding="utf-8"?>
<LinearLayout xmlns:android="http://schemas.android.com/apk/res/android"
    xmlns:app="http://schemas.android.com/apk/res-auto"
    android:orientation="vertical"
    android:layout_width="match_parent"
    android:layout_height="match_parent">

    <RelativeLayout
        android:layout_width="match_parent"
        android:layout_height="0dp"
        android:layout_weight="10">

        <VideoView
            android:layout_width="match_parent"
            android:layout_height="match_parent"
            android:layout_alignParentBottom="true"
            android:layout_alignParentEnd="true"
            android:layout_alignParentLeft="true"
            android:layout_alignParentRight="true"
            android:layout_alignParentStart="true"
            android:layout_alignParentTop="true"
          android:id="@+id/vid"/>

    </RelativeLayout>

</LinearLayout>
Step 4. Custom Adapter For View Pager
Now let us create a custom adapter which will set data for view pager to show.
Prepare a new kotlin class and give it a name “SlidingImage_Adapter.kt”
Following will be coding lines for it.
import android.content.Context
import android.media.MediaPlayer
import android.net.Uri
import android.os.Parcelable
import android.support.v4.view.PagerAdapter
import android.util.Log
import android.view.LayoutInflater
import android.view.View
import android.view.ViewGroup
import android.widget.ProgressBar
import android.widget.TextView
import android.widget.VideoView

import java.util.ArrayList
import java.util.HashMap

/**
 * Created by Parsania Hardik on 23/04/2016.
 */
class SlidingImage_Adapter(private val context: Context) : PagerAdapter() {

    private val inflater: LayoutInflater

    init {
        inflater = LayoutInflater.from(context)
    }

    override fun destroyItem(container: ViewGroup, position: Int, `object`: Any) {
        container.removeView(`object` as View)
    }

    override fun getCount(): Int {
        // Log.d("sizeeee","-->"+alEventImages.size());
        return 2
    }

    override fun instantiateItem(view: ViewGroup, position: Int): Any {
        Log.d("reacheddddd", "reached")
        val imageLayout = inflater.inflate(R.layout.swipe_fragment, view, false)!!

        val mVideoView = imageLayout!!.findViewById(R.id.vid) as VideoView

        if (position == 0) {
            val uriPath = "android.resource://com.example.parsaniahardik.kotlin_video_slider/" + R.raw.funn  //update package name
            val uri = Uri.parse(uriPath)
            mVideoView.setVideoURI(uri)
            mVideoView.requestFocus()
            mVideoView.start()
            mVideoView.setOnCompletionListener { mVideoView.start() }

        } else if (position == 1) {
            val uriPath = "android.resource://com.example.parsaniahardik.kotlin_video_slider/" + R.raw.smallvideo  //update package name
            val uri = Uri.parse(uriPath)
            mVideoView.setVideoURI(uri)
            mVideoView.requestFocus()
            mVideoView.start()
            mVideoView.setOnCompletionListener { mVideoView.start() }

        }
        // imageView.setImageResource(IMAGES.get(position));

        view.addView(imageLayout, 0)

        return imageLayout
    }

    override fun isViewFromObject(view: View, `object`: Any): Boolean {
        return view == `object`
    }

    override fun restoreState(state: Parcelable?, loader: ClassLoader?) {}

    override fun saveState(): Parcelable? {
        return null
    }

}
Replace Package name
There is a package name present in the adapter class.
Below line includes package name.
val uriPath = "android.resource://com.example.parsaniahardik.kotlin_video_slider/" + R.raw.funn //update package name
You must replace it with your app’s package name.
Two videos are there in this demo, so you need to update package name at two places.(If else loop is there in adapter class, this is where you will update package name)
Step 5. Saving Shared Preference
App intro is shown only once in app. So to implement this feature we need to store if user is opening the app for the first time or not.
For this, we will make a new class named PreferenceHelper.kt
Copy following code in it
import android.content.Context
import android.content.SharedPreferences

class PreferenceHelper(private val context: Context) {

    private val INTRO = "intro"
    private val app_prefs: SharedPreferences

    init {
        app_prefs = context.getSharedPreferences("shared",
                Context.MODE_PRIVATE)
    }

    fun putIntro(loginorout: String) {
        val edit = app_prefs.edit()
        edit.putString(INTRO, loginorout)
        edit.commit()
    }

    fun getIntro(): String {
        return app_prefs.getString(INTRO, "")
    }

}
Step 6. Welcome Activity
After user have shown app intro once, we should redirect him to welcome activity or the default activity of the app every time he opens the app.
So make a new activity named WelcomeActivity.
Copy below code into activity_welcome.xml
<?xml version="1.0" encoding="utf-8"?>
<LinearLayout xmlns:android="http://schemas.android.com/apk/res/android"
    xmlns:tools="http://schemas.android.com/tools"
    android:orientation="vertical"
    android:layout_width="match_parent"
    android:layout_height="match_parent"
    tools:context="com.example.parsaniahardik.kotlin_video_slider.WelcomeActivity">

    <TextView
        android:layout_width="wrap_content"
        android:layout_height="wrap_content"
        android:text="Welcome to App"
        android:textSize="25sp"
        android:textColor="#000"/>

    <Button
        android:layout_width="wrap_content"
        android:layout_height="wrap_content"
        android:id="@+id/btn"
        android:text="click here to see intro when restarting the app"/>

</LinearLayout>
Paste following code into WelcomeActivity.kt class
import android.support.v7.app.AppCompatActivity
import android.os.Bundle
import android.view.View
import android.widget.Button

class WelcomeActivity : AppCompatActivity() {

    private var btn: Button? = null
    private var preferenceHelper: PreferenceHelper? = null

    override fun onCreate(savedInstanceState: Bundle?) {
        super.onCreate(savedInstanceState)
        setContentView(R.layout.activity_welcome)

        btn = findViewById(R.id.btn) as Button
        preferenceHelper = PreferenceHelper(this)

        btn!!.setOnClickListener {
            preferenceHelper!!.putIntro("")
            onBackPressed()
        }

    }
}
Step 7. Change Main Activity
Finally, make some changes in Main Activity.
Add below code in activity_main.xml
<?xml version="1.0" encoding="utf-8"?>
<LinearLayout xmlns:android="http://schemas.android.com/apk/res/android"
    xmlns:tools="http://schemas.android.com/tools"
    android:orientation="vertical"
    android:layout_width="match_parent"
    android:layout_height="match_parent"
    xmlns:app="http://schemas.android.com/apk/res-auto"
    tools:context="com.example.parsaniahardik.kotlin_video_slider.MainActivity">

    <RelativeLayout
        android:layout_width="match_parent"
        android:layout_height="wrap_content"
        android:layout_weight="1">

        <android.support.v4.view.ViewPager
            android:id="@+id/pager"
            android:layout_width="match_parent"
            android:layout_height="match_parent"
            android:layout_alignParentTop="true" />

        <com.viewpagerindicator.CirclePageIndicator
            android:id="@+id/indicator"
            android:layout_width="match_parent"
            android:layout_height="wrap_content"
            android:layout_alignParentBottom="true"
            android:layout_centerHorizontal="true"
            android:gravity="bottom"
            android:padding="10dip"
            app:centered="true"
            app:fillColor="#df0623"
            app:pageColor="#fff"
            app:snap="false" />
    </RelativeLayout>

    <TextView
        android:layout_width="match_parent"
        android:layout_height="40dp"
        android:id="@+id/done"
        android:background="#000"
        android:gravity="center"
        android:textSize="20sp"
        android:text="Done"
        android:textColor="#fff"/>

</LinearLayout>
Source code for MainActivity.kt is like below
import android.content.Intent
import android.os.Handler
import android.support.v4.view.ViewPager
import android.support.v7.app.AppCompatActivity
import android.os.Bundle
import android.view.View
import android.widget.TextView

import com.viewpagerindicator.CirclePageIndicator

class MainActivity : AppCompatActivity() {

    private var mPager: ViewPager? = null
    private var indicator: CirclePageIndicator? = null
    private var tvdone: TextView? = null
    private var preferenceHelper: PreferenceHelper? = null

    override fun onCreate(savedInstanceState: Bundle?) {
        super.onCreate(savedInstanceState)
        setContentView(R.layout.activity_main)

        tvdone = findViewById(R.id.done) as TextView
        preferenceHelper = PreferenceHelper(this)

        if (preferenceHelper!!.getIntro().equals("no")) {
            val intent = Intent(this@MainActivity, WelcomeActivity::class.java)
            intent.addFlags(Intent.FLAG_ACTIVITY_CLEAR_TASK or Intent.FLAG_ACTIVITY_NEW_TASK)
            startActivity(intent)
            this.finish()
        }

        tvdone!!.setOnClickListener {
            preferenceHelper!!.putIntro("no")
            val intent = Intent(this@MainActivity, WelcomeActivity::class.java)
            intent.addFlags(Intent.FLAG_ACTIVITY_CLEAR_TASK or Intent.FLAG_ACTIVITY_NEW_TASK)
            startActivity(intent)
            this@MainActivity.finish()
        }

        init()
    }

    private fun init() {
        mPager = findViewById(R.id.pager) as ViewPager
        indicator = findViewById(R.id.indicator) as CirclePageIndicator
        mPager!!.adapter = SlidingImage_Adapter(this)
        indicator!!.setViewPager(mPager)

        val density = resources.displayMetrics.density

        //Set circle indicator radius
        indicator!!.radius = 5 * density

        NUM_PAGES = 3

        // Auto start of viewpager
        val handler = Handler()
        val Update = Runnable {
            if (currentPage == NUM_PAGES) {
                currentPage = 0
            }
            mPager!!.setCurrentItem(currentPage++, true)
        }
        /*  Timer swipeTimer = new Timer();
        swipeTimer.schedule(new TimerTask() {
            @Override
            public void run() {
                handler.post(Update);
            }
        }, 5000, 5000);*/

        // Pager listener over indicator
        indicator!!.setOnPageChangeListener(object : ViewPager.OnPageChangeListener {

            override fun onPageSelected(position: Int) {
                currentPage = position

            }

            override fun onPageScrolled(pos: Int, arg1: Float, arg2: Int) {

            }

            override fun onPageScrollStateChanged(pos: Int) {

            }
        })

    }

    override// this method is used for removing top and bottom navbars(fullscreen)
    fun onWindowFocusChanged(hasFocus: Boolean) {
        super.onWindowFocusChanged(hasFocus)
        if (hasFocus) {
            window.decorView.systemUiVisibility = (View.SYSTEM_UI_FLAG_LAYOUT_STABLE
                    or View.SYSTEM_UI_FLAG_LAYOUT_HIDE_NAVIGATION
                    or View.SYSTEM_UI_FLAG_LAYOUT_FULLSCREEN
                    or View.SYSTEM_UI_FLAG_HIDE_NAVIGATION
                    or View.SYSTEM_UI_FLAG_FULLSCREEN
                    or View.SYSTEM_UI_FLAG_IMMERSIVE_STICKY)
        }

    }

    companion object {
        private var NUM_PAGES = 0
        private var currentPage = 0
    }

}
Look at below method
 override// this method is used for removing top and bottom navbars(fullscreen)
    fun onWindowFocusChanged(hasFocus: Boolean) {
        super.onWindowFocusChanged(hasFocus)
        if (hasFocus) {
            window.decorView.systemUiVisibility = (View.SYSTEM_UI_FLAG_LAYOUT_STABLE
                    or View.SYSTEM_UI_FLAG_LAYOUT_HIDE_NAVIGATION
                    or View.SYSTEM_UI_FLAG_LAYOUT_FULLSCREEN
                    or View.SYSTEM_UI_FLAG_HIDE_NAVIGATION
                    or View.SYSTEM_UI_FLAG_FULLSCREEN
                    or View.SYSTEM_UI_FLAG_IMMERSIVE_STICKY)
        }

    }
Above method is used to remove top and bottom navigation bars.
So it will enable us to show the video on full screen of android device.
So it was all about Kotlin Video Slider tutorial.
Hope you enjoyed it and also understand it!
Keep sharing DemoNuts tutorials in your social media.
Comment out your questions, We will answer you in best possible ways.
Download Source Code For Kotlin Video Slider
[sociallocker]Download Kotlin_Video_Slider[/sociallocker]