Welcome guys to Android Custom ArrayAdapter Tutorial With Example In Android Studio.
Android adapter gives facility to transfer the data from the data source to multi views like listview, gridview or spinner.
There are few types of adapter. Base adapter, simple adapter, custom simple adapter, array adapter, custom arrayadapter etc.
Array adapter is used when the data source is available in the list format. For example, string array.
With array adapter, we can develop the listview with limited functionalities.
For creating more complex structures, developers can use custom array adapter.
To make custom arrayadapter, we need to develop specific JAVA class which extends the arrayadapter.
After extending the array adapter, we can override the methods of base adapter to customize the adapter.
We can override the methods of base adapter because array adapter is extending base adapter also.
Sample code block for custom array adapter may look like the below
public class CustomArrayAdapter extends ArrayAdapter {

     public CustomArrayAdapter(Context context, int textViewResourceId, String[] myImageArray) {

        super(context, textViewResourceId, myImageArray);

    }
    @Override
    public View getView(final int position, View convertView, ViewGroup parent) {

       return view;
    }

   @Override
    public int getCount() {
        return imageModelArrayList.size();
    }

   @Override
    public long getItemId(int position) {
        return 0;
    }

    @Override
    public int getItemViewType(int position) {

        return position;
    }

}
When the class is extending the ArrayAdapter then it is custom array adapter.
You should define the constructor of this class with super keyword as per shown int the above code.
Array Adapter is the sub class of the base adapter, so you can override the methods of the base adapter for more customization.
Methods of Custom Array Adapter
Now Let us read the methods available in the above code one by one.
1. getView()
This method helps us to create the each view for the row item of listview or cell of gridview.
super.getView() method can inflate the view for row item.
Using this inflated view, we can get the access to the various UI widgets present in the row item XML file.
For example, I have inflate the textview using it’s id and also have implemented it’s click scenario.
Similarly, you can access other UI widgets as per your necessity.
2. getCount()
This method will return the number of rows present in the listview.
It will give us number of cells in the case of gridview.
We can use data source like arraylist to check the total number of data items and then return this number.
3. getItem(int position)
This method will return the data at the specified position.
For example, a hashmap from arraylist of hashmap at the specified position will be returned by this method.
4. getItemId()
This method will return the specific id associated with the data set.
5. getItemViewType(int position)
Listview can have more than two types of row.
For example, a header row, sub header row, normal child row, footer row etc.
When compiler is creating the every row of listview, there should be something which tells it type of the row.
This work will be done by the getItemViewType method.
Custom Array Adapter Example
Prepare a new android studio project.
Step 1. Layout Files
Now in the activity_main.xml file, add the following code lines
<?xml version="1.0" encoding="utf-8"?>
<android.support.constraint.ConstraintLayout xmlns:android="http://schemas.android.com/apk/res/android"
    xmlns:app="http://schemas.android.com/apk/res-auto"
    xmlns:tools="http://schemas.android.com/tools"
    android:layout_width="match_parent"
    android:layout_height="match_parent"
    tools:context=".MainActivity">

    <ListView
        android:id="@+id/listview"
        android:layout_width="match_parent"
        android:layout_height="match_parent"
        android:divider="#e20fc6"
        android:dividerHeight="3dp"/>

</android.support.constraint.ConstraintLayout>
I have added one listview in the main layout file.
This listview have two properties about divider.
Divider height and color. You can change it with different values as per your mind.
Now make a new XML resource file under res->layout directory.
Name of this file should be custom_item.xml
Coding lines for custom_item.xml are as the following
<?xml version="1.0" encoding="utf-8"?>
<LinearLayout
    xmlns:android="http://schemas.android.com/apk/res/android"
    android:layout_width="match_parent"
    android:layout_height="match_parent"
    android:orientation="vertical">

    <TextView
        android:layout_width="match_parent"
        android:layout_height="80dp"
        android:id="@+id/tv"
        android:gravity="center_vertical"
        android:padding="20dp"
        android:textSize="25sp"
        android:textColor="#fff"
        android:text="hello"
        android:background="#e9c811"/>

</LinearLayout>
Adapter will use this file to make the view of the each row of the listview.
This file has one textview. Adapter will set different text value in different row.
Step 2. Custom Array Adapter
Make a new JAVA class and give it a name CustomArrayAdapter.java
Code structure for this file is as the below
import android.content.Context;
import android.view.LayoutInflater;
import android.view.View;
import android.view.ViewGroup;
import android.widget.ArrayAdapter;
import android.widget.TextView;
import android.widget.Toast;
public class CustomArrayAdapter extends ArrayAdapter {
private String[] myImageArray;
private Context context;
public CustomArrayAdapter(Context context, int textViewResourceId, String[] myImageArray) {
super(context, textViewResourceId, myImageArray);
this.myImageArray = myImageArray;
this.context = context;
}
@Override
public View getView(final int position, View convertView, ViewGroup parent) {
LayoutInflater inflater = (LayoutInflater) getContext().getSystemService(Context.LAYOUT_INFLATER_SERVICE);
View view ;
view = inflater.inflate(R.layout.custom_item, null);
TextView textView = (TextView) view.findViewById(R.id.tv);
textView.setText(myImageArray[position]);
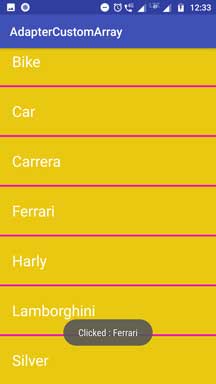
textView.setOnClickListener(new View.OnClickListener() {
@Override
public void onClick(View v) {
Toast.makeText(context, "Clicked : "+ myImageArray[position], Toast.LENGTH_SHORT).show();
}
});
return view;
}
}
As you can see that we have created a custom array adapter class.
This class is extending an ArrayAdapter.
Constructor of this array has three parameters.
First is context. Second is layout XML file for row (which is custom_item.xml) and third is string array, which is our data source.
Now getView() method will create the layout for each row of the listview.
In this method, compiler will first inflate the custom_item.xml file.
Then it will find the textview using it’s id.
After that, it will set the text to the textview using data source. (string array myImageArray)
Then after, it will write click event for this textview.
Step 3. Main JAVA file
At last, in the MainActivity.java file, write down the below source code
import android.support.v7.app.AppCompatActivity;
import android.os.Bundle;
import android.widget.ListView;
public class MainActivity extends AppCompatActivity {
private ListView listView;
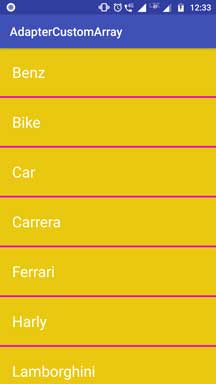
private String[] myImageNameList = new String[]{"Benz", "Bike",
"Car","Carrera"
,"Ferrari","Harly",
"Lamborghini","Silver"};
@Override
protected void onCreate(Bundle savedInstanceState) {
super.onCreate(savedInstanceState);
setContentView(R.layout.activity_main);
listView=(ListView)findViewById(R.id.listview);
CustomArrayAdapter arrayAdapter = new CustomArrayAdapter(this,R.layout.custom_item, myImageNameList);
listView.setAdapter(arrayAdapter);
}
}
First of all, compiler will create the data set, a string array with names of cars in the string format.
Then it will create the object of the CustomArrayAdapter class then it will set this object to the listview.
View for android custom arrayadapter ListView