
This article is on Android Custom Dialog With Transparent Background Color Example.
You will learn to make custom dialog with transparent background.
We will also learn to change background color with different level of transparency.
For this purpose, we will make separate XML layout files for every dialog.
One easy trick for transparent background is to make the root layout of XML file as a transparent.
Creating Transparent Background
Step 1. Making Colors
First of all, we will define various colors with different opacity.
Write down the below lines in res->values->colors.xml file.
<?xml version="1.0" encoding="utf-8"?>
<resources>
    <color name="colorPrimary">#3F51B5</color>
    <color name="colorPrimaryDark">#303F9F</color>
    <color name="colorAccent">#FF4081</color>

    <color name="colorTransparent">#43000000</color>
    <color name="redTransparent">#7ffd0101</color>
</resources>
Here, colorTransparent and redTransparent are the colors we will use in dialog background.
See the below image,
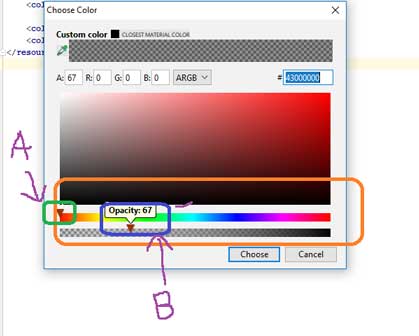
- Above Image shows us how to define color with different opacity.
- For this, open your colors.xml file.
- Here, you will see squares filled with colors define in <color name=””……….></color> tags. These squares are at the left side of the <color> tags.
- Click on that square. System will open a dialog window like the above image.
- In this window, there two horizontal sliders (A & B as per the above image) .
- With the help of the A, you can set the color and by using B, you can set the opacity of that color.
- Lower the opacity, more transparency is there.
Step 2. XML files for dialog
Before making drawable files, we need to add two images in the drawable folder.
After downloading images from above link, add these two images in res->drawable folder.
For every custom dialog, we will make separate XML drawable files.
So, create a new XML file under res->drawable directory.
Set the name of the file as dialog_transparent.xml and add the following code
<RelativeLayout xmlns:android="http://schemas.android.com/apk/res/android"
    android:layout_width="match_parent"
    android:layout_height="match_parent"
    android:gravity="center"
    android:background="@color/colorTransparent"
    android:orientation="vertical">

    <ImageView
        android:id="@+id/a"
        android:layout_width="match_parent"
        android:layout_height="120dp"
        android:gravity="center"
        android:scaleType="fitCenter"
        android:src="@drawable/tww" />

    <LinearLayout
        android:layout_width="match_parent"
        android:layout_height="wrap_content"
        android:layout_below="@+id/a"
        android:orientation="vertical">

        <TextView
            android:id="@+id/text_dialog"
            android:layout_width="match_parent"
            android:layout_height="wrap_content"
            android:layout_below="@+id/a"
            android:layout_centerHorizontal="true"
            android:layout_marginBottom="20dp"
            android:layout_marginLeft="4dp"
            android:layout_marginRight="4dp"
            android:layout_marginTop="20dp"
            android:gravity="center_horizontal"
            android:text="Your Custom Dialog"
            android:textColor="#fff"
            android:textStyle="bold"
            android:textSize="20sp" />

        <LinearLayout
            android:layout_width="match_parent"
            android:layout_height="wrap_content"
            android:gravity="center"
            android:layout_marginBottom="20dp"
            android:orientation="horizontal">

            <Button
                android:id="@+id/btn1"
                android:layout_width="wrap_content"
                android:layout_height="wrap_content"
                android:textSize="20sp"
                android:text="OK"
                android:textColor="#000" />

            <Button
                android:id="@+id/btn2"
                android:layout_width="wrap_content"
                android:layout_height="wrap_content"
                android:layout_marginLeft="10dp"
                android:gravity="center_vertical|center_horizontal"
                android:text="Cancel"
                android:textSize="20sp"
                android:textColor="#000" />

        </LinearLayout>

    </LinearLayout>

</RelativeLayout>
- Above code will generate custom dialog with fully transparent background.
- The parent element of this file is RelativeLayout.
- I have set the background color of this relativelayout as the fully transparent with opacity 67.
- Elements other than relativelayout will create attractive custom dialog with twitter image, text and two buttons.
Second file
Now under res->drawable directory, make another XML file and give it a name dialog_second.xml
Code structure for dialog_second.xml is as the below
<RelativeLayout xmlns:android="http://schemas.android.com/apk/res/android"
    android:layout_width="match_parent"
    android:layout_height="match_parent"
    android:background="@color/colorTransparent"
    android:gravity="center"
    android:orientation="vertical">

    <LinearLayout
        android:layout_width="match_parent"
        android:layout_height="wrap_content"
        android:background="#ffffff"
        android:layout_margin="20dp"
        android:orientation="vertical">


        <ImageView
            android:id="@+id/a"
            android:layout_width="match_parent"
            android:layout_height="120dp"
            android:gravity="center"
            android:scaleType="fitCenter"
            android:src="@drawable/tww" />

        <LinearLayout
            android:layout_width="match_parent"
            android:layout_height="wrap_content"
            android:layout_below="@+id/a"
            android:orientation="vertical">

            <TextView
                android:id="@+id/text_dialog"
                android:layout_width="match_parent"
                android:layout_height="wrap_content"
                android:layout_below="@+id/a"
                android:layout_centerHorizontal="true"
                android:layout_marginBottom="20dp"
                android:layout_marginLeft="4dp"
                android:layout_marginRight="4dp"
                android:layout_marginTop="20dp"
                android:gravity="center_horizontal"
                android:text="Your Custom Dialog"
                android:textColor="#ff000000"
                android:textSize="20sp" />

            <LinearLayout
                android:layout_width="match_parent"
                android:layout_height="wrap_content"
                android:layout_marginBottom="20dp"
                android:gravity="center"
                android:orientation="horizontal">

                <Button
                    android:id="@+id/btn1"
                    android:layout_width="wrap_content"
                    android:layout_height="wrap_content"
                    android:text="OK"
                    android:textColor="#000"
                    android:textSize="20sp" />

                <Button
                    android:id="@+id/btn2"
                    android:layout_width="wrap_content"
                    android:layout_height="wrap_content"
                    android:layout_marginLeft="10dp"
                    android:gravity="center_vertical|center_horizontal"
                    android:text="Cancel"
                    android:textColor="#000"
                    android:textSize="20sp" />

            </LinearLayout>

        </LinearLayout>

    </LinearLayout>

</RelativeLayout>
- It has the same dialog structure as the previous one. A twitter image, text and two buttons.
- But I have set the background of square in which twitter image, text and two buttons are present, as the WHITE color.
- For real view of this dialog, you can see the output video present at the bottom end of this tutorial.
Third File
Under the same directory, prepare another XML file named third_dialog.xml
Code structure for third_dialog.xml is as the following
<RelativeLayout xmlns:android="http://schemas.android.com/apk/res/android"
    android:layout_width="match_parent"
    android:layout_height="match_parent"
    android:gravity="center"
    android:background="@color/redTransparent"
    android:orientation="vertical">

    <ImageView
        android:id="@+id/a"
        android:layout_width="match_parent"
        android:layout_height="120dp"
        android:gravity="center"
        android:scaleType="fitCenter"
        android:src="@drawable/tww" />

    <LinearLayout
        android:layout_width="match_parent"
        android:layout_height="wrap_content"
        android:layout_below="@+id/a"
        android:orientation="vertical">

        <TextView
            android:id="@+id/text_dialog"
            android:layout_width="match_parent"
            android:layout_height="wrap_content"
            android:layout_below="@+id/a"
            android:layout_centerHorizontal="true"
            android:layout_marginBottom="20dp"
            android:layout_marginLeft="4dp"
            android:layout_marginRight="4dp"
            android:layout_marginTop="20dp"
            android:gravity="center_horizontal"
            android:text="Your Custom Dialog"
            android:textColor="#fff"
            android:textSize="20sp" />

        <LinearLayout
            android:layout_width="match_parent"
            android:layout_height="wrap_content"
            android:gravity="center"
            android:layout_marginBottom="20dp"
            android:orientation="horizontal">

            <Button
                android:id="@+id/btn1"
                android:layout_width="wrap_content"
                android:layout_height="wrap_content"
                android:textSize="20sp"
                android:text="OK"
                android:textColor="#000" />

            <Button
                android:id="@+id/btn2"
                android:layout_width="wrap_content"
                android:layout_height="wrap_content"
                android:layout_marginLeft="10dp"
                android:gravity="center_vertical|center_horizontal"
                android:text="Cancel"
                android:textSize="20sp"
                android:textColor="#000" />

        </LinearLayout>

    </LinearLayout>

</RelativeLayout>
- This file also create custom dialog with same elements.
- But it will hold the red background with opacity 127.
- I have set the red color with opacity 127 at the root element of this file, which is RelativeLayout.
Step 3. Last Main Changes
Now it is time to make final changes in this project.
Copy the below coding lines in your activity_main.xml file
<?xml version="1.0" encoding="utf-8"?>
<LinearLayout xmlns:android="http://schemas.android.com/apk/res/android"
    xmlns:app="http://schemas.android.com/apk/res-auto"
    xmlns:tools="http://schemas.android.com/tools"
    android:layout_width="match_parent"
    android:layout_height="match_parent"
    android:orientation="vertical"
    tools:context=".MainActivity">

    <Button
        android:layout_width="wrap_content"
        android:layout_height="wrap_content"
        android:id="@+id/btn1_d"
        android:textSize="10sp"
        android:layout_marginTop="2dp"
        android:text="Open First custom Dialog"/>

    <Button
        android:layout_width="wrap_content"
        android:layout_height="wrap_content"
        android:id="@+id/btn2"
        android:textSize="10sp"
        android:layout_marginTop="2dp"
        android:text="Open Second custom Dialog"/>

    <Button
        android:layout_width="wrap_content"
        android:layout_height="wrap_content"
        android:id="@+id/btn3"
        android:textSize="10sp"
        android:layout_marginTop="2dp"
        android:text="Open Third custom Dialog"/>

</LinearLayout>
- I have taken three buttons in this file.
- Every buttons will create custom dialog using different drawable XML files which we have just created in step 2.
Code snippet for MainActivity.java is as the following
import android.app.Activity;
import android.app.Dialog;
import android.support.v7.app.AppCompatActivity;
import android.os.Bundle;
import android.view.View;
import android.view.Window;
import android.widget.Button;
import android.widget.TextView;

public class MainActivity extends AppCompatActivity {

    private Button btn1, btn2, btn3;

    @Override
    protected void onCreate(Bundle savedInstanceState) {
        super.onCreate(savedInstanceState);
        setContentView(R.layout.activity_main);

        btn1 = findViewById(R.id.btn1_d);
        btn2 = findViewById(R.id.btn2);
        btn3 = findViewById(R.id.btn3);

        btn1.setOnClickListener(new View.OnClickListener() {
            @Override
            public void onClick(View v) {
                showDialog(MainActivity.this,"First Custom Dialog");
            }
        });

        btn2.setOnClickListener(new View.OnClickListener() {
            @Override
            public void onClick(View v) {
                showDialogSecond(MainActivity.this,"Second Custom Dialog");
            }
        });

        btn3.setOnClickListener(new View.OnClickListener() {
            @Override
            public void onClick(View v) {
                showDialogThird(MainActivity.this,"Third Custom Dialog");
            }
        });

    }

    public void showDialog(Activity activity, String msg){

        final Dialog dialog = new Dialog(activity, android.R.style.Theme_Translucent_NoTitleBar_Fullscreen);
        dialog.requestWindowFeature(Window.FEATURE_NO_TITLE);
        dialog.setCancelable(false);
        dialog.setContentView(R.layout.dialog_transparent);

        TextView text = (TextView) dialog.findViewById(R.id.text_dialog);
        text.setText(msg);

        Button dialogButton1 = (Button) dialog.findViewById(R.id.btn1);
        dialogButton1.setOnClickListener(new View.OnClickListener() {
            @Override
            public void onClick(View v) {
                dialog.dismiss();
            }
        });

        Button dialogButton2 = (Button) dialog.findViewById(R.id.btn2);
        dialogButton2.setOnClickListener(new View.OnClickListener() {
            @Override
            public void onClick(View v) {
                dialog.dismiss();
            }
        });

        dialog.show();

    }

    public void showDialogSecond(Activity activity, String msg){

        final Dialog dialog = new Dialog(activity, android.R.style.Theme_Translucent_NoTitleBar_Fullscreen);
        dialog.requestWindowFeature(Window.FEATURE_NO_TITLE);
        dialog.setCancelable(false);
        dialog.setContentView(R.layout.dialog_second);

        TextView text = (TextView) dialog.findViewById(R.id.text_dialog);
        text.setText(msg);

        Button dialogButton1 = (Button) dialog.findViewById(R.id.btn1);
        dialogButton1.setOnClickListener(new View.OnClickListener() {
            @Override
            public void onClick(View v) {
                dialog.dismiss();
            }
        });

        Button dialogButton2 = (Button) dialog.findViewById(R.id.btn2);
        dialogButton2.setOnClickListener(new View.OnClickListener() {
            @Override
            public void onClick(View v) {
                dialog.dismiss();
            }
        });

        dialog.show();

    }

    public void showDialogThird(Activity activity, String msg){

        final Dialog dialog = new Dialog(activity, android.R.style.Theme_Translucent_NoTitleBar_Fullscreen);
        dialog.requestWindowFeature(Window.FEATURE_NO_TITLE);
        dialog.setCancelable(false);
        dialog.setContentView(R.layout.third_dialog);

        TextView text = (TextView) dialog.findViewById(R.id.text_dialog);
        text.setText(msg);

        Button dialogButton1 = (Button) dialog.findViewById(R.id.btn1);
        dialogButton1.setOnClickListener(new View.OnClickListener() {
            @Override
            public void onClick(View v) {
                dialog.dismiss();
            }
        });

        Button dialogButton2 = (Button) dialog.findViewById(R.id.btn2);
        dialogButton2.setOnClickListener(new View.OnClickListener() {
            @Override
            public void onClick(View v) {
                dialog.dismiss();
            }
        });

        dialog.show();

    }


}
Consider the below coding lines
 btn1.setOnClickListener(new View.OnClickListener() {
            @Override
            public void onClick(View v) {
                showDialog(MainActivity.this,"First Custom Dialog");
            }
        });

        btn2.setOnClickListener(new View.OnClickListener() {
            @Override
            public void onClick(View v) {
                showDialogSecond(MainActivity.this,"Second Custom Dialog");
            }
        });

        btn3.setOnClickListener(new View.OnClickListener() {
            @Override
            public void onClick(View v) {
                showDialogThird(MainActivity.this,"Third Custom Dialog");
            }
        });
- There are three button clicks in the above snippet.
- Compiler will call showDialog() method when the user clicks the first button.
- It will call showDialogSecond() method when the user clicks the second button.
- On the click of third button, compiler execute the showDialogThird() method.
Code For showDialog() method is as the below
 public void showDialog(Activity activity, String msg){

        final Dialog dialog = new Dialog(activity, android.R.style.Theme_Translucent_NoTitleBar_Fullscreen);
        dialog.requestWindowFeature(Window.FEATURE_NO_TITLE);
        dialog.setCancelable(false);
        dialog.setContentView(R.layout.dialog_transparent);

        TextView text = (TextView) dialog.findViewById(R.id.text_dialog);
        text.setText(msg);

        Button dialogButton1 = (Button) dialog.findViewById(R.id.btn1);
        dialogButton1.setOnClickListener(new View.OnClickListener() {
            @Override
            public void onClick(View v) {
                dialog.dismiss();
            }
        });

        Button dialogButton2 = (Button) dialog.findViewById(R.id.btn2);
        dialogButton2.setOnClickListener(new View.OnClickListener() {
            @Override
            public void onClick(View v) {
                dialog.dismiss();
            }
        });

        dialog.show();

    }
- Compiler will create the object of the Dialog class.
- Then it will set the content view as the dialog_transparent.xml file.
- So this custom dialog will have the view created by the dialog_transparent.xml file.
- Then compiler will set the text in the textview of the dialog.
- After this, compiler will set the button clicks for OK and CANCLE button.
- Finally, dialog.show() method will create the dialog with transparent background.
Similarly, showDialogSecond() method and showDialogThird() method will create dialogs.
- showDialogSecond() method will inflate dialog_second.xml file and showDialogThird() method will inflate third_dialog.xml file.
Thus, you have seen that creating a custom dialog with transparent background is not a complex task if you make it with proper XML file.
Transparent background with any color is also possible with little trick and tips.