Android Custom Simple Adapter Tutorial With Example In Android Studio is here.
Adapter in android is working as a link or connection between a data source and the multiple view like listview, gridview or spinner.
To connect the data source with listview in an easy manner, we can use android’s in built class named Simple Adapter.
Simple Adapter uses very less lines of codes to make listview, gridview or spinner.
Using simple adapter, we can create basic listview with limited functionality.
Custom Simple Adapter Basics
To create more complex functionalities, we need to make custom simple adapter.
Functionalities like click events of UI widgets, checkboxes maintenance, radio buttons maintenance etc. are complex events with adapters.
Custom adapter helps us to handle these events seamlessly.
Simple adapter can not inflate the view in the row layout of listview which have various UI widgets.
Here, custom simple adapter comes into the picture.
You can use custom simple adapter to develop listview, gridview or spinner with easy and simple coding lines.
Custom adapter extends the simple adapter so that we can modify or override the basic methods simple adapter.
Following is the example of the custom simple adapter
public class CustomSimpleAdapter extends SimpleAdapter {
private Context context;
private ArrayList<HashMap<String, String>> arrayList;
public CustomSimpleAdapter(Context context, ArrayList<HashMap<String, String>> data, int resource, String[] from, int[] to){
super(context, data, resource, from, to);
this.context = context;
this.arrayList = data;
}
@Override
public View getView(final int position, View convertView, ViewGroup parent) {
View view = super.getView(position, convertView, parent);
TextView textView = (TextView) view.findViewById(R.id.name);
textView.setOnClickListener(new View.OnClickListener() {
@Override
public void onClick(View v) {
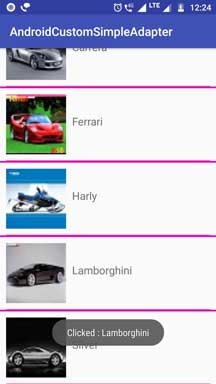
Toast.makeText(context, "Clicked : "+ arrayList.get(position).get("name"), Toast.LENGTH_SHORT).show();
}
});
return view;
}
@Override
public int getCount() {
return imageModelArrayList.size();
}
@Override
public Object getItem(int position) {
return imageModelArrayList.get(position);
}
@Override
public long getItemId(int position) {
return 0;
}
@Override
public int getItemViewType(int position) {
return position;
}
}
As you can see that the class is extending the Simple Adapter.
Because simple adapter is the sub class of Base adapter, you can override the methods of base class even in custom adapter.
You should define the constructor as per shown in the above code using super keyword.
Methods of Custom Simple Adapter
Let us understand methods present in the above code one by one.
1. getView()
This method helps us to create the each view for the row item of listview or cell of gridview.
We can inflate the view using the super.getView() method.
Using this inflated view, we can get the access to the various UI widgets present in the row item XML file.
For example, I have inflate the textview using it’s id and also have implemented it’s click scenario.
Similarly, you can access other UI widgets as per your necessity.
2. getCount()
This method will return the number of rows in the listview.
Number of cells in case of gridview.
We can use data set like arraylist to check the total number of count and then just return this number.
3. getItem(int position)
This method will return the data at the specified position.
For example, a hashmap from arraylist of hashmap at the specified position will be returned by this method.
4. getItemId()
This method will return the specific id associated with the data set.
5. getItemViewType(int position)
Listview can have more than two types of row.
For example, a header row, sub header row, normal child row, footer row etc.
When compiler is creating the every row of listview, there should be something which tells it type of the row.
This work will be done by the getItemViewType method.
Custom Simple Adapter With Example
Follow all the below steps to use the custom simple adapter.
Make a fresh new project in the android studio.
Select “Empty activity” while you are selecting the default activity.
Step 1. Download Images
Click the following link to download required images.
Download demonuts_images_listview
When you are complete with the download, copy these images to the res->drawable directory.
Step 2. Layout Files
Now let us make a layout file which will help us to create the UI of listview item.
Create a new file and give it a name like simple_item.xml
<?xml version="1.0" encoding="utf-8"?>
<LinearLayout xmlns:android="http://schemas.android.com/apk/res/android"
    android:layout_width="match_parent"
    android:layout_height="match_parent"
    android:orientation="vertical">

    <LinearLayout
        android:layout_width="match_parent"
        android:layout_height="wrap_content"
        android:orientation="horizontal">

        <ImageView
            android:id="@+id/imgView"
            android:layout_width="100dp"
            android:layout_height="100dp"
            android:layout_marginLeft="10dp"
            android:layout_marginTop="10dp" />

        <TextView
            android:id="@+id/name"
            android:layout_width="match_parent"
            android:layout_height="110dp"
            android:gravity="center_vertical"
            android:textAppearance="?android:attr/textAppearanceMedium"
            android:paddingLeft="10dp"
            android:text="Name" />

    </LinearLayout>

    <View
        android:layout_width="match_parent"
        android:layout_height="1dp"
        android:layout_marginTop="10dp"
        android:layout_marginLeft="10dp"
        android:layout_marginRight="10dp"
        android:background="@color/colorAccent"/>

</LinearLayout>
This file holds the textview and one imageview.
So every row of listview will have one textview and one imageview.
Now in the activity_main.xml file, write down the following coding lines
<?xml version="1.0" encoding="utf-8"?>
<android.support.constraint.ConstraintLayout xmlns:android="http://schemas.android.com/apk/res/android"
    xmlns:app="http://schemas.android.com/apk/res-auto"
    xmlns:tools="http://schemas.android.com/tools"
    android:layout_width="match_parent"
    android:layout_height="match_parent"
    tools:context=".MainActivity">

    <ListView
        android:id="@+id/listview"
        android:layout_width="match_parent"
        android:layout_height="match_parent"
        android:divider="#e20fc6"
        android:dividerHeight="3dp"        />

</android.support.constraint.ConstraintLayout>
Just add the listview in the main file. Nothing else.
Step 3. Custom Adapter Generation
Make a new JAVA class and give it a name CustomSimpleAdapter.java
Code structure for CustomSimpleAdapter.java looks like the below
import android.content.Context;
import android.view.View;
import android.view.ViewGroup;
import android.widget.SimpleAdapter;
import android.widget.TextView;
import android.widget.Toast;
import java.util.ArrayList;
import java.util.HashMap;

public class CustomSimpleAdapter extends SimpleAdapter {

    private Context context;
    private ArrayList<HashMap<String, String>> arrayList;

    public CustomSimpleAdapter(Context context, ArrayList<HashMap<String, String>> data, int resource, String[] from, int[] to){

        super(context, data, resource, from, to);
        this.context = context;
        this.arrayList = data;

    }
    @Override
    public View getView(final int position, View convertView, ViewGroup parent) {

        View view = super.getView(position, convertView, parent);

        TextView textView = (TextView) view.findViewById(R.id.name);

        textView.setOnClickListener(new View.OnClickListener() {
            @Override
            public void onClick(View v) {
                Toast.makeText(context, "Clicked : "+ arrayList.get(position).get("name"), Toast.LENGTH_SHORT).show();
            }
        });

        return view;
    }
}
There is a constructor in this file.
Constructor will get context, arraylist of hashmap (data source), resource (XML file ), from (string array) and to (integer array).
Below line will take care about all the parameters.
super(context, data, resource, from, to);
Compiler will get the XML view file and it will set automatically to every row.
Similarly, it will set the data, from and to at appropriate place.
Now focus on the getView() method.
Here, compiler will inflate the view from and using this view, it will find the textview by it’s id.
Then, it will set the logic when the user clicks on the textview.
Step 4. Dealing With Main Activity
Source code for MainActivity.java goes as the below
import android.support.v7.app.AppCompatActivity;
import android.os.Bundle;
import android.widget.ListView;
import java.util.ArrayList;
import java.util.HashMap;

public class MainActivity extends AppCompatActivity {

    private ListView listView;

    private int[] myImageList = new int[]{R.drawable.benz, R.drawable.bike,
            R.drawable.car,R.drawable.carrera
            ,R.drawable.ferrari,R.drawable.harly,
            R.drawable.lamborghini,R.drawable.silver};
    private String[] myImageNameList = new String[]{"Benz", "Bike",
            "Car","Carrera"
            ,"Ferrari","Harly",
            "Lamborghini","Silver"};

    @Override
    protected void onCreate(Bundle savedInstanceState) {
        super.onCreate(savedInstanceState);
        setContentView(R.layout.activity_main);

        listView=(ListView)findViewById(R.id.listview);

        ArrayList<HashMap<String,String>> arrayList=new ArrayList<>();
        for (int i=0; i< 8 ;i++)
        {
            HashMap<String,String> hashMap=new HashMap<>();//create a hashmap to store the data in key value pair
            hashMap.put("name",myImageNameList[i]);
            hashMap.put("image",myImageList[i]+"");
            arrayList.add(hashMap);//add the hashmap into arrayList
        }

        String[] from={"name","image"};//string array
        int[] to={R.id.name,R.id.imgView};//int array of views id's

        CustomSimpleAdapter customSimpleAdapter= new CustomSimpleAdapter(this,arrayList,R.layout.simple_item,from,to);//Create object and set the parameters for simpleAdapter
        listView.setAdapter(customSimpleAdapter);//sets the adapter for listView

    }
}
One string array has the names of the cars.
One integer array has the integer reference to the images present in the drawable.
for loop will create the data set which is the arraylist of hashmap.
In the every iteration of for loop, compiler will create one hashmap.
This hashmap will have two children.
One is the name and other is the image.
Now, a string array named “from” has two values, “name”,”image”
These values are same as the two key of the hashmap.
Integer array “to” has the reference to textview and imageview. (R.id.name and R.id.imgView)
Finally, in the object of the Custom Adapter Class, we will pass all these in parameter adn then set this adapter to the listview.
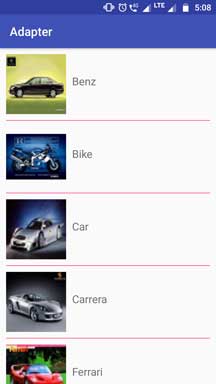
Final result of the above example is