
Android Edittext Shake Animation tutorial with example is written here.
To make animated edit text Programmatically, we need to use Animation class.
Generally, we use the shake effect on EditText to get user’s attention on several occasions.
We require user attention when he enter’s any false information.
There are many ways to tell user about wrong inputs in the EditText.
Such methods are showing toast, showing snack bar, setError method etc. are there.
To make this process more attractive, we can shake edittext which produces animation effects.
For example, we can shake edittext vertically, horizontally or in some other direction.
In this tutorial, you will learn to use above shake and animation methods.
We can do this from XML code as well as Programmatically from JAVA class.
Ending View
Step 1. Drawable File
Create a new XML file under res->drawable directory.
Give it a name edittext.xml and add the following source code in it.
<?xml version="1.0" encoding="utf-8"?>
<selector xmlns:android="http://schemas.android.com/apk/res/android">

    <item android:state_focused="true">
        <shape android:shape="rectangle">
            <padding
                android:left="4dp"
                android:top="4dp"
                android:right="4dp"
                android:bottom="4dp"
                />

            <gradient android:startColor="#00c4c7a9" android:endColor="#00d6dadf" android:angle="270" />

            <stroke android:width="10px" android:color="@color/colorPrimary" />
            <corners android:radius="4dp" />
        </shape>
    </item>

    <item android:state_focused="false">
        <shape android:shape="rectangle">
            <padding
                android:left="4dp"
                android:top="4dp"
                android:right="4dp"
                android:bottom="4dp"
                />

            <gradient android:startColor="#00c4c7a9" android:endColor="#00d6dadf" android:angle="270" />
            <stroke  android:width="10px" android:color="@color/colorPrimary" />
            <corners android:radius="4dp" />

        </shape>
    </item>


</selector>
- This file enable us to give border size and border color to EditText.
- We can also provide corner radius to edittext using above code.
- Gradient effect makes edittext more attractive that can be set in the above file.
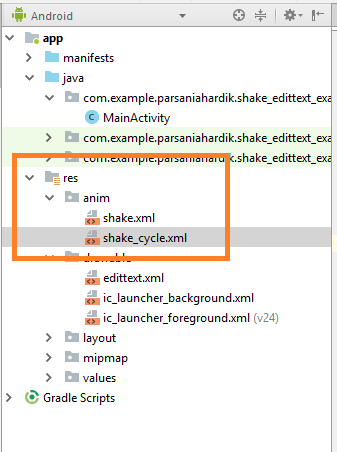
Step 2. Anim folder files
Make a new folder in res directory and name it as “anim”
In the “anim” folder, make a new XML resource file named shake.xml
See the below image for directory structure
Write the below code block in shake.xml
<translate xmlns:android="http://schemas.android.com/apk/res/android"
    android:duration="500"
    android:fromXDelta="0"
    android:interpolator="@anim/shake_cycle"
    android:toXDelta="20" />
- First line is for duration between every two cycle of shake movement.
- Higher the value of first line, system will take more time between two cycle. It means that animation will take more time to complete.
- Second line is fromXDelta and last line is toXDelta.
- fromXDelta is directing the point from where edittext will start to move towards the right side.
- Movement of edittext is left to right in this case.
- toXDelta is the point where edittext will stop and will go back to fromXDelta point (right to left).
So edittext will move left to right (0 to 10) and will come back from 10 to 0 (right to left).
- Third line is indicating another file named shake_cycler.xml
- So make a new file in the anim folder and give it a name shake_cycle.xml
Copy the following source code in shake_cycle.xml
<cycleInterpolator
    xmlns:android="http://schemas.android.com/apk/res/android"
    android:cycles="10" />
- It is just defining the number of cycles for the animations.
- You can directly increase or decrease the cycles from this file.
Step 3. Main File Changes
Now we need to update activity_main.xml and MainActivity.java files.
Add the following Code block in activity_main.xml
<?xml version="1.0" encoding="utf-8"?>
<LinearLayout xmlns:android="http://schemas.android.com/apk/res/android"
    xmlns:app="http://schemas.android.com/apk/res-auto"
    xmlns:tools="http://schemas.android.com/tools"
    android:layout_width="match_parent"
    android:layout_height="match_parent"
    android:orientation="vertical"
    tools:context=".MainActivity">

    <TextView
        android:layout_width="wrap_content"
        android:layout_height="wrap_content"
        android:textColor="#000"
        android:textSize="15sp"
        android:layout_marginTop="10dp"
        android:layout_marginLeft="20dp"
        android:text="Below is shaking from XML code"
        />

    <EditText
        android:layout_width="match_parent"
        android:layout_height="50dp"
        android:layout_marginLeft="20dp"
        android:layout_marginRight="20dp"
        android:id="@+id/et"
        android:background="@drawable/edittext"
        android:layout_marginTop="10dp"
        />

    <Button
        android:layout_width="wrap_content"
        android:layout_height="wrap_content"
        android:layout_marginTop="10dp"
        android:layout_marginLeft="20dp"
        android:id="@+id/btn"
        android:text="Button"/>

    <TextView
        android:layout_width="wrap_content"
        android:layout_height="wrap_content"
        android:textColor="#000"
        android:textSize="15sp"
        android:layout_marginTop="10dp"
        android:layout_marginLeft="20dp"
        android:text="Below is shaking Programmatically!!!"
        />

    <EditText
        android:layout_width="match_parent"
        android:layout_height="50dp"
        android:layout_marginLeft="20dp"
        android:layout_marginRight="20dp"
        android:id="@+id/etp"
        android:background="@drawable/edittext"
        android:layout_marginTop="10dp"
        />

    <Button
        android:layout_width="wrap_content"
        android:layout_height="wrap_content"
        android:layout_marginTop="10dp"
        android:layout_marginLeft="20dp"
        android:id="@+id/btnp"
        android:text="Button"/>

    <TextView
        android:layout_width="wrap_content"
        android:layout_height="wrap_content"
        android:textColor="#000"
        android:textSize="15sp"
        android:layout_marginTop="10dp"
        android:layout_marginLeft="20dp"
        android:text="Below is shaking Programmatically!!!"
        />

    <EditText
        android:layout_width="match_parent"
        android:layout_height="50dp"
        android:layout_marginLeft="20dp"
        android:layout_marginRight="20dp"
        android:id="@+id/etc"
        android:background="@drawable/edittext"
        android:layout_marginTop="10dp"
        />

    <Button
        android:layout_width="wrap_content"
        android:layout_height="wrap_content"
        android:layout_marginTop="10dp"
        android:layout_marginLeft="20dp"
        android:id="@+id/btnc"
        android:text="Button"/>

</LinearLayout>
- There are three pairs containing Edittext, Textview and Button.
- Textview is giving information about the type of animation.
- Edittext is experiencing the shake animation.
But when the user clicks on button, this animation will take place.
Write Down the below coding lines in MainActivity.java
import android.support.v7.app.AppCompatActivity;
import android.os.Bundle;
import android.view.View;
import android.view.animation.Animation;
import android.view.animation.AnimationUtils;
import android.view.animation.CycleInterpolator;
import android.view.animation.TranslateAnimation;
import android.widget.Button;
import android.widget.EditText;

public class MainActivity extends AppCompatActivity {

    private EditText et, etp, etc;
    private Button btn, btnp, btnc;

    @Override
    protected void onCreate(Bundle savedInstanceState) {
        super.onCreate(savedInstanceState);
        setContentView(R.layout.activity_main);

        et = findViewById(R.id.et);
        btn = findViewById(R.id.btn);
        etp = findViewById(R.id.etp);
        btnp = findViewById(R.id.btnp);
        etc = findViewById(R.id.etc);
        btnc = findViewById(R.id.btnc);

        btn.setOnClickListener(new View.OnClickListener() {
            @Override
            public void onClick(View v) {
                Animation shake = AnimationUtils.loadAnimation(MainActivity.this, R.anim.shake);
               et.startAnimation(shake);
            }
        });

        btnp.setOnClickListener(new View.OnClickListener() {
            @Override
            public void onClick(View v) {
                etp.startAnimation(shakeError());
            }
        });

        btnc.setOnClickListener(new View.OnClickListener() {
            @Override
            public void onClick(View v) {
                etc.startAnimation(shakeCircle());
            }
        });

    }

    public TranslateAnimation shakeError() {
        TranslateAnimation shake = new TranslateAnimation(0, 0, 0, 20);
        shake.setDuration(1000);
        shake.setInterpolator(new CycleInterpolator(7));
        return shake;
    }

    public TranslateAnimation shakeCircle() {
        TranslateAnimation shake = new TranslateAnimation(0, 20, 0, 20);
        shake.setDuration(5000);
        shake.setInterpolator(new CycleInterpolator(7));
        return shake;
    }
}
- Let us read the above code in deeply.
- First few lines of onCreate() method is defining the edittexts and buttons.
Now look at the below code
  btn.setOnClickListener(new View.OnClickListener() {
            @Override
            public void onClick(View v) {
                Animation shake = AnimationUtils.loadAnimation(MainActivity.this, R.anim.shake);
               et.startAnimation(shake);
            }
        });
- When the user clicks the button, compiler will execute the above code.
- We have used Animation class in this method of shaking.
- Just pass the shake.xml file from anim folder as I have written in the above code.
- Now start the animation with object of the Animation class by passing it to startAnimation method..
Consider the following code
  btnp.setOnClickListener(new View.OnClickListener() {
            @Override
            public void onClick(View v) {
                etp.startAnimation(shakeError());
            }
        });
- Above code will generate vertical animation Programmatically.
- For this, I have used shakeError() method as you can see in the above code.
Code structure for shakeError() method is as the following
  public TranslateAnimation shakeError() {
        TranslateAnimation shake = new TranslateAnimation(0, 0, 0, 20);
        shake.setDuration(1000);
        shake.setInterpolator(new CycleInterpolator(7));
        return shake;
    }
- First line is defining the X and Y points. Both X points are 0 because we do want only vertical animation.
- Stating Y point is 0 and Ending Y point is 20. So edittext will move from 0 to 20 (up to down) and vise versa.
- Second line is just setting the duration between two cycle.
- Third line is defining the number of cycles for shake animations.
Now read the below code block
 btnc.setOnClickListener(new View.OnClickListener() {
            @Override
            public void onClick(View v) {
                etc.startAnimation(shakeCircle());
            }
        });
- Above code is using shakeCircle() to make animations.
Coding lines for shakeCircle() method is as below
 public TranslateAnimation shakeCircle() {
        TranslateAnimation shake = new TranslateAnimation(0, 20, 0, 20);
        shake.setDuration(5000);
        shake.setInterpolator(new CycleInterpolator(7));
        return shake;
    }
- It is the same as the shakeError() error.
- Just the X and Y points are different.
- You can play around with the various values of X and Y points to generate many animations.
Download Source Code For Android EditText Shake Animation
[sociallocker]Download Code For ShakeEditTextExample[/sociallocker]