
Android expandablelistview tutorial with example will enhance your knowledge today.
Two android expandablelistview examples are there in this tutorial.
1. Android Expandable ListView Tutorial Example
2. Android Expandable ListView With Checkbox Example Handle Multiple Selection
1. Android Expandable ListView Tutorial Example
We will create an app with expandablelistview which will use the custom adapter.
Expandable listview enables you to show the data in two level categories list. First level list is known as parent which includes children items as it’s sub items.
This differs from the Listview by allowing two levels :
- groups which can individually be expanded to show its children.
- The items come from the expandableListAdapter associated with this view.
Developers use expandable listview because using two level listview will give better user experience.
Users can also expand and collapse parent groups as per their requirements.
Final Look
If you have followed all the steps properly then you should get following output from your example.
First of all learn about basic concepts about expandable listview. After that we will create a practical example.
XML Coding
Following code example shows how you can define expandable listview in xml layout file.
<ExpandableListView
        android:layout_width="wrap_content"
        android:layout_height="wrap_content"
        android:id="@+id/exp_list"
        android:indicatorLeft="?android:attr/expandableListPreferredItemIndicatorLeft"
        android:divider="#A4C739"
        android:dividerHeight="0.5dp"
        android:layout_alignParentTop="true"
        android:layout_alignParentLeft="true"
        android:layout_alignParentStart="true" />
It has attributes like id, layout width and height, divider etc.
android:id
id will represent the expandable listview when you are inflating it in the java or kotlin class.
android:devider
The value of this attribute can be a drawable or color. This divider is used to separate two parent items from each other.
android:dividerHeight
This attribute represents the thickness of the divider.
Higher value will lead the divider to more thicker.
You can give divider height value in the form of dp, sp or px.
android:childDivider
It can be a drawable or a simple color which is used as a divider for children. (It will drawn below and above child items.) The height of this will be the same as the height of the normal list item divider.
color is in the form of #rgb, #argb, #rrggbb or #aarrggbb.
android:childIndicator
it shows the specified indicator besides the child view.
android:groupIndicator
Indicator shown beside the group View. This can be a stateful Drawable.
Methods Of Expandable Listview
Android provides many methods to control the expandable listview programmatically.
collapseGroup(int groupPos)
this method will collapse the group (parent) which is already open.
expandableListview.collapseGroup(0);
Above line will collapse the first group.
This method returns boolean value. If the group is collapsed then it will return true. If the group is already collapsed then it will return false.
expandGroup(int groupPos)
This method will expand the particular group which is already close.
expandableListview.expandGroup(0);
Above line will expand the first group.
This method also returns boolean value. If the group is expanded then it will return true. If the group is already expanded then it will return false.
getSelectedId()
It returns the ID of the currently selected group or child.
getSelectedPosition()
It gives the position of the currently selected group or child (along with its type).
isGroupExpanded(int groupPosition)
It will return a boolean (true or false) value. If the given group is expanded then it will return a true otherwise false.
setAdapter(ExpandableListAdapter adapter)
It will set the adapter that provides data to this view.
setChildDivider(Drawable childDivider)
It will set the drawable between every two children. Set child divider programmatically using this method.
setChildIndicator(Drawable childIndicator)
Sets the indicator to be drawn next to a child. You can use specific drawable file for this.
setGroupIndicator(Drawable groupIndicator)
Sets the indicator to be drawn next to a group.
setSelectedChild(int groupPosition, int childPosition, boolean shouldExpandGroup)
Sets the selection to the specified child. Last parameter is boolean so it’s value is true then the group of the selected child is open otherwise not.
Making Android Studio Example
In this tutorial, we will show different movies according to the categories like Action Movies, Comedy Movies etc.
Now let us create this example by using base adapter.
Step 1. Category Layouts
I will create each layouts for parent and child rows.
Create one layout resource file named child_layout.xml and add below source code
<?xml version="1.0" encoding="utf-8"?>
<LinearLayout xmlns:android="http://schemas.android.com/apk/res/android"
    android:layout_width="match_parent"
    android:layout_height="match_parent">

    <TextView
        android:layout_width="match_parent"
        android:layout_height="wrap_content"
        android:textColor="#07800d"
        android:textSize="20sp"
        android:text="child"
        android:paddingLeft="?android:attr/expandableListPreferredChildPaddingLeft"
        android:paddingTop="10dp"
        android:paddingBottom="10dp"
        android:id="@+id/child_txt" />
</LinearLayout>
Now create another file and give it a name parent_layout.xml
Add following source code in it
<?xml version="1.0" encoding="utf-8"?>
<LinearLayout xmlns:android="http://schemas.android.com/apk/res/android"
    android:layout_width="match_parent"
    android:layout_height="match_parent"
    android:divider="#ec2121"
    android:dividerHeight="0.5dp">

    <TextView
        android:layout_width="match_parent"
        android:layout_height="wrap_content"
        android:paddingLeft="?android:attr/expandableListPreferredItemPaddingLeft"
        android:textColor="#f07e27"
        android:textSize="20sp"
        android:text="Parent"
        android:paddingTop="10dp"
        android:paddingBottom="10dp"
        android:id="@+id/parent_txt" />

</LinearLayout>
Just one textview is present in each file which means that we will only show the names of the items.
Step 2. Expandable Adapter
Adapter will fetch the data and it will set this data to their appropriate place.
Write down the below source code in ExpandableAdapter.java class
import android.content.Context;
import android.view.LayoutInflater;
import android.view.View;
import android.view.ViewGroup;
import android.widget.BaseExpandableListAdapter;
import android.widget.TextView;
import java.util.ArrayList;

public class ExpandableAdapter extends BaseExpandableListAdapter {

    Context ctx;
    public static ArrayList<ArrayList<String>> childList;
    private String[] parents;

    public ExpandableAdapter(Context ctx, ArrayList<ArrayList<String>> childList,  String[] parents){

        this.ctx = ctx;
        this.childList = childList;
        this.parents = parents;

    }

    @Override
    public int getGroupCount() {
        return childList.size();
    }

    @Override
    public int getChildrenCount(int parent) {
        return parents.length;
    }

    @Override
    public Object getGroup(int parent) {

        return parents[parent];
    }

    @Override
    public Object getChild(int parent, int child) {
        return childList.get(parent).get(child);
    }

    @Override
    public long getGroupId(int parent) {
        return parent;
    }

    @Override
    public long getChildId(int parent, int child) {
        return child;
    }

    @Override
    public boolean hasStableIds() {
        return false;
    }

    @Override
    public View getGroupView(int parent, boolean isExpanded, View convertView, ViewGroup parentview) {

        if(convertView == null){
            LayoutInflater inflater = (LayoutInflater) ctx.getSystemService(Context.LAYOUT_INFLATER_SERVICE);
            convertView = inflater.inflate(R.layout.parent_layout, parentview, false);

        }

        TextView parent_textvew = (TextView) convertView.findViewById(R.id.parent_txt);
        parent_textvew.setText(parents[parent]);
        return  convertView;
    }

    @Override
    public View getChildView(int parent, int child, boolean isLastChild, View convertView, ViewGroup parentview) {

        if(convertView == null){
            LayoutInflater inflater = (LayoutInflater) ctx.getSystemService(Context.LAYOUT_INFLATER_SERVICE);
            convertView = inflater.inflate(R.layout.child_layout, parentview, false);

        }

        TextView child_textvew = (TextView) convertView.findViewById(R.id.child_txt);
        child_textvew.setText(getChild(parent,child).toString());
        return  convertView;
    }

    @Override
    public boolean isChildSelectable(int groupPosition, int childPosition) {
        return false;
    }
}
Read the constructor of the adapter class.
public ExpandableAdapter(Context ctx, ArrayList<ArrayList<String>> childList,  String[] parents){

        this.ctx = ctx;
        this.childList = childList;
        this.parents = parents;

    }
It contains one arraylist and one string array. Arraylist is the data for the sub category or child items and string array is the data for the parent item or main category.
I will explain more about this adapter class later in the step 3.
Step 3. Final Coding
At last, you just need to change code for activity_main.xml and MainActivity.java
Replace the code of activity_main.xml with the following
<?xml version="1.0" encoding="utf-8"?>
<android.support.constraint.ConstraintLayout xmlns:android="http://schemas.android.com/apk/res/android"
    xmlns:app="http://schemas.android.com/apk/res-auto"
    xmlns:tools="http://schemas.android.com/tools"
    android:layout_width="match_parent"
    android:layout_height="match_parent"
    tools:context=".MainActivity">

    <ExpandableListView
        android:layout_width="wrap_content"
        android:layout_height="wrap_content"
        android:id="@+id/exp_list"
        android:indicatorLeft="?android:attr/expandableListPreferredItemIndicatorLeft"
        android:divider="#A4C739"
        android:dividerHeight="0.5dp"
        android:layout_alignParentTop="true"
        android:layout_alignParentLeft="true"
        android:layout_alignParentStart="true" />

</android.support.constraint.ConstraintLayout>
Copy and paste the below source code into MainActivity.java file
import android.support.v7.app.AppCompatActivity;
import android.os.Bundle;
import android.widget.ExpandableListView;
import java.util.ArrayList;

public class MainActivity extends AppCompatActivity {

    private ExpandableAdapter expandableAdapter;
    private ExpandableListView expList;
    private String[] parents = new String[]{"Action Movies", "Romantic Movies","Comedy Movies",};
    private ArrayList<String> Action_Movies, Romantic_Movies, Comedy_Movies;
    public static ArrayList<ArrayList<String>> childList;

    @Override
    protected void onCreate(Bundle savedInstanceState) {
        super.onCreate(savedInstanceState);
        setContentView(R.layout.activity_main);

        expList = (ExpandableListView) findViewById(R.id.exp_list);

        setChildMovies();

        expandableAdapter = new ExpandableAdapter(this, childList, parents);
        expList.setAdapter(expandableAdapter);

    }


    private void setChildMovies(){

        Action_Movies = new ArrayList<>();
        Romantic_Movies = new ArrayList<>();
        Comedy_Movies = new ArrayList<>();

        Action_Movies.add("Dark Knight");
        Action_Movies.add("Transporter");
        Action_Movies.add("Iron Man");

        Romantic_Movies.add("Twilight");
        Romantic_Movies.add("Titanic");
        Romantic_Movies.add("The House Bunny");

        Comedy_Movies.add("We are the millers");
        Comedy_Movies.add("Hang over");
        Comedy_Movies.add("Last Night");

        childList = new ArrayList<>();

        childList.add(Action_Movies);
        childList.add(Romantic_Movies);
        childList.add(Comedy_Movies);


    }

}
In this class, we will set up data for child and parent items.
Following line will help us to show parent data in the main category of expandable listview.
private String[] parents = new String[]{"Action Movies", "Romantic Movies","Comedy Movies",};
Above string array is passed as a parameter in the adapter constructor. Adapter will use this string array to populate the parent list.
Look at the below code
 private void setChildMovies(){

        Action_Movies = new ArrayList<>();
        Romantic_Movies = new ArrayList<>();
        Comedy_Movies = new ArrayList<>();

        Action_Movies.add("Dark Knight");
        Action_Movies.add("Transporter");
        Action_Movies.add("Iron Man");

        Romantic_Movies.add("Twilight");
        Romantic_Movies.add("Titanic");
        Romantic_Movies.add("The House Bunny");

        Comedy_Movies.add("We are the millers");
        Comedy_Movies.add("Hang over");
        Comedy_Movies.add("Last Night");

        childList = new ArrayList<>();

        childList.add(Action_Movies);
        childList.add(Romantic_Movies);
        childList.add(Comedy_Movies);
}
Above method will create an Arraylist of String Artaylist.
Action_Movies, Romantic_Movies and Comedy_Movies are the string Arraylists.
All these three string arraylists are added into the another arraylist which is childList.
Explanation of Adapter
Consider following method from the adapter class.
@Override
    public View getGroupView(int parent, boolean isExpanded, View convertView, ViewGroup parentview) {

        if(convertView == null){
            LayoutInflater inflater = (LayoutInflater) ctx.getSystemService(Context.LAYOUT_INFLATER_SERVICE);
            convertView = inflater.inflate(R.layout.parent_layout, parentview, false);

        }

        TextView parent_textvew = (TextView) convertView.findViewById(R.id.parent_txt);
        parent_textvew.setText(parents[parent]);
        return  convertView;
    }
Above method will display the parent list.
Compiler will inflate the parent_layout.xml as the primary layout for showing the parent list.
Each parent list item will have the layout of parent_layout.xml file.
After this the text of the parent is set by using the string array “parents.”
Similarly, child items are set by using the below method from the adapter class.
@Override
    public View getChildView(int parent, int child, boolean isLastChild, View convertView, ViewGroup parentview) {

        if(convertView == null){
            LayoutInflater inflater = (LayoutInflater) ctx.getSystemService(Context.LAYOUT_INFLATER_SERVICE);
            convertView = inflater.inflate(R.layout.child_layout, parentview, false);

        }

        TextView child_textvew = (TextView) convertView.findViewById(R.id.child_txt);
        child_textvew.setText(getChild(parent,child).toString());
        return  convertView;
    }
First of all, the compiler will inflate child_layout.xml file.
The text of the child item is set by using the getChild() method.
Here is the code for the getChild() method.
@Override
    public Object getChild(int parent, int child) {
        return childList.get(parent).get(child);
    }
We will get parent and child position in this method’s parameter.
Then, simply we will use childList (Arraylist of string arrays) to get our desired child name.
So it was all the knowledge about android expandablelistview tutorial.
2. Android Expandable ListView With Checkbox Example Handle Multiple Selection
Android ExpandableListView Checkbox Example is covered in this post.
We will put checkboxes in the child rows of expandable listview.
We will solve the general problems relating to android expandablelistview with checkbox like
- checkbox gets unchecked while scrolling the listview
- Different positioned or multiple checkboxes are checked when click on single box
In this example, we will put checkbox in both parent and child row. It means that we will create expandable listview with multiple checkboxes.
If you click on parent checkbox then all it’s child rows will be also checked. But you can also check few rows of child from the same parent as well.
After selecting required items, we will send these selected items to the next activity also.
First, see the output of the tutorial then we will develop it step by step.
Step 1. Create project in Android Studio.
Make a new project in android studio with empty activity as the default activity.
Step 2. Update colors.xml
Update your colors.xml file with following
<?xml version="1.0" encoding="utf-8"?>
<resources>
    <color name="colorPrimary">#3F51B5</color>
    <color name="colorPrimaryDark">#303F9F</color>
    <color name="colorAccent">#FF4081</color>
    <color name="colorWhite">#fff</color>
    <color name="colorBlack">#000</color>
</resources>
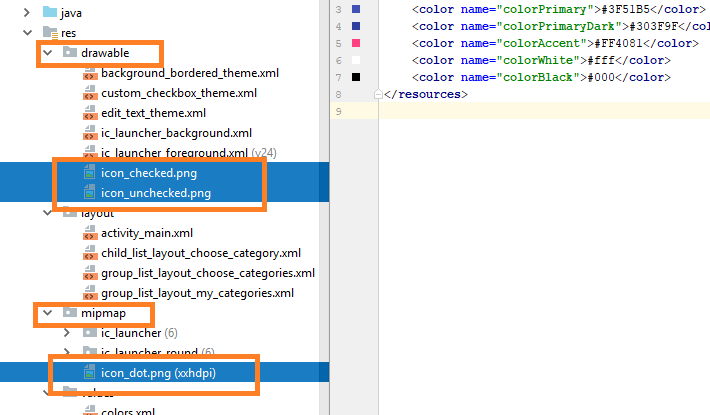
Step 3. Adding Images
Download Images by Clicking following link
[sociallocker]Download Images[/sociallocker]
It contains three images,
- icon_checked,
- icon_unchecked and
- icon_dot
Now, put icon_dot into mipmap folder and copy icon_checked and icon_unchecked into drawable folder.
See below image for reference
Step 4. Adding files in drawable
Make a new layout xml named background_bordered_theme.xml and add below source code in it
<?xml version="1.0" encoding="utf-8"?>
<shape xmlns:android="http://schemas.android.com/apk/res/android">

    <corners
        android:radius="5dp" />

    <stroke
        android:width="1dp" />

    <solid
        android:color="@android:color/transparent" />
</shape>
Now create another layout xml file and give it a name custom_checkbox_theme.xml
Copy below code into it
<?xml version="1.0" encoding="utf-8"?>
<selector xmlns:android="http://schemas.android.com/apk/res/android" >
    <item android:state_checked="true"
        android:drawable="@drawable/icon_checked" />
    <item android:state_pressed="true"
        android:drawable="@drawable/icon_checked" />
    <item android:state_pressed="false"
        android:drawable="@drawable/icon_unchecked" />
</selector>
Prepare third xml file named edit_text_theme.xml
Code for this file is like
<?xml version="1.0" encoding="UTF-8"?>
<shape xmlns:android="http://schemas.android.com/apk/res/android"
    android:id="@+id/listview_background_shape">
    <stroke
        android:width="0dp"
        android:color="@android:color/white" />
    <padding
        android:bottom="2dp"
        android:left="2dp"
        android:right="2dp"
        android:top="2dp" />
    <corners android:radius="2dp" />
    <solid android:color="@color/colorWhite"
        android:alpha="0.3"/>
</shape>
Step 5. Making layout resources files
Create a new layout resource xml file in res->layout folder. It will be called child_list_layout_choose_category.xml
It’s code seems like
<?xml version="1.0" encoding="utf-8"?>
<LinearLayout xmlns:android="http://schemas.android.com/apk/res/android"
    android:orientation="vertical"
    android:layout_width="match_parent"
    android:layout_height="match_parent"
    android:background="@drawable/edit_text_theme">


    <LinearLayout
        android:layout_width="match_parent"
        android:layout_height="wrap_content"
        android:orientation="horizontal">

        <LinearLayout
            android:layout_width="0dp"
            android:layout_height="match_parent"
            android:layout_weight="0.3"
            android:gravity="center|right">

            <ImageView
                android:layout_width="15dp"
                android:layout_height="15dp"
                android:visibility="visible"
                android:background="@mipmap/icon_dot"/>
        </LinearLayout>

        <LinearLayout
            android:layout_width="0dp"
            android:layout_height="match_parent"
            android:layout_weight="1">

            <TextView
                android:id="@+id/tvSubCategoryName"
                android:layout_width="match_parent"
                android:layout_height="wrap_content"
                android:minHeight="50dp"
                android:layout_marginLeft="15dp"
                android:gravity="center_vertical|left"
                android:textColor="@color/colorBlack"/>
        </LinearLayout>

        <LinearLayout
            android:layout_width="0dp"
            android:layout_height="match_parent"
            android:layout_weight="0.3"
            android:gravity="center">

            <CheckBox
                android:id="@+id/cbSubCategory"
                android:layout_width="wrap_content"
                android:layout_height="wrap_content"
                android:focusable="false"
                android:button="@drawable/custom_checkbox_theme" />

        </LinearLayout>
    </LinearLayout>

    <View
        android:id="@+id/viewDivider"
        android:layout_width="match_parent"
        android:layout_height="0.5dp"
        android:background="@color/colorBlack"/>
</LinearLayout>
Make second xml file in res->layout folder and give it sweet name like group_list_layout_choose_categories.xml
Add below code in it
<?xml version="1.0" encoding="utf-8"?>
<LinearLayout xmlns:android="http://schemas.android.com/apk/res/android"
    android:orientation="vertical"
    android:layout_width="match_parent"
    android:layout_height="match_parent"
    android:descendantFocusability="beforeDescendants">

    <View
        android:layout_width="match_parent"
        android:layout_height="10dp" />

    <LinearLayout
        android:layout_width="match_parent"
        android:layout_height="wrap_content"
        android:orientation="horizontal"
        android:background="@drawable/edit_text_theme">

        <LinearLayout
            android:layout_width="0dp"
            android:layout_height="match_parent"
            android:layout_weight="0.3"
            android:gravity="center">

            <ImageView
                android:id="@+id/ivCategory"
                android:layout_width="30dp"
                android:layout_height="30dp"
                android:visibility="gone"/>
        </LinearLayout>

        <LinearLayout
            android:layout_width="0dp"
            android:layout_height="match_parent"
            android:layout_weight="1">

            <TextView
                android:id="@+id/tvMainCategoryName"
                android:layout_width="match_parent"
                android:layout_height="wrap_content"
                android:minHeight="50dp"
                android:gravity="center_vertical|left"
                android:textColor="@color/colorBlack"/>
        </LinearLayout>

        <LinearLayout
            android:layout_width="0dp"
            android:layout_height="match_parent"
            android:layout_weight="0.3"
            android:gravity="center">

            <CheckBox
                android:id="@+id/cbMainCategory"
                android:layout_width="wrap_content"
                android:layout_height="wrap_content"
                android:focusable="false"
                android:button="@drawable/custom_checkbox_theme" />

        </LinearLayout>
    </LinearLayout>
</LinearLayout>
Prepare last xml file in res->layout and gibe its name group_list_layout_my_categories.xml
<?xml version="1.0" encoding="utf-8"?>
<LinearLayout xmlns:android="http://schemas.android.com/apk/res/android"
    android:orientation="vertical"
    android:layout_width="match_parent"
    android:layout_height="match_parent"
    android:descendantFocusability="beforeDescendants">

    <View
        android:layout_width="match_parent"
        android:layout_height="10dp" />

    <LinearLayout
        android:layout_width="match_parent"
        android:layout_height="wrap_content"
        android:orientation="horizontal"
        android:background="@drawable/background_bordered_theme">

        <LinearLayout
            android:layout_width="0dp"
            android:layout_height="match_parent"
            android:layout_weight="0.3"
            android:gravity="center">

            <ImageView
                android:id="@+id/ivCategory"
                android:layout_width="30dp"
                android:layout_height="30dp"
                android:visibility="gone"/>
        </LinearLayout>

        <LinearLayout
            android:layout_width="0dp"
            android:layout_height="match_parent"
            android:layout_weight="1">

            <TextView
                android:id="@+id/tvMainCategoryName"
                android:layout_width="match_parent"
                android:layout_height="wrap_content"
                android:minHeight="50dp"
                android:gravity="center_vertical|left"
                android:textColor="@color/colorBlack"/>
        </LinearLayout>

        <LinearLayout
            android:layout_width="0dp"
            android:layout_height="match_parent"
            android:layout_weight="0.3"
            android:gravity="center">

            <CheckBox
                android:id="@+id/cbMainCategory"
                android:layout_width="wrap_content"
                android:layout_height="wrap_content"
                android:focusable="false"
                android:button="@drawable/custom_checkbox_theme" />

        </LinearLayout>
    </LinearLayout>
</LinearLayout>
Step 6. Making Model Classes
Make a new folder called Model in app->java->your package name (It is the same path where your MainActivity is present)
See below image where you need to put required JAVA classes
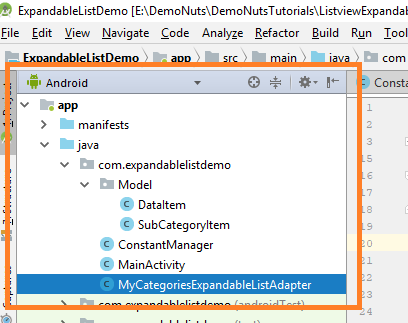
Create a new JAVA class named DataItem.java in Model folder
Add Code for it like
import java.util.List;

public class DataItem {

    private String categoryId;
    private String categoryName;
    private String isChecked = "NO";
    private List<SubCategoryItem> subCategory;

    public DataItem() {
    }

    public String getCategoryId() {
        return categoryId;
    }

    public void setCategoryId(String categoryId) {
        this.categoryId = categoryId;
    }

    public String getCategoryName() {
        return categoryName;
    }

    public void setCategoryName(String categoryName) {
        this.categoryName = categoryName;
    }

    public String getIsChecked() {
        return isChecked;
    }

    public void setIsChecked(String isChecked) {
        this.isChecked = isChecked;
    }

    public List<SubCategoryItem> getSubCategory() {
        return subCategory;
    }

    public void setSubCategory(List<SubCategoryItem> subCategory) {
        this.subCategory = subCategory;
    }
}
Above class is representing the model structure for parent items or main category.
Make a second Model class named SubCategoryItem.java in Model folder
Add following code in it
public class SubCategoryItem {

    private String categoryId;
    private String subId;
    private String subCategoryName;
    private String isChecked;

    public String getCategoryId() {
        return categoryId;
    }

    public void setCategoryId(String categoryId) {
        this.categoryId = categoryId;
    }

    public String getSubId() {
        return subId;
    }

    public void setSubId(String subId) {
        this.subId = subId;
    }

    public String getSubCategoryName() {
        return subCategoryName;
    }

    public void setSubCategoryName(String subCategoryName) {
        this.subCategoryName = subCategoryName;
    }

    public String getIsChecked() {
        return isChecked;
    }

    public void setIsChecked(String isChecked) {
        this.isChecked = isChecked;
    }
}
Above class will word as a model for sub category or child items.
Make a new JAVA class named “ConstantManager.java” at the path shown in above image
Code for this class will look like
import java.util.ArrayList;
import java.util.HashMap;

class ConstantManager {

    public static final String CHECK_BOX_CHECKED_TRUE = "YES";
    public static final String CHECK_BOX_CHECKED_FALSE = "NO";

    public static   ArrayList<ArrayList<HashMap<String, String>>> childItems = new ArrayList<>();
    public static ArrayList<HashMap<String, String>> parentItems = new ArrayList<>();


    public class Parameter {
        public static final String IS_CHECKED = "is_checked";
        public static final String SUB_CATEGORY_NAME = "sub_category_name";
        public static final String CATEGORY_NAME = "category_name";
        public static final String CATEGORY_ID = "category_id";
        public static final String SUB_ID = "sub_id";
    }
}
Prepare another JAVA class named MyCategoriesExpandableListAdapter.java
Add below source code in it
import android.app.Activity;
import android.content.Context;
import android.view.LayoutInflater;
import android.view.View;
import android.view.ViewGroup;
import android.widget.BaseExpandableListAdapter;
import android.widget.CheckBox;
import android.widget.ImageView;
import android.widget.TextView;
import java.util.ArrayList;
import java.util.HashMap;

/**
 * Created by zerones on 04-Oct-17.
 */

public class MyCategoriesExpandableListAdapter extends BaseExpandableListAdapter {

    private final ArrayList<ArrayList<HashMap<String, String>>> childItems;
    private ArrayList<HashMap<String, String>> parentItems;
    //    private final ArrayList<HashMap<String, String>> childItems;
    private LayoutInflater inflater;
    private Activity activity;
    private HashMap<String, String> child;
    private int count = 0;
    private boolean isFromMyCategoriesFragment;

    public MyCategoriesExpandableListAdapter(Activity activity, ArrayList<HashMap<String, String>> parentItems,
                                             ArrayList<ArrayList<HashMap<String, String>>> childItems,boolean isFromMyCategoriesFragment) {

        this.parentItems = parentItems;
        this.childItems = childItems;
        this.activity = activity;
        this.isFromMyCategoriesFragment = isFromMyCategoriesFragment;
        inflater = (LayoutInflater) activity.getSystemService(Context.LAYOUT_INFLATER_SERVICE);

    }

    @Override
    public int getGroupCount() {
        return parentItems.size();
    }

    @Override
    public int getChildrenCount(int groupPosition) {
        return (childItems.get(groupPosition)).size();
    }

    @Override
    public Object getGroup(int i) {
        return null;
    }

    @Override
    public Object getChild(int i, int i1) {
        return null;
    }

    @Override
    public long getGroupId(int i) {
        return 0;
    }

    @Override
    public long getChildId(int i, int i1) {
        return 0;
    }

    @Override
    public boolean hasStableIds() {
        return false;
    }

    @Override
    public View getGroupView(final int groupPosition, final boolean b, View convertView, ViewGroup viewGroup) {
         final ViewHolderParent viewHolderParent;
        if (convertView == null) {

            if(isFromMyCategoriesFragment) {
                convertView = inflater.inflate(R.layout.group_list_layout_my_categories, null);
            }else {
                convertView = inflater.inflate(R.layout.group_list_layout_choose_categories, null);
            }
            viewHolderParent = new ViewHolderParent();

            viewHolderParent.tvMainCategoryName = convertView.findViewById(R.id.tvMainCategoryName);
            viewHolderParent.cbMainCategory = convertView.findViewById(R.id.cbMainCategory);
            viewHolderParent.ivCategory = convertView.findViewById(R.id.ivCategory);
            convertView.setTag(viewHolderParent);
        } else {
            viewHolderParent = (ViewHolderParent) convertView.getTag();
        }

        if (parentItems.get(groupPosition).get(ConstantManager.Parameter.IS_CHECKED).equalsIgnoreCase(ConstantManager.CHECK_BOX_CHECKED_TRUE)) {
            viewHolderParent.cbMainCategory.setChecked(true);
            notifyDataSetChanged();

        } else {
            viewHolderParent.cbMainCategory.setChecked(false);
            notifyDataSetChanged();
        }

        viewHolderParent.cbMainCategory.setOnClickListener(new View.OnClickListener() {
            @Override
            public void onClick(View view) {
                if (viewHolderParent.cbMainCategory.isChecked()) {
                    parentItems.get(groupPosition).put(ConstantManager.Parameter.IS_CHECKED, ConstantManager.CHECK_BOX_CHECKED_TRUE);

                    for (int i = 0; i < childItems.get(groupPosition).size(); i++) {
                        childItems.get(groupPosition).get(i).put(ConstantManager.Parameter.IS_CHECKED, ConstantManager.CHECK_BOX_CHECKED_TRUE);
                    }
                    notifyDataSetChanged();

                }
                else {
                    parentItems.get(groupPosition).put(ConstantManager.Parameter.IS_CHECKED, ConstantManager.CHECK_BOX_CHECKED_FALSE);
                    for (int i = 0; i < childItems.get(groupPosition).size(); i++) {
                        childItems.get(groupPosition).get(i).put(ConstantManager.Parameter.IS_CHECKED, ConstantManager.CHECK_BOX_CHECKED_FALSE);
                    }
                    notifyDataSetChanged();
                }
            }
        });

        ConstantManager.childItems = childItems;
        ConstantManager.parentItems = parentItems;

        viewHolderParent.tvMainCategoryName.setText(parentItems.get(groupPosition).get(ConstantManager.Parameter.CATEGORY_NAME));

        return convertView;
    }

    @Override
    public View getChildView(final int groupPosition, final int childPosition, final boolean b, View convertView, ViewGroup viewGroup) {

        final ViewHolderChild viewHolderChild;
        child = childItems.get(groupPosition).get(childPosition);

        if (convertView == null) {
            convertView = inflater.inflate(R.layout.child_list_layout_choose_category, null);
            viewHolderChild = new ViewHolderChild();

            viewHolderChild.tvSubCategoryName = convertView.findViewById(R.id.tvSubCategoryName);
            viewHolderChild.cbSubCategory = convertView.findViewById(R.id.cbSubCategory);
            viewHolderChild.viewDivider = convertView.findViewById(R.id.viewDivider);
            convertView.setTag(viewHolderChild);
        } else {
            viewHolderChild = (ViewHolderChild) convertView.getTag();
        }

        if (childItems.get(groupPosition).get(childPosition).get(ConstantManager.Parameter.IS_CHECKED).equalsIgnoreCase(ConstantManager.CHECK_BOX_CHECKED_TRUE)) {
            viewHolderChild.cbSubCategory.setChecked(true);
            notifyDataSetChanged();
        } else {
            viewHolderChild.cbSubCategory.setChecked(false);
            notifyDataSetChanged();
        }

        viewHolderChild.tvSubCategoryName.setText(child.get(ConstantManager.Parameter.SUB_CATEGORY_NAME));
        viewHolderChild.cbSubCategory.setOnClickListener(new View.OnClickListener() {
            @Override
            public void onClick(View view) {
                if (viewHolderChild.cbSubCategory.isChecked()) {
                    count = 0;
                    childItems.get(groupPosition).get(childPosition).put(ConstantManager.Parameter.IS_CHECKED, ConstantManager.CHECK_BOX_CHECKED_TRUE);
                    notifyDataSetChanged();
                } else {
                    count = 0;
                    childItems.get(groupPosition).get(childPosition).put(ConstantManager.Parameter.IS_CHECKED, ConstantManager.CHECK_BOX_CHECKED_FALSE);
                    notifyDataSetChanged();
                }

                for (int i = 0; i < childItems.get(groupPosition).size(); i++) {
                    if (childItems.get(groupPosition).get(i).get(ConstantManager.Parameter.IS_CHECKED).equalsIgnoreCase(ConstantManager.CHECK_BOX_CHECKED_TRUE)) {
                        count++;
                    }
                }
                if (count == childItems.get(groupPosition).size()) {
                    parentItems.get(groupPosition).put(ConstantManager.Parameter.IS_CHECKED, ConstantManager.CHECK_BOX_CHECKED_TRUE);
                    notifyDataSetChanged();
                } else {
                    parentItems.get(groupPosition).put(ConstantManager.Parameter.IS_CHECKED, ConstantManager.CHECK_BOX_CHECKED_FALSE);
                    notifyDataSetChanged();
                }


                ConstantManager.childItems = childItems;
                ConstantManager.parentItems = parentItems;
            }
        });

        return convertView;
    }

    @Override
    public boolean isChildSelectable(int i, int i1) {
        return false;
    }
    @Override
    public void onGroupCollapsed(int groupPosition) {
        super.onGroupCollapsed(groupPosition);
    }

    @Override
    public void onGroupExpanded(int groupPosition) {
        super.onGroupExpanded(groupPosition);
    }

    private class ViewHolderParent {

        TextView tvMainCategoryName;
        CheckBox cbMainCategory;
        ImageView ivCategory;
    }

    private class ViewHolderChild {

        TextView tvSubCategoryName;
        CheckBox cbSubCategory;
        View viewDivider;
    }


}
Step 7. Update Main Activity
Finally, update activity_main.xml like below
<?xml version="1.0" encoding="utf-8"?>
<LinearLayout xmlns:android="http://schemas.android.com/apk/res/android"
    xmlns:app="http://schemas.android.com/apk/res-auto"
    xmlns:tools="http://schemas.android.com/tools"
    android:layout_width="match_parent"
    android:layout_height="match_parent"
    android:orientation="vertical"
    tools:context=".MainActivity">

    <ExpandableListView
        android:id="@+id/lvCategory"
        android:layout_width="match_parent"
        android:layout_height="match_parent"
        android:childDivider="@color/colorBlack"
        android:divider="@null"
        android:dividerHeight="0dp" />

</LinearLayout>
And replace code of MainActivity.java with following
import android.content.Intent;
import android.support.v7.app.AppCompatActivity;
import android.os.Bundle;
import android.util.Log;
import android.view.View;
import android.widget.Button;
import android.widget.ExpandableListView;
import com.expandablelistdemo.Model.DataItem;
import com.expandablelistdemo.Model.SubCategoryItem;
import java.util.ArrayList;
import java.util.HashMap;

public class MainActivity extends AppCompatActivity {

    private Button btn;
    private ExpandableListView lvCategory;

    private ArrayList<DataItem> arCategory;
    private ArrayList<SubCategoryItem> arSubCategory;
    private ArrayList<ArrayList<SubCategoryItem>> arSubCategoryFinal;

    private ArrayList<HashMap<String, String>> parentItems;
    private ArrayList<ArrayList<HashMap<String, String>>> childItems;
    private MyCategoriesExpandableListAdapter myCategoriesExpandableListAdapter;

    @Override
    protected void onCreate(Bundle savedInstanceState) {
        super.onCreate(savedInstanceState);
        setContentView(R.layout.activity_main);

        btn = findViewById(R.id.btn);

        btn.setOnClickListener(new View.OnClickListener() {
            @Override
            public void onClick(View v) {
                Intent intent = new Intent(MainActivity.this,CheckedActivity.class);
                startActivity(intent);
            }
        });

        setupReferences();
    }

    private void setupReferences() {

        lvCategory = findViewById(R.id.lvCategory);
        arCategory = new ArrayList<>();
        arSubCategory = new ArrayList<>();
        parentItems = new ArrayList<>();
        childItems = new ArrayList<>();

        DataItem dataItem = new DataItem();
        dataItem.setCategoryId("1");
        dataItem.setCategoryName("Adventure");

        arSubCategory = new ArrayList<>();
        for(int i = 1; i < 6; i++) {

            SubCategoryItem subCategoryItem = new SubCategoryItem();
            subCategoryItem.setCategoryId(String.valueOf(i));
            subCategoryItem.setIsChecked(ConstantManager.CHECK_BOX_CHECKED_FALSE);
            subCategoryItem.setSubCategoryName("Adventure: "+i);
            arSubCategory.add(subCategoryItem);
        }
        dataItem.setSubCategory(arSubCategory);
        arCategory.add(dataItem);

        dataItem = new DataItem();
        dataItem.setCategoryId("2");
        dataItem.setCategoryName("Art");
        arSubCategory = new ArrayList<>();
        for(int j = 1; j < 6; j++) {

            SubCategoryItem subCategoryItem = new SubCategoryItem();
            subCategoryItem.setCategoryId(String.valueOf(j));
            subCategoryItem.setIsChecked(ConstantManager.CHECK_BOX_CHECKED_FALSE);
            subCategoryItem.setSubCategoryName("Art: "+j);
            arSubCategory.add(subCategoryItem);
        }
        dataItem.setSubCategory(arSubCategory);
        arCategory.add(dataItem);

        dataItem = new DataItem();
        dataItem.setCategoryId("3");
        dataItem.setCategoryName("Cooking");
        arSubCategory = new ArrayList<>();
        for(int k = 1; k < 6; k++) {

            SubCategoryItem subCategoryItem = new SubCategoryItem();
            subCategoryItem.setCategoryId(String.valueOf(k));
            subCategoryItem.setIsChecked(ConstantManager.CHECK_BOX_CHECKED_FALSE);
            subCategoryItem.setSubCategoryName("Cooking: "+k);
            arSubCategory.add(subCategoryItem);
        }

        dataItem.setSubCategory(arSubCategory);
        arCategory.add(dataItem);

        Log.d("TAG", "setupReferences: "+arCategory.size());

        for(DataItem data : arCategory){
//                        Log.i("Item id",item.id);
            ArrayList<HashMap<String, String>> childArrayList =new ArrayList<HashMap<String, String>>();
            HashMap<String, String> mapParent = new HashMap<String, String>();

            mapParent.put(ConstantManager.Parameter.CATEGORY_ID,data.getCategoryId());
            mapParent.put(ConstantManager.Parameter.CATEGORY_NAME,data.getCategoryName());

            int countIsChecked = 0;
            for(SubCategoryItem subCategoryItem : data.getSubCategory()) {

                HashMap<String, String> mapChild = new HashMap<String, String>();
                mapChild.put(ConstantManager.Parameter.SUB_ID,subCategoryItem.getSubId());
                mapChild.put(ConstantManager.Parameter.SUB_CATEGORY_NAME,subCategoryItem.getSubCategoryName());
                mapChild.put(ConstantManager.Parameter.CATEGORY_ID,subCategoryItem.getCategoryId());
                mapChild.put(ConstantManager.Parameter.IS_CHECKED,subCategoryItem.getIsChecked());

                if(subCategoryItem.getIsChecked().equalsIgnoreCase(ConstantManager.CHECK_BOX_CHECKED_TRUE)) {

                    countIsChecked++;
                }
                childArrayList.add(mapChild);
            }

            if(countIsChecked == data.getSubCategory().size()) {

                data.setIsChecked(ConstantManager.CHECK_BOX_CHECKED_TRUE);
            }else {
                data.setIsChecked(ConstantManager.CHECK_BOX_CHECKED_FALSE);
            }

            mapParent.put(ConstantManager.Parameter.IS_CHECKED,data.getIsChecked());
            childItems.add(childArrayList);
            parentItems.add(mapParent);

        }

        ConstantManager.parentItems = parentItems;
        ConstantManager.childItems = childItems;

        myCategoriesExpandableListAdapter = new MyCategoriesExpandableListAdapter(this,parentItems,childItems,false);
        lvCategory.setAdapter(myCategoriesExpandableListAdapter);
    }
}
We will create data for expandable listview in this activity.
Step 8. Accessing Checked Items
To get the selected parents and child items, we need to create one new activity.
We will get checked items in this activity. So make one new activity named CheckedActivity.
Add the below source code in activity_checked.xml
<?xml version="1.0" encoding="utf-8"?>
<LinearLayout xmlns:android="http://schemas.android.com/apk/res/android"
    xmlns:app="http://schemas.android.com/apk/res-auto"
    xmlns:tools="http://schemas.android.com/tools"
    android:orientation="vertical"
    android:layout_width="match_parent"
    android:layout_height="match_parent"
    android:paddingLeft="10dp"
    android:paddingTop="20dp"
    tools:context=".CheckedActivity">

    <TextView
        android:layout_width="wrap_content"
        android:layout_height="wrap_content"
        android:textSize="20sp"
        android:text="Selected Parents : "/>

    <TextView
        android:layout_width="wrap_content"
        android:layout_height="wrap_content"
        android:text=""
        android:textSize="20sp"
        android:id="@+id/parent"/>

    <TextView
        android:layout_width="wrap_content"
        android:layout_height="wrap_content"
        android:textSize="20sp"
        android:text="Selected Children : "/>

    <TextView
        android:layout_width="wrap_content"
        android:layout_height="wrap_content"
        android:text=""
        android:textSize="20sp"
        android:id="@+id/child"/>

</LinearLayout>
Write down the below code in CheckedActivity.java
import android.support.v7.app.AppCompatActivity;
import android.os.Bundle;
import android.widget.TextView;

public class CheckedActivity extends AppCompatActivity {

    private TextView tvParent, tvChild;

    @Override
    protected void onCreate(Bundle savedInstanceState) {
        super.onCreate(savedInstanceState);
        setContentView(R.layout.activity_checked);

        tvParent = findViewById(R.id.parent);
        tvChild = findViewById(R.id.child);

        for (int i = 0; i < MyCategoriesExpandableListAdapter.parentItems.size(); i++ ){

            String isChecked = MyCategoriesExpandableListAdapter.parentItems.get(i).get(ConstantManager.Parameter.IS_CHECKED);

            if (isChecked.equalsIgnoreCase(ConstantManager.CHECK_BOX_CHECKED_TRUE))
            {
                tvParent.setText(tvParent.getText() + MyCategoriesExpandableListAdapter.parentItems.get(i).get(ConstantManager.Parameter.CATEGORY_NAME));
            }

            for (int j = 0; j < MyCategoriesExpandableListAdapter.childItems.get(i).size(); j++ ){

                String isChildChecked = MyCategoriesExpandableListAdapter.childItems.get(i).get(j).get(ConstantManager.Parameter.IS_CHECKED);

                if (isChildChecked.equalsIgnoreCase(ConstantManager.CHECK_BOX_CHECKED_TRUE))
                {
                    tvChild.setText(tvChild.getText() +" , " + MyCategoriesExpandableListAdapter.parentItems.get(i).get(ConstantManager.Parameter.CATEGORY_NAME) + " "+(j+1));
                }

            }

        }
    }
}
I have taken one nested for loop in the above code.
Parent for loop will check which parents are selected and it will print them in the textview.
Inner for loop will get the selected child items and then print it on the another textview.
Now run your project and enjoy playing with checkboxes in expandable listview.
Thanks for reading our android expandablelistview tutorial example.