
Welcome to Android GridView Tutorial With Example For Beginners.
GridView is a view group that displays the items in the two dimensional view. (Row and Column)
This grid view items are vertically scrollable but not horizontally.
GridView is the dynamical view, meaning that it inserts the data item automatically using the adapter.
Android gridview can adjust any number of data items with it’s scrollable feature.
Most common example of gridview is your android device’s gallery application.
Gallery displays the images and videos in a gridview with rows and columns.
Gridview also enable user to click on it’s any item. We will also learn how to deal with click event.
Adapter of GridView
Adapter will work as an agent between gridview and the data source.
It will fetch the data items one by one from the data source and passes it to the gridview.
GridView will create it’s cell using this data item.
Adapter is the simple JAVA class. We can make custom adapter by extending the ArrayAdapter or Base adapter.
We will see the usage of adapter in the example that we will create at the end of this article.
GridView XML Code
Following is the XML representation of the android gridview.
<GridView
    android:layout_width="match_parent"
    android:layout_height="0dp"
    android:id="@+id/gv"
    android:numColumns="3"
    android:layout_weight="1">
</GridView>
XML representation of grid view has various properties.
Let us see how this properties affects the gridview settings.
1. android:id=”@+id/gv”
id is the unique identity for the gridview.
In the java file, compiler will get the reference to gridview using this id.
Value of ID should be unique in the whole android app to reduce the runtime errors.
2. android:layout_width
It defines the actual width of the gridview.
Generally, it should be match_parent which means a full width gridview.
However, you can give specific value in dp in certain cases.
3. android:layout_height
This property gives the height to the gridview.
For making our gridview a responsive through various screen size, you can give it a full height or you can define weight with linearlayout.
For specific purpose, you can also define it in the dp values to make static height in any screen size.
4. android:numColumns=”3″
This property tells the grid view how many columns it need to create.
Two types of value can be there.
One is auto_fit and another is any integer number.
auto_fit means that gridview will decide itself how many columns to create according to the width of the android device.
Specific integer number is static and number of columns will be of this value regardless of screen width.
5. android:horizontalSpacing=”3dp”
It defines the default horizontal space amount among every columns.
The value of this property can be in pixel(px),density pixel(dp) or scale independent pixel(sp).
6. android:verticalSpacing=”6dp”
It defines the default vertical space amount among every rows.
The value of this property can be in pixel(px),density pixel(dp) or scale independent pixel(sp).
7. android:columnWidth=”30dp”
This property is giving the fixed width to the every column of the gridview.
8. android:gravity=”center”
It specifies the gravity within each cell.
Methods of GridView
Android gives us specific methods to control the gridview.
1. setAdapter(ListAdapter adapter)
It simply attach the adapter to the grid view.
2. setColumnWidth(int columnWidth)
It sets the column width programmatically.
3. setHorizontalSpacing(int horizontalSpacing)
Set the amount of horizontal (x) spacing to place between each item in the gridview.
4. setNumColumns(int numColumns)
Set the number of columns in the gridview.
5. setSelection(int position)
Sets the currently selected item
6. setVerticalSpacing(int verticalSpacing)
Set the amount of vertical (y) spacing to place between each item in the gridview.
7. getColumnWidth()
Return the width of a column in the grid.
8. getGravity()
Describes how the child views are horizontally aligned.
9. getHorizontalSpacing()
Returns the amount of horizontal spacing currently used between each item in the grid.
10. getNumColumns()
Get the number of columns in the grid.
11. getVerticalSpacing()
Returns the amount of vertical spacing between each item in the gridview.
GridView Android Studio Examples
Now let us make two gridview projects.
In the first one, we will use base adapter and in another, we will use array adapter.
Step 1. Layout Work
First of all, we will make a gridview using base adapter.
Create a new project in android studio.
I recommend you to select empty activity when making a new project.
Now in the activity_main.xml file, add the following code
<?xml version="1.0" encoding="utf-8"?>
<android.support.constraint.ConstraintLayout xmlns:android="http://schemas.android.com/apk/res/android"
    xmlns:app="http://schemas.android.com/apk/res-auto"
    xmlns:tools="http://schemas.android.com/tools"
    android:layout_width="match_parent"
    android:layout_height="match_parent"
    tools:context=".MainActivity">

    <GridView
        android:layout_width="match_parent"
        android:layout_height="0dp"
        android:id="@+id/gv"
        android:numColumns="3"
        android:layout_weight="1">
    </GridView>

</android.support.constraint.ConstraintLayout>
Main layout contains one gridview.
This gridview will have three columns.
Now prepare a new XML layout file in res->layout directory.
Give this file a name like grid_item.xml
Code structure for grid_item.xml is as the following
<?xml version="1.0" encoding="utf-8"?>
<LinearLayout
    xmlns:android="http://schemas.android.com/apk/res/android"
    android:orientation="vertical"
    android:layout_width="match_parent"
    android:layout_height="match_parent">

    <ImageView
        android:layout_height="130dp"
        android:layout_width="130dp"
        android:padding="10dp"
        android:id="@+id/ivGallery"
        android:src="@mipmap/ic_launcher_round"
        android:scaleType="fitXY"
        />

    <TextView
        android:layout_width="130dp"
        android:layout_height="wrap_content"
        android:id="@+id/tv"
        android:gravity="center"
        android:textColor="#000"
        android:textSize="19dp"
        android:text="hello"/>

</LinearLayout>
This file creates the layout for the cell of the grid view.
Adapter will use this file when creating a cell with data items.
One imageview and one textview is there in this file.
Now let us add some car images in our project.
Download these images by clicking on the below link.
Download Our car_images_listview
After downloading these images, copy them into the res->drawable directory.
Step 2. Grid Model
Let us create a model class for grid view.
This model will help us to maintain the data seamlessly.
Make a new JAVA class and give it a name ImageModel.java
Write down the following coding lines in ImageModel.java
/**
 * Created by Parsania Hardik on 03-Jan-17.
 */
public class ImageModel {

private String name;
private int image_drawable;

public String getName() {
        return name;
        }

public void setName(String name) {
        this.name = name;
        }

public int getImage_drawable() {
        return image_drawable;
        }

public void setImage_drawable(int image_drawable) {
        this.image_drawable = image_drawable;
        }
}
Above model class has two main variables.
One is the string variable and another is integer variable.
String is for image name and another is integer reference to drawable image.
Now for both these variables, I have written getter and setter methods.
Step 3. Adapter Creation
Make a new JAVA class called GridBaseAdapter.java
Code structure for GridBaseAdapter.java should look like the below
import android.content.Context;
import android.view.LayoutInflater;
import android.view.View;
import android.view.ViewGroup;
import android.widget.BaseAdapter;
import android.widget.ImageView;
import android.widget.TextView;
import java.util.ArrayList;

public class GridBaseAdapter extends BaseAdapter {

    private LayoutInflater inflater;
    private Context ctx;
    private ArrayList<ImageModel> imageModelArrayList;
    private ImageView ivGallery;
    private TextView textView;

    public GridBaseAdapter(Context ctx, ArrayList<ImageModel> imageModelArrayList) {

        this.ctx = ctx;
        this.imageModelArrayList = imageModelArrayList;
    }

    @Override
    public int getCount() {
        return imageModelArrayList.size();
    }

    @Override
    public Object getItem(int position) {
        return imageModelArrayList.get(position);
    }

    @Override
    public long getItemId(int position) {
        return 0;
    }

    @Override
    public View getView(int position, View convertView, ViewGroup parent) {

        inflater = (LayoutInflater) ctx
                .getSystemService(Context.LAYOUT_INFLATER_SERVICE);

        View itemView = inflater.inflate(R.layout.grid_item, parent, false);

        ivGallery = (ImageView) itemView.findViewById(R.id.ivGallery);
        textView = (TextView) itemView.findViewById(R.id.tv);

        ivGallery.setImageResource(imageModelArrayList.get(position).getImage_drawable());
        textView.setText(imageModelArrayList.get(position).getName());

        return itemView;
    }
}
You can see that the above class is extending the Base adapter.
So we have override some methods of the Base adapter.
Constructor of this class has two parameters.
First is giving us the context. Second is the arraylist with the objects of the ImageModel class.
This arraylist is the data source to populate the grid view.
We will create this arraylist in the MainActivity.java class in the next step.
Now focus on the getView() method.
Compiler will first inflate the grid_item.xml file.
Then it will get the textview and imageview id.
After this, it will set the image and the text in the imageview and textview respectively.
Step 4. Main Activity Code
Now in the MainActivity.java file, add the below source code
import android.support.v7.app.AppCompatActivity;
import android.os.Bundle;
import android.view.View;
import android.view.ViewGroup;
import android.widget.AdapterView;
import android.widget.GridView;
import android.widget.Toast;

import java.util.ArrayList;

public class MainActivity extends AppCompatActivity {

    private GridView gvGallery;
    private GridBaseAdapter gridBaseAdapter;
    private ArrayList<ImageModel> imageModelArrayList;

    private int[] myImageList = new int[]{R.drawable.benz, R.drawable.bike,
            R.drawable.car,R.drawable.carrera
            ,R.drawable.ferrari,R.drawable.harly,
            R.drawable.lamborghini,R.drawable.silver};
    private String[] myImageNameList = new String[]{"Benz", "Bike",
            "Car","Carrera"
            ,"Ferrari","Harly",
            "Lamborghini","Silver"};

    @Override
    protected void onCreate(Bundle savedInstanceState) {
        super.onCreate(savedInstanceState);
        setContentView(R.layout.activity_main);

        gvGallery = findViewById(R.id.gv);

        imageModelArrayList = populateList();

        gridBaseAdapter = new GridBaseAdapter(getApplicationContext(),imageModelArrayList);
        gvGallery.setAdapter(gridBaseAdapter);

        gvGallery.setOnItemClickListener(new AdapterView.OnItemClickListener() {
            @Override
            public void onItemClick(AdapterView<?> parent, View view, int position, long id) {
                Toast.makeText(MainActivity.this, myImageNameList[position]+" Clicked", Toast.LENGTH_SHORT).show();
            }
        });

    }

    private ArrayList<ImageModel> populateList(){

        ArrayList<ImageModel> list = new ArrayList<>();

        for(int i = 0; i < 8; i++){
            ImageModel imageModel = new ImageModel();
            imageModel.setName(myImageNameList[i]);
            imageModel.setImage_drawable(myImageList[i]);
            list.add(imageModel);
        }

        return list;
    }
}
I have taken one string array and one integer array.
String array myImageNameList holds the names of the cars.
While integer array myImageList contains the integer reference to the images present in the drawable folder.
Now compiler will populate the arraylist (imageModelArrayList) using the populateList() method.
We will pass these imageModelArrayList to the second parameter of GridBaseAdapter constructor.
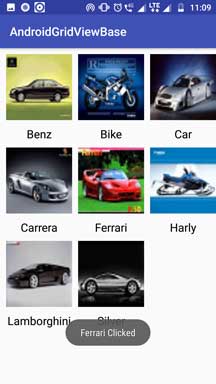
Finally, compiler will set the click event for gridview.
When the user clicks on the gridview, it will show a toast.
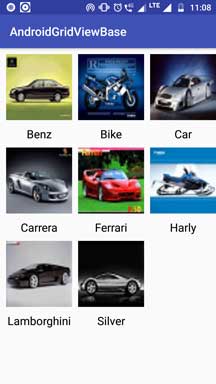
Output of GridView
When you run the above example, you should get the below output
Second Example With ArrayAdapter
In this example, our adapter will use ArrayAdapter instead of Base adapter.
So make a new fresh android studio project with empty activity.
Step 1. Layout Files Code
In the activity_main.xml file, write down the following lines
<?xml version="1.0" encoding="utf-8"?>
<android.support.constraint.ConstraintLayout xmlns:android="http://schemas.android.com/apk/res/android"
    xmlns:app="http://schemas.android.com/apk/res-auto"
    xmlns:tools="http://schemas.android.com/tools"
    android:layout_width="match_parent"
    android:layout_height="match_parent"
    tools:context=".MainActivity">

    <GridView
        android:layout_width="match_parent"
        android:layout_height="0dp"
        android:id="@+id/gv"
        android:numColumns="3"
        android:layout_weight="1">
    </GridView>

</android.support.constraint.ConstraintLayout>
Simply one gridview in the main layout.
Now make a new XML layout resource file. Give it a name gv_cell.xml
You should write the below code snippet in the gv_cell.xml file.
<?xml version="1.0" encoding="utf-8"?>
<LinearLayout
    xmlns:android="http://schemas.android.com/apk/res/android"
    android:orientation="vertical"
    android:layout_width="match_parent"
    android:layout_height="match_parent">

    <ImageView
        android:layout_height="130dp"
        android:layout_width="130dp"
        android:padding="10dp"
        android:id="@+id/ivGallery"
        android:src="@mipmap/ic_launcher_round"
        android:scaleType="fitXY"/>

    <TextView
        android:layout_width="130dp"
        android:layout_height="wrap_content"
        android:id="@+id/tv"
        android:gravity="center"
        android:textColor="#000"
        android:textSize="19dp"
        android:text="hello"/>

</LinearLayout>
This file is the responsible for the view layout of each cell of our gridview.
It has one imageview and one textview.
You can change the text color, text size, text style etc. in this file.
Step 2. Write Main Code
In the MainActivity.java file, add the below code snippet
import android.support.v7.app.AppCompatActivity;
import android.os.Bundle;
import android.view.View;
import android.widget.AdapterView;
import android.widget.GridView;
import android.widget.Toast;

public class MainActivity extends AppCompatActivity {

    private GridView gridView;

    private int[] images = new int[]{R.drawable.benz, R.drawable.bike,
            R.drawable.car,R.drawable.carrera
            ,R.drawable.ferrari,R.drawable.harly,
            R.drawable.lamborghini,R.drawable.silver};
    private String[] names = new String[]{"Benz", "Bike",
            "Car","Carrera"
            ,"Ferrari","Harly",
            "Lamborghini","Silver"};

    @Override
    protected void onCreate(Bundle savedInstanceState) {
        super.onCreate(savedInstanceState);
        setContentView(R.layout.activity_main);

        gridView = findViewById(R.id.gv);

        GridArrayAdapter gridArrayAdapter = new GridArrayAdapter(this,R.layout.gv_cell,images,names);
        gridView.setAdapter(gridArrayAdapter);

        gridView.setOnItemClickListener(new AdapterView.OnItemClickListener() {
            @Override
            public void onItemClick(AdapterView<?> parent, View view, int position, long id) {
                Toast.makeText(MainActivity.this, names[position]+" Clicked", Toast.LENGTH_SHORT).show();
            }
        });


    }
}
There are same two variables as we have taken in the first example.
One is string array variable with names of the cars in the string format.
Second is the integer array variable with reference to the images in the drawable folder.
Now focus on the constructor of the GridArrayAdapter. We will create this class in the next step.
Right now let us just see it’s constructor.
First parameter is simply a context. Second one is the reference to the gv_cell.xml file.
Third one is integer array and fourth one is the string array.
Step 3. Making an Array Adapter
Prepare a new JAVA class and name it as GridArrayAdapter.java
Code layout for this file is as the below.
import android.content.Context;
import android.support.annotation.NonNull;
import android.view.LayoutInflater;
import android.view.View;
import android.view.ViewGroup;
import android.widget.ArrayAdapter;
import android.widget.ImageView;
import android.widget.TextView;

public class GridArrayAdapter extends ArrayAdapter {

    private int[] images = new int[]{};
    private String[] names = new String[]{};

    public GridArrayAdapter(@NonNull Context context, int resource,  int[] images, String[] names) {
        super(context, resource);
        this.images = images;
        this.names = names;
    }

    @Override
    public int getCount() {
        return names.length;
    }

    @Override
    public View getView(int position, View convertView, ViewGroup parent) {

        View v;

        LayoutInflater inflater = (LayoutInflater) getContext().getSystemService(Context.LAYOUT_INFLATER_SERVICE);

        v = inflater.inflate(R.layout.gv_cell, null);

        TextView textView = (TextView) v.findViewById(R.id.tv);
        ImageView imageView = (ImageView) v.findViewById(R.id.ivGallery);

        textView.setText(names[position]);
        imageView.setImageResource(images[position]);

        return v;

    }

}
This class is extending the Array Adapter.
getView() method will create the view for each cell.
This method uses gv_cell.xml file to make the layout of the cell.
Then compiler will set the image and text using the integer and string array which are our data source.
See the below image which are outcome of above example.