Welcome to Android Simpleadapter Tutorial With Example In Android Studio.
We will learn about basic information about simple adapter in depth today.
Let me explain little information about adapter first.
Adapter in android is the bridge between the data source and dynamic UI Views like ListView, GridView or Spinner.
For example, you have one string array which holds the names of the various animals.
Now you want to create a listview using this string array. Here, adapter will fetch the names from string array and then it will provide it to the listview.
Without adapter, it is not possible to make dynamic views in android.
Android SimpleAdapter
If you want to map the data in the XML views then simple adapter is the best option.
You can make an ArrayList of map for data maintenance in the simple adapter.
Generally, every developer uses an ArrayList of a Hashmap.
Every hash map represent the single row of listview.
See the below constructor of Simple adapter for more reference.
SimpleAdapter(Context context, List<? extends Map<String, ?>> data, int resource, String[]from, int[] to)
Above constructor have five parameters which plays their significant role while making a listview.
Methods of Simple Adapter
Simple adapter is the child class of Base adapter.
So it can use all the methods of the Base adapter. Some of these methods are as the below
1. getCount()
It will return the number of data sets available in the data source.
In other words, it will give the number of rows in the listview.
2. getItem(int position)
Get the data item associated with the specified position in the data set.
3. getView(int position, View convertView, ViewGroup parent)
Get a View that displays the data at the specified position in the data set.
We will inflate the special XML layout file in this method. Every row of listview will have the same view as this XML file.
Values to textview, imageview etc. in the row item of listview is also given in this method.
4. getDropDownView(int position, View convertView, ViewGroup parent)
Gets a View that displays in the drop down popup the data at the specified position in the data set.
5. getFilter()
Returns a filter that can be used to constrain data with a filtering pattern.
6. setDropDownViewResource(int resource)
Sets the layout resource to create the drop down views.
layout resource means a special XML file for drop down view.
7. setViewBinder(SimpleAdapter.ViewBinder viewBinder)
Sets the binder used to bind data to views.
Constructor of Simple Adapter
Following is the constructor of Simple adapter.
SimpleAdapter(Context context, List<? extends Map<String, ?>> data, int resource, String[]from, int[] to)
Above constructor have five parameters which plays their significant role while making a listview.
Now let us understand how all the above parameters works.
1. Context context
Context gives the reference to the class in which we write the constructor.
We can use this, ActivityName.this, getApplicationContext(), getActivity() to show the context.
getActivity() is generally used in the Fragment.
this, ActivityName.this are generally used in the activity.
2. List<? extends Map<String, ?>> data
This parameter is the data source. It is a list or arraylist of maps.
For example, we can use arraylist of hashmap in this parameter.
Every hashmap of the arraylist will provide the data for the each row item of the listview.
3. int resource
This parameters refers to the XML resource layout file which we use to generate the view of every row item of listview.
In listview, gridview or spinner, when we create a custom adapter, we need to make separate XML file for row items.
If you are making a listview with text and image then in the XML file, we need to add one textview and one imageview.
Every row of listview will have one textview and one imageview because it is inflating that file.
simple_item.xml is this item (int resource) in the example I have given at the end of this tutorial.
4. String[] from and int[] to
String[] from={"name","image"};//string array
int[] to={R.id.name,R.id.imgView};//int array of views id's
Both from and to parameters are related to each other.
Let us consider the first values of string array from and integer array to.
Below is the hashmap structure.
 HashMap<String,String> hashMap=new HashMap<>();//create a hashmap to store the data in key value pair
            hashMap.put("name",animalName[i]);
            hashMap.put("image",animalImages[i]+"");
Hashmap has two types of key : name and image.
Both values of string array from are also name and image.
So when compiler is going to set the value of the name key of hashmap, it should set the value to the R.id.name.
R.id.name is the first value of integer array “to” and it is referencing the textview.
Similarly, for the key “image” of hashmap, compiler will set it’s value to the R.id.imgView.
R.id.imgView is the Imageview and it is the second parameter of integer array “to”
ListView with Simple Adapter
Let us make a listview with the use of Simple adapter.
Prepare a brand new project in android studio.
Step 1. XML Code
First of all, we will write the source code for XML layout files.
In the activity_main.xml file, add the below lines
<?xml version="1.0" encoding="utf-8"?>
<android.support.constraint.ConstraintLayout xmlns:android="http://schemas.android.com/apk/res/android"
    xmlns:app="http://schemas.android.com/apk/res-auto"
    xmlns:tools="http://schemas.android.com/tools"
    android:layout_width="match_parent"
    android:layout_height="match_parent"
    tools:context=".MainActivity">

    <ListView
        android:id="@+id/listview"
        android:layout_width="match_parent"
        android:layout_height="match_parent"
        android:divider="#e20fc6"
        android:dividerHeight="3dp"        />

</android.support.constraint.ConstraintLayout>
One simple listview is present in this file. We will attach simple adapter to this listview.
Now make a new XML layout file under res->layout directory.
Give this a name like simple_item.xml
Write down the below code snippet in the simple_item.xml
<?xml version="1.0" encoding="utf-8"?>
<LinearLayout xmlns:android="http://schemas.android.com/apk/res/android"
    android:layout_width="match_parent"
    android:layout_height="match_parent"
    android:orientation="vertical">

    <LinearLayout
        android:layout_width="match_parent"
        android:layout_height="wrap_content"
        android:orientation="horizontal">

        <ImageView
            android:id="@+id/imgView"
            android:layout_width="100dp"
            android:layout_height="100dp"
            android:layout_marginLeft="10dp"
            android:layout_marginTop="10dp" />

        <TextView
            android:id="@+id/name"
            android:layout_width="match_parent"
            android:layout_height="110dp"
            android:gravity="center_vertical"
            android:textAppearance="?android:attr/textAppearanceMedium"
            android:paddingLeft="10dp"
            android:text="Name" />

    </LinearLayout>

    <View
        android:layout_width="match_parent"
        android:layout_height="1dp"
        android:layout_marginTop="10dp"
        android:layout_marginLeft="10dp"
        android:layout_marginRight="10dp"
        android:background="@color/colorAccent"/>

</LinearLayout>
This file will provide the view for the each row item of the listview.
I have added one Textview, one Imageview and one simple view in the above file.
Compiler will write the name of the car in the textview and an image of the car will be set in the imageview.
Simple view will work as a divider.
Step 2. Car Images
Download the car images by clicking the below link
Download Car demonuts_images_listview
After getting the above car images, add them into res->drawable directory.
Step 3. Main Code
In the MainActivity.java file, add the following source code
import android.support.v7.app.AppCompatActivity;
import android.os.Bundle;
import android.widget.ListView;
import android.widget.SimpleAdapter;
import java.util.ArrayList;
import java.util.HashMap;

public class MainActivity extends AppCompatActivity {

    //initialize view's
    private ListView listView;

    private int[] myImageList = new int[]{R.drawable.benz, R.drawable.bike,
            R.drawable.car,R.drawable.carrera
            ,R.drawable.ferrari,R.drawable.harly,
            R.drawable.lamborghini,R.drawable.silver};
    private String[] myImageNameList = new String[]{"Benz", "Bike",
            "Car","Carrera"
            ,"Ferrari","Harly",
            "Lamborghini","Silver"};

    @Override
    protected void onCreate(Bundle savedInstanceState) {
        super.onCreate(savedInstanceState);
        setContentView(R.layout.activity_main);

        listView=(ListView)findViewById(R.id.listview);

        ArrayList<HashMap<String,String>> arrayList=new ArrayList<>();
        for (int i=0; i< 8 ;i++)
        {
            HashMap<String,String> hashMap=new HashMap<>();//create a hashmap to store the data in key value pair
            hashMap.put("name",myImageNameList[i]);
            hashMap.put("image",myImageList[i]+"");
            arrayList.add(hashMap);//add the hashmap into arrayList
        }
        String[] from={"name","image"};//string array
        int[] to={R.id.name,R.id.imgView};//int array of views id's

        SimpleAdapter simpleAdapter=new SimpleAdapter(this,arrayList,R.layout.simple_item,from,to);//Create object and set the parameters for simpleAdapter
        listView.setAdapter(simpleAdapter);//sets the adapter for listView


    }
}
As you can read, I have created one string array which holds the names of the cars.
One integer array holds the integer values which indicates the drawable images.
Finally, one object of the SimpleAdapter class in created with appropriate parameters.
When you attach this adapter to listview, you will be able to showcase the data on the listview.
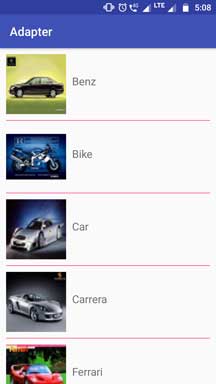
Output of the above example is as the following picture