
Hello and welcome to the app intro animation video slider android studio example.
This app intro animation video slider android tutorial guides you to show a slideshow of video to introduce the Android app.
First check the output of example then we will develop app intro animation video slider android step by step.
Download Source Code
[sociallocker]Download Source Code[/sociallocker]
Creating app intro animation video slider android step by step
Step 1: Create a new project in Android Studio.
Open fresh new android studio project. Select Main Activity as the empty activity to reduce complexity.
Step 2: Updating build.gradle(Module:app) file
add following code into dependencies{}
compile 'com.github.JakeWharton:ViewPagerIndicator:2.4.1'
Step 3: Adding resource directory “raw” under “res” directory.
Now we need to create a raw directory, in which we will save our video.
Follow below steps
- One left click on res directory at left menu side of the android studio.
- One Right click on res directory, one menu will open.
- From that menu, follow New-> Android resource directory
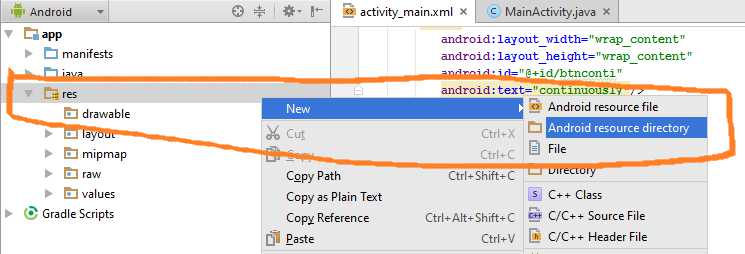
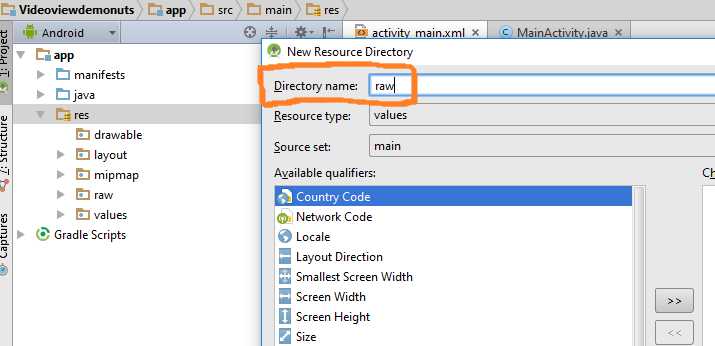
- When you click on Android resource directory, one dialog will open.
- In Directory name, give value as “raw.“
Now save your video in the raw directory.
We have added two videos in this. You can download them by clicking following link.
[sociallocker]Download videos[/sociallocker]
Step 4: Creating Layout resource for single slide
Create one layout resource file under layout directory and name it as swipe_fragment.xml
add following source code
<?xml version="1.0" encoding="utf-8"?>
<LinearLayout xmlns:android="http://schemas.android.com/apk/res/android"
    xmlns:app="http://schemas.android.com/apk/res-auto"
    android:orientation="vertical"
    android:layout_width="match_parent"
    android:layout_height="match_parent">

    <RelativeLayout
        android:layout_width="match_parent"
        android:layout_height="0dp"
        android:layout_weight="10">

        <VideoView
            android:layout_width="match_parent"
            android:layout_height="match_parent"
            android:layout_alignParentBottom="true"
            android:layout_alignParentEnd="true"
            android:layout_alignParentLeft="true"
            android:layout_alignParentRight="true"
            android:layout_alignParentStart="true"
            android:layout_alignParentTop="true"
          android:id="@+id/vid"/>

    </RelativeLayout>

</LinearLayout>
Step 5: Preparing Adapter class for Viewpager
Open a new Java class and name it as SlidingImage_Adapter.java
import android.content.Context;
import android.media.MediaPlayer;
import android.net.Uri;
import android.os.Parcelable;
import android.support.v4.view.PagerAdapter;
import android.util.Log;
import android.view.LayoutInflater;
import android.view.View;
import android.view.ViewGroup;
import android.widget.ProgressBar;
import android.widget.TextView;
import android.widget.VideoView;

import java.util.ArrayList;
import java.util.HashMap;

/**
 * Created by Parsania Hardik on 23/04/2016.
 */
public class SlidingImage_Adapter extends PagerAdapter {

    private LayoutInflater inflater;
    private Context context;

    public SlidingImage_Adapter(Context context) {

        this.context = context;
        inflater = LayoutInflater.from(context);
    }

    @Override
    public void destroyItem(ViewGroup container, int position, Object object) {
        container.removeView((View) object);
    }

    @Override
    public int getCount() {
       // Log.d("sizeeee","-->"+alEventImages.size());
        return 2;
    }

    @Override
    public Object instantiateItem(ViewGroup view, final int position) {
        Log.d("reacheddddd","reached");
        View imageLayout = inflater.inflate(R.layout.swipe_fragment, view, false);

        assert imageLayout != null;
        final VideoView mVideoView = (VideoView) imageLayout.findViewById(R.id.vid);

       if(position == 0){
            String uriPath = "android.resource://com.exampledemo.parsaniahardik.intro_video_slider/"+R.raw.funn;  //update package name
            Uri uri = Uri.parse(uriPath);
           mVideoView.setVideoURI(uri);
           mVideoView.requestFocus();
           mVideoView.start();
           mVideoView.setOnCompletionListener(new MediaPlayer.OnCompletionListener() {
               @Override
               public void onCompletion(MediaPlayer mp) {
                   mVideoView.start();
                }
            });

        }else if(position == 1){
            String uriPath = "android.resource://com.exampledemo.parsaniahardik.intro_video_slider/"+R.raw.smallvideo;  //update package name
            Uri uri = Uri.parse(uriPath);
            mVideoView.setVideoURI(uri);
            mVideoView.requestFocus();
            mVideoView.start();
            mVideoView.setOnCompletionListener(new MediaPlayer.OnCompletionListener() {
               @Override
               public void onCompletion(MediaPlayer mp) {
                   mVideoView.start();
                }
            });

        }
       // imageView.setImageResource(IMAGES.get(position));

        view.addView(imageLayout, 0);

        return imageLayout;
    }

    @Override
    public boolean isViewFromObject(View view, Object object) {
        return view.equals(object);
    }

    @Override
    public void restoreState(Parcelable state, ClassLoader loader) {
    }

    @Override
    public Parcelable saveState() {
        return null;
    }

}
Update Package Name
Look at the below line
String uriPath = "android.resource://com.exampledemo.parsaniahardik.intro_video_slider/"+R.raw.smallvideo; //update package name
It contains the package name of the app. You need to replace it with your app’s package name.
There are two lines where you need to update package name. If else loop is present in the adapter class, this is where package name is present.
Step 6: Create PreferenceHelper.java class
Create new class named PreferenceHelper.java
This class is used to implement Shared Preference
import android.content.Context;
import android.content.SharedPreferences;

public class PreferenceHelper {

    private final String INTRO = "intro";
       private SharedPreferences app_prefs;
    private Context context;

    public PreferenceHelper(Context context) {
        app_prefs = context.getSharedPreferences("shared",
                Context.MODE_PRIVATE);
        this.context = context;
    }

    public void putIntro(String loginorout) {
        SharedPreferences.Editor edit = app_prefs.edit();
        edit.putString(INTRO, loginorout);
        edit.commit();
    }
    public String getIntro() {
        return app_prefs.getString(INTRO, "");
    }

}
Step 7: Creating WelcomeActivity
Create new activity WelcomeActivity.
Check step 6 of scan barcode android example to know how to create a new activity in android studio.
Now put below code in WelcomeActivity.java class
import android.support.v7.app.AppCompatActivity;
import android.os.Bundle;
import android.view.View;
import android.widget.Button;

public class WelcomeActivity extends AppCompatActivity {

    private Button btn;
    private PreferenceHelper preferenceHelper;

    @Override
    protected void onCreate(Bundle savedInstanceState) {
        super.onCreate(savedInstanceState);
        setContentView(R.layout.activity_welcome);

        btn = (Button) findViewById(R.id.btn);
        preferenceHelper = new PreferenceHelper(this);

        btn.setOnClickListener(new View.OnClickListener() {
            @Override
            public void onClick(View v) {
                preferenceHelper.putIntro("");
                onBackPressed();
            }
        });

    }
}
Step 8: Updating activity_welcome.xml file
Add below source code in activity_welcome.xml
<?xml version="1.0" encoding="utf-8"?>
<LinearLayout xmlns:android="http://schemas.android.com/apk/res/android"
    xmlns:tools="http://schemas.android.com/tools"
    android:orientation="vertical"
    android:layout_width="match_parent"
    android:layout_height="match_parent"
    tools:context="com.exampledemo.parsaniahardik.intro_video_slider.WelcomeActivity">

    <TextView
        android:layout_width="wrap_content"
        android:layout_height="wrap_content"
        android:text="Welcome to App"
        android:textSize="25sp"
        android:textColor="#000"/>

    <Button
        android:layout_width="wrap_content"
        android:layout_height="wrap_content"
        android:id="@+id/btn"
        android:text="click here to see intro when restarting the app"/>

</LinearLayout>
Step 9: Updating activity_main.xml file
Add below code in activity_main.xml file
<?xml version="1.0" encoding="utf-8"?>
<LinearLayout xmlns:android="http://schemas.android.com/apk/res/android"
    xmlns:tools="http://schemas.android.com/tools"
    android:orientation="vertical"
    android:layout_width="match_parent"
    android:layout_height="match_parent"
    xmlns:app="http://schemas.android.com/apk/res-auto"
    tools:context="com.exampledemo.parsaniahardik.intro_video_slider.MainActivity">

    <RelativeLayout
        android:layout_width="match_parent"
        android:layout_height="wrap_content"
        android:layout_weight="1">

        <android.support.v4.view.ViewPager
            android:id="@+id/pager"
            android:layout_width="match_parent"
            android:layout_height="match_parent"
            android:layout_alignParentTop="true" />

        <com.viewpagerindicator.CirclePageIndicator
            android:id="@+id/indicator"
            android:layout_width="match_parent"
            android:layout_height="wrap_content"
            android:layout_alignParentBottom="true"
            android:layout_centerHorizontal="true"
            android:gravity="bottom"
            android:padding="10dip"
            app:centered="true"
            app:fillColor="#df0623"
            app:pageColor="#fff"
            app:snap="false" />
    </RelativeLayout>

    <TextView
        android:layout_width="match_parent"
        android:layout_height="40dp"
        android:id="@+id/done"
        android:background="#000"
        android:gravity="center"
        android:textSize="20sp"
        android:text="Done"
        android:textColor="#fff"/>

</LinearLayout>
Step 10: Updating MainActivity.java
Update MainActivity with following source code
import android.content.Intent;
import android.os.Handler;
import android.support.v4.view.ViewPager;
import android.support.v7.app.AppCompatActivity;
import android.os.Bundle;
import android.view.View;
import android.widget.TextView;

import com.viewpagerindicator.CirclePageIndicator;

public class MainActivity extends AppCompatActivity {

    private ViewPager mPager;
    private static int NUM_PAGES = 0;
    private static int currentPage = 0;
    private CirclePageIndicator indicator;
    private TextView tvdone;
    private PreferenceHelper preferenceHelper;

    @Override
    protected void onCreate(Bundle savedInstanceState) {
        super.onCreate(savedInstanceState);
        setContentView(R.layout.activity_main);

        tvdone = (TextView) findViewById(R.id.done);
        preferenceHelper = new PreferenceHelper(this);

        if(preferenceHelper.getIntro().equals("no")){
            Intent intent = new Intent(MainActivity.this, WelcomeActivity.class);
            intent.addFlags(Intent.FLAG_ACTIVITY_CLEAR_TASK | Intent.FLAG_ACTIVITY_NEW_TASK);
            startActivity(intent);
            this.finish();
        }

        tvdone.setOnClickListener(new View.OnClickListener() {
            @Override
            public void onClick(View v) {

                preferenceHelper.putIntro("no");
                Intent intent = new Intent(MainActivity.this, WelcomeActivity.class);
                intent.addFlags(Intent.FLAG_ACTIVITY_CLEAR_TASK | Intent.FLAG_ACTIVITY_NEW_TASK);
                startActivity(intent);
                MainActivity.this.finish();
            }
        });

        init();
    }

    private void init() {
        mPager = (ViewPager) findViewById(R.id.pager);
        indicator = (CirclePageIndicator) findViewById(R.id.indicator);
        mPager.setAdapter(new SlidingImage_Adapter(this));
        indicator.setViewPager(mPager);

        final float density = getResources().getDisplayMetrics().density;

        //Set circle indicator radius
        indicator.setRadius(5 * density);

        NUM_PAGES = 3;

        // Auto start of viewpager
        final Handler handler = new Handler();
        final Runnable Update = new Runnable() {
            public void run() {
                if (currentPage == NUM_PAGES) {
                    currentPage = 0;
                }
                mPager.setCurrentItem(currentPage++, true);
            }
        };
      /*  Timer swipeTimer = new Timer();
        swipeTimer.schedule(new TimerTask() {
            @Override
            public void run() {
                handler.post(Update);
            }
        }, 5000, 5000);*/

        // Pager listener over indicator
        indicator.setOnPageChangeListener(new ViewPager.OnPageChangeListener() {

            @Override
            public void onPageSelected(int position) {
                currentPage = position;

            }

            @Override
            public void onPageScrolled(int pos, float arg1, int arg2) {

            }

            @Override
            public void onPageScrollStateChanged(int pos) {

            }
        });

    }

    @Override  // this method is used for removing top and bottom navbars(fullscreen)
    public void onWindowFocusChanged(boolean hasFocus) {
        super.onWindowFocusChanged(hasFocus);
        if (hasFocus) {
            getWindow().getDecorView().setSystemUiVisibility(
                    View.SYSTEM_UI_FLAG_LAYOUT_STABLE
                            | View.SYSTEM_UI_FLAG_LAYOUT_HIDE_NAVIGATION
                            | View.SYSTEM_UI_FLAG_LAYOUT_FULLSCREEN
                            | View.SYSTEM_UI_FLAG_HIDE_NAVIGATION
                            | View.SYSTEM_UI_FLAG_FULLSCREEN
                            | View.SYSTEM_UI_FLAG_IMMERSIVE_STICKY);
        }

    }

}
Pay attention to the below method
 @Override  // this method is used for removing top and bottom navbars(fullscreen)
    public void onWindowFocusChanged(boolean hasFocus) {
        super.onWindowFocusChanged(hasFocus);
        if (hasFocus) {
            getWindow().getDecorView().setSystemUiVisibility(
                    View.SYSTEM_UI_FLAG_LAYOUT_STABLE
                            | View.SYSTEM_UI_FLAG_LAYOUT_HIDE_NAVIGATION
                            | View.SYSTEM_UI_FLAG_LAYOUT_FULLSCREEN
                            | View.SYSTEM_UI_FLAG_HIDE_NAVIGATION
                            | View.SYSTEM_UI_FLAG_FULLSCREEN
                            | View.SYSTEM_UI_FLAG_IMMERSIVE_STICKY);
        }

    }
This method will remove top and bottom navigation bars.
So that we can present the video slide in full screen.
So we are done for app intro animation video slider android studio programmatically example tutorial. Thank you.