
Warm welcome Custom UItableview cell swift iOS Example Tutorial.
In this post, we will make custom prototype cell with swift.
We will not use any xib file in this tutorial example.
In uitableview custom cell, you can add any UI widget like label, text field, button etc.
Output Of Custom Cell
Move 1. Creating Storyboard
Create a new project in xCode. Select a type of project as a single view application.
First task is to make some changes in the Main.storyboard file.
Click on Main.storyboard file and see the below image.
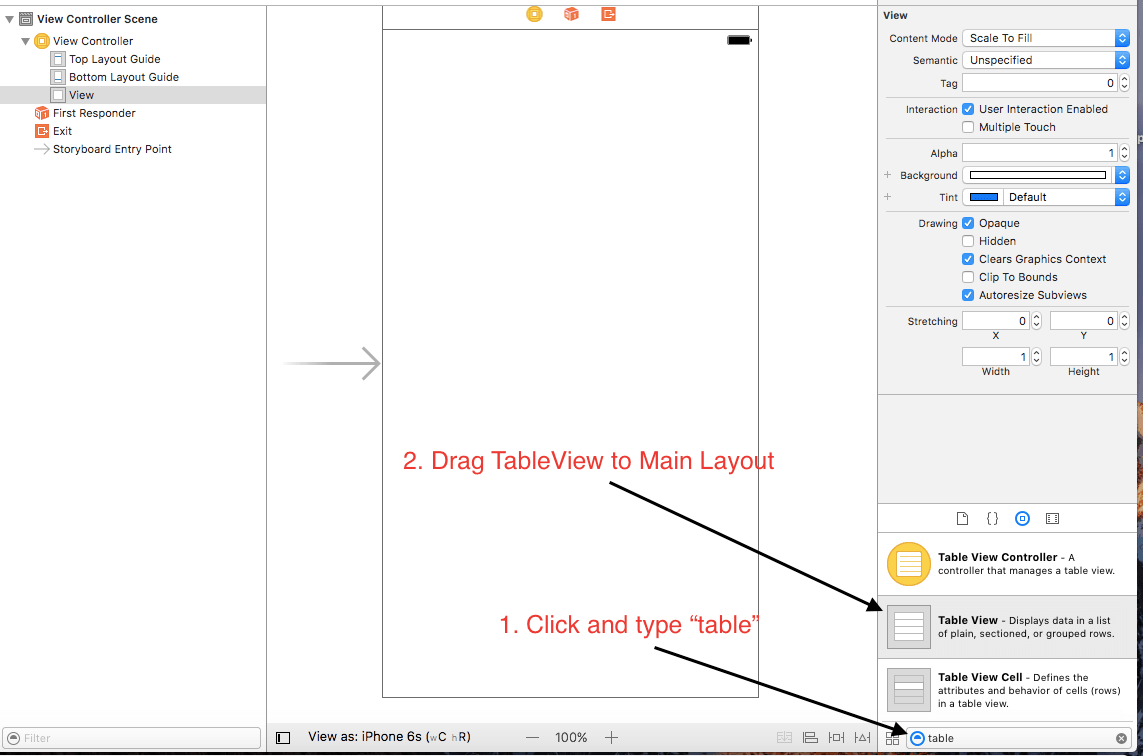
- First step on the above image is saying to search for “TableView” at the bottom right corner.
- After typing “TableView”, drag the Table View to the main layout. (As per the second step in above image)
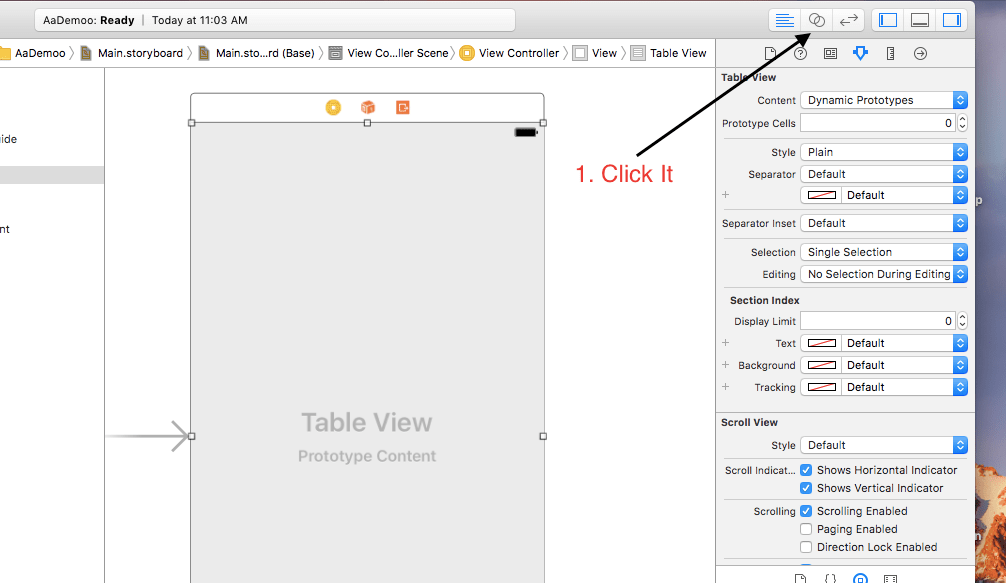
Now consider the below image
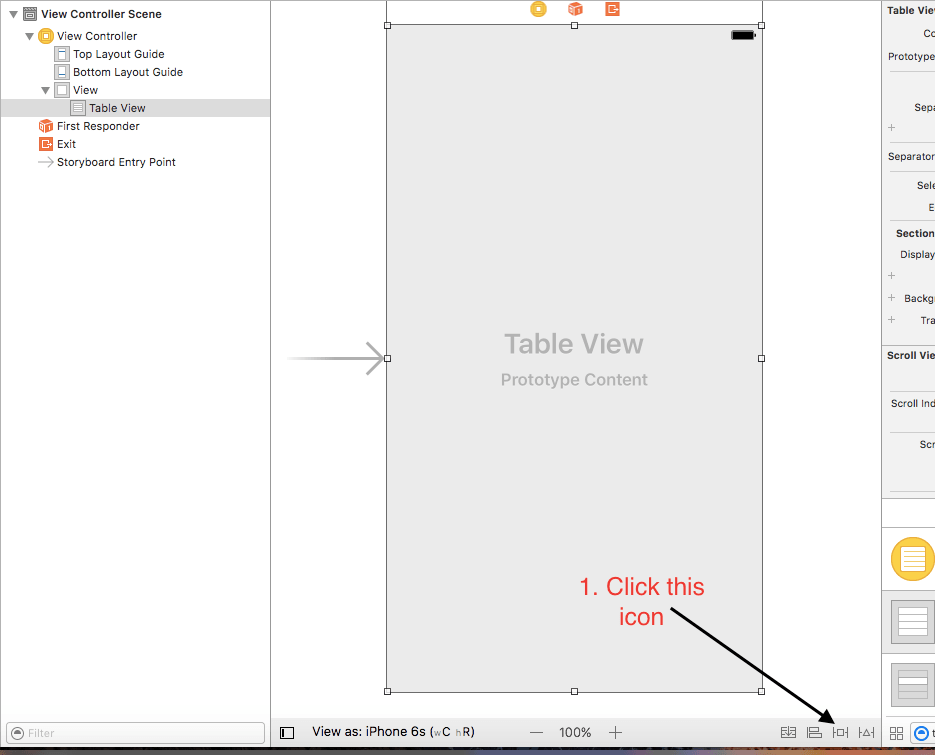
Set the height and width of the Table View as the full screen. For this, you need to drag four corners of the table view. (top, bottom, right, left)- After this, our table view should look like the above image.
- Then click on the constraints icon as per the step 1 of the above image.
After clicking the constraints icon, you can see a pop up dialog like the below image
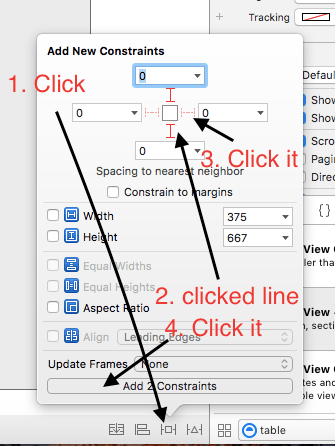
First step in the above image is already done.- Now you can see that there are four constraints in the image. (top, bottom. right and left)
- In the picture, I have already clicked top and bottom constraints. You need to click right and left one. (Step 3 in image)
- After this, click on the “Add 4 constraints” button as per the step 4 of the image.
Now attend the following picture
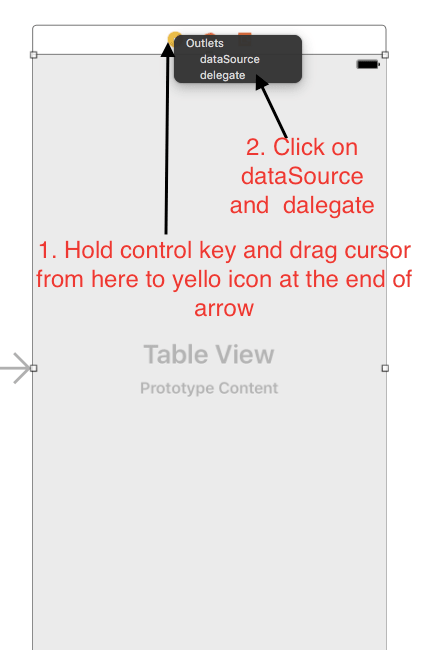
Let us enable the dataSource and delegate.- Hold the control key and move the mouse cursor from tableview to the yellow icon at the top of the tableview. (See the step 1 in above image)
- After this, you will see a black screen with two options : dataSource and delegate.
- You need to select both of them. If you can not select both of them at first attempt, repeat the process and select one which was not selected in the first attempt.
Move 2. Assistant Screen
See the following image
- See the step 1 in the image and click on the assistant editor icon. (icon with two circles)
- When you clicks the assistant editor icon, you will also see the ViewController.swift class on the screen as per the below image.
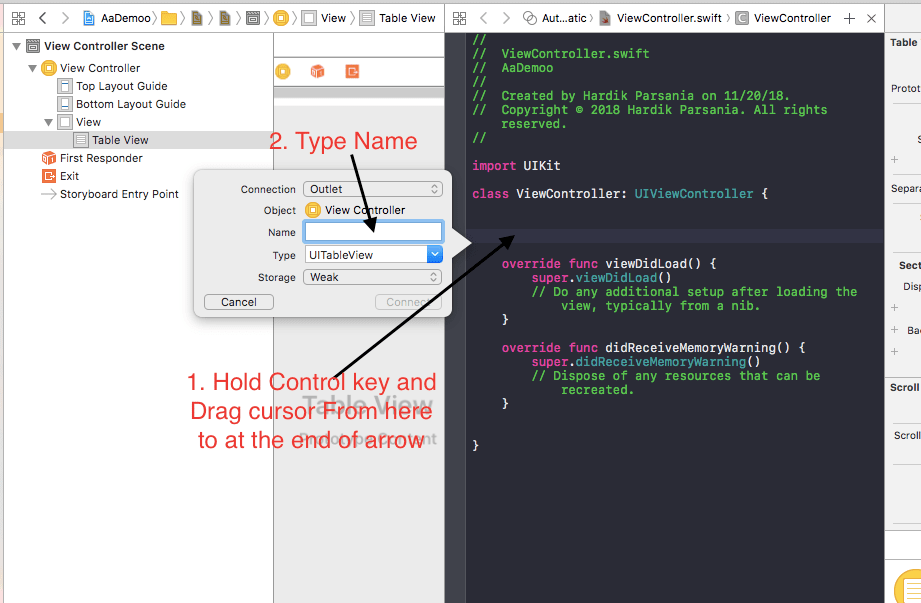
- Now it is time to create outlet for our TableView.
- As per the step 1, hold the control key and drag the cursor from tableview to ViewController.swift class.
- After this, you will see one pop up as per the above image.
- Type a name of the TableView in Name field. I am entering “tableview”.
Now click the Connect button. After this, you can see that in your ViewController.swift class, below line is written automatically,
@IBOutlet weak var tableViewCustom: UITableView!
Now it is time to create custom prototype cell.
Watch the below image
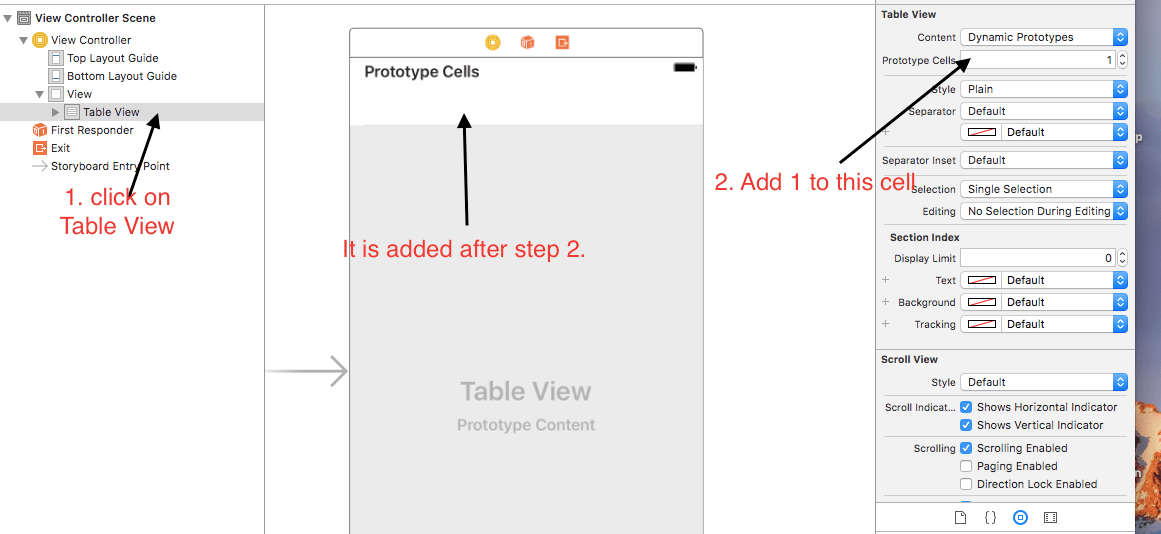
Click on Table View at the left side bar as per step 1 in above image.- Then as per the step 2, add 1 to the Prototype Cells field. After this, a prototype cell is added to the table view layout.
Now see the following image
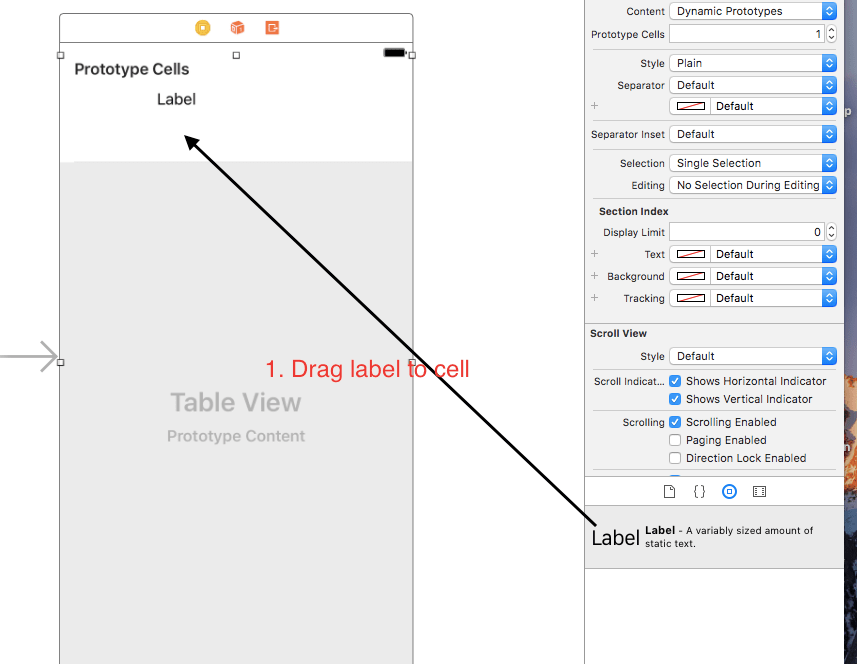
Let us add label and other UI layout to custom prototype cell.- As per the above image, add label and UI layout widgets by dragging them to the prototype cell layout as per the above image.
- Now you can add text to label, change the size and color of the label text etc customization.
- Also change the background color and other stuffs.
Consider the following image
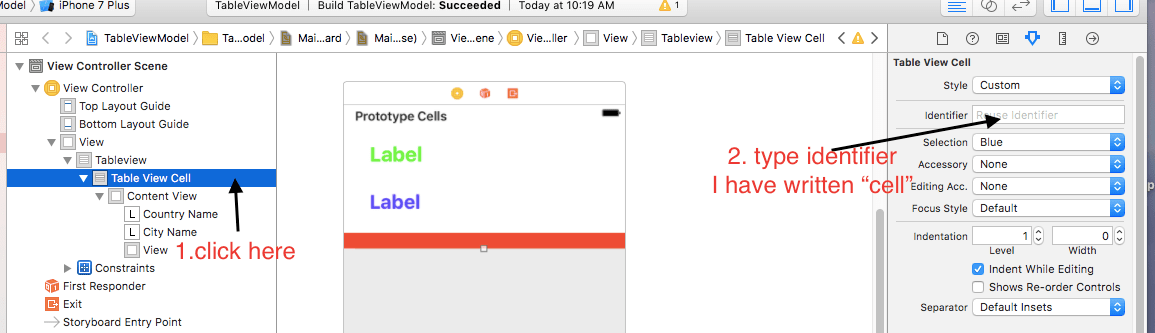
As per the step 1, click on the Table View Cell at the left side bar.- Now, at the right side bar, give a suitable name in the field “Identifier.” I am giving “cell” here.
Move 3. Creating New File
See the following picture,

As per the above picture, click on the File->New->file- When a new screen appears, select the Cocoa Touch class and hit NEXT button.
See the below picture
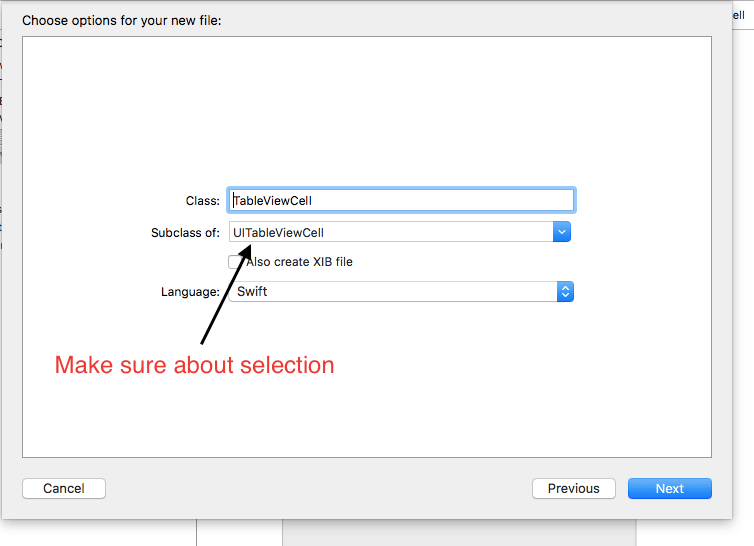
After selecting cocoa touch class, you will see the above screen.- In the class: field give the name of the class. I have written TableViewCell here.
- In the Subclass of: field, make sure you have selected UITableViewCell.
- Then hit the Next button and then click on CREATE button.
Then watch the following picture
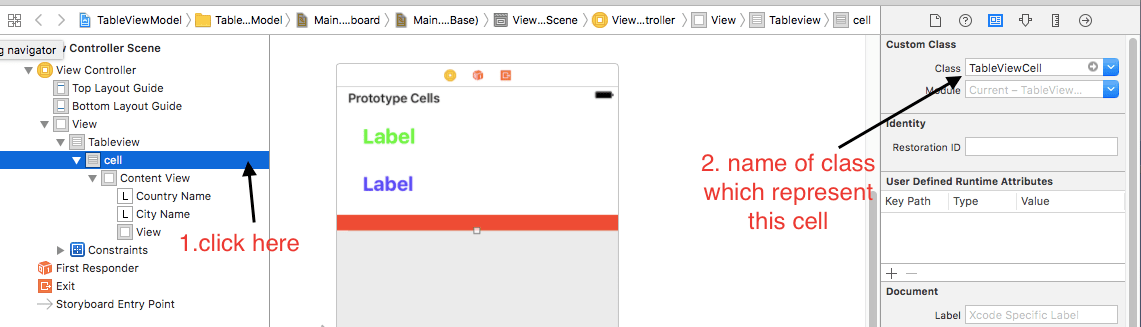
As per the first step oh the above image, click on the cell at the left side bar.- Now click on the blue icon at the right side bar as per the step 2 of above image.
- In the class: field, give the name of the class we have just created. (TableViewCell)
Now consider the below image
It is time to add outlets for our two labels.- We will connect both labels with TableViewCell class.
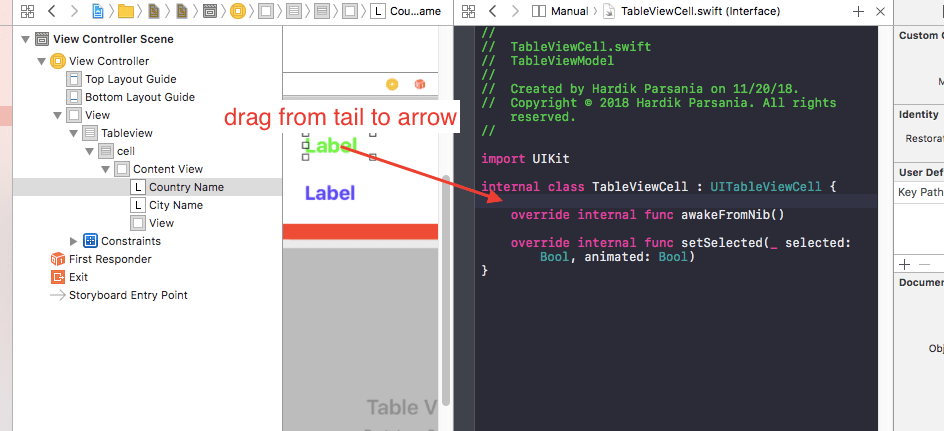
- Open an assistant editor. Open Main.storyboard and TableViewCell class side by side as per the above image.
- Now hold the control key and drag the mouse cursor from first label to the TableViewCell class.
- A pop up will be opened, same as when we did the outlet for the table view.
- Give appropriate name for first label as Name and name for second label as City
After this, you can see that below two lines are automatically written in your TableViewCell.swift file.
    @IBOutlet weak var Name: UILabel!
    @IBOutlet weak var City: UILabel!
Move 4. TableViewCell.swift file
After doing all the above work, let us see how TableViewCell.swift looks.
Code structure for TableViewCell.swift should look like the below
//
//  TableViewCell.swift
//  TableViewModelCustomCell
//
//  Created by Hardik Parsania on 11/19/18.
//  Copyright © 2018 Hardik Parsania. All rights reserved.
//

import UIKit

class TableViewCell: UITableViewCell {

    @IBOutlet weak var Name: UILabel!
    @IBOutlet weak var City: UILabel!

    override func awakeFromNib() {

        super.awakeFromNib()
        // Initialization code
    }

    override func setSelected(_ selected: Bool, animated: Bool) {
        super.setSelected(selected, animated: animated)

        // Configure the view for the selected state
    }

}
Move 5. Other files
Let us create a model class for data maintenance.
Create a new Cocoa touch class and give it a name DataModel.swift
Following is the coding lines for DataModel.swift file
//
//  DataModel.swift
//  TableViewModelCustomCell
//
//  Created by Hardik Parsania on 11/19/18.
//  Copyright © 2018 Hardik Parsania. All rights reserved.
//

import UIKit

class DataModel {

    var name: String?
    var city: String?

    init(name: String?, city: String?) {
        self.name = name
        self.city = city

    }
}
Now let us write the ViewController.swift file.
Add the below lines in ViewControllers.swift file
//
//  ViewController.swift
//  TableViewModelCustomCell
//
//  Created by Hardik Parsania on 11/19/18.
//  Copyright © 2018 Hardik Parsania. All rights reserved.
//

import UIKit

class ViewController: UIViewController , UITableViewDataSource, UITableViewDelegate {

    @IBOutlet weak var tableview: UITableView!


    var firstNames: [String] = ["Hardik" ,"Roger", "Andrew", "Eliz", "Kety"]
    var cityNames: [String] = ["Rajkot" ,"Basel", "New York", "London", "Sydney"]

    //a list to store DataModel
    var dataModels = [DataModel]()

    override func viewDidLoad() {
        super.viewDidLoad()
        // Do any additional setup after loading the view, typically from a nib.

        //traversing through all elements of the array
        for i in 0..<5{

            self.dataModels.append(DataModel(name: String(i) + firstNames[i], city: String(i) + cityNames[i]))
            //displaying data in tableview
            self.tableview.reloadData()

        }

    }

    //the method returning size of the list
    public func tableView(_ tableView: UITableView, numberOfRowsInSection section: Int) -> Int{
        return dataModels.count
    }

    //the method returning each cell of the list
    public func tableView(_ tableView: UITableView, cellForRowAt indexPath: IndexPath) -> UITableViewCell{

        let cell = tableView.dequeueReusableCell(withIdentifier: "cell", for: indexPath) as! TableViewCell

        //getting the hero for the specified position
        let model: DataModel

        model = dataModels [indexPath.row]

        //displaying values
        cell.Name.text = model.name
        cell.City.text = model.city

        return cell

    }

    override func didReceiveMemoryWarning() {
        super.didReceiveMemoryWarning()
        // Dispose of any resources that can be recreated.
    }


}
Let us go deep in above code
Consider the below lines
var firstNames: [String] = ["Hardik" ,"Roger", "Andrew", "Eliz", "Kety"]
var cityNames: [String] = ["Rajkot" ,"Basel", "New York", "London", "Sydney"]
- First line is making a string array with the names of persons.
- Second one making an array with city names.
- In the viewLoad() function, we are making one for loop. every iteration will create an object of DataModel class.
- Then compiler will give firstName and cityName to object then it will assign this object to the dataModels which is the array of these objects of DataModel class.
Consider below function
  //the method returning each cell of the list
    public func tableView(_ tableView: UITableView, cellForRowAt indexPath: IndexPath) -> UITableViewCell{

        let cell = tableView.dequeueReusableCell(withIdentifier: "cell", for: indexPath) as! TableViewCell

        //getting the hero for the specified position
        let model: DataModel

        model = dataModels [indexPath.row]

        //displaying values
        cell.Name.text = model.name
        cell.City.text = model.city

        return cell

    }
Above function will create the cell with proper values and then it will return it to the compiler and compiler will attach it to the table view.