
Today’s tutorial is about Android Facebook Integration with Login and Logout.
Social media integration is one of the most popular topics that we can see in applications programming. Like another social networks, Facebook provides powerful API for a lot of platform, including mobiles OS in general and Android in particular.
As we can see in many applications which needing user dentifiable information (account), they allow us to create a new account from Facebook ID (Login with Facebook). By this way, apps will use oAuth to get our public information through connecting and communicating with Facebook SDK.
Android facebook integration login example implement the social login in android app, so that user can login or sign in to the app without creating username and password.
We will fetch information like first name, last name, email, gender , facebook id and birth date from facebbok.
We will integrate it by using Facebook’s latest SDK. Checkout output of this example tutorial which is developed by demonuts.com
Download Source Code for android facebook integration login
[sociallocker] Download Facebook_login_profile_source code [/sociallocker]
Step 1: Create a new project
As always Prepare new project in the Android Studio. Select first activity as empty activity.
Step 2: Create an app in the Facebook developer console.
Watch following video, which describes the whole process to develop an app in facebook developer console.
Now here is a quick explanation of above video.
- Login to your facebook account and open Facebook developer console.
- Click on create app button which is at right upper corner and fill required information.
- After creating an app, click on setting from left menu side bar. Save your App ID, which is required in android studio project later.
- Click on Add platform and select Android. Fill package name and class in which you are going to add code for Facebook login integration Android. Now for getting Key Hash add following code in your project and run it, so you will get Key Hash in logcat as you shown in above video.
- Code for getting Key Hash:
try { PackageInfo info = getPackageManager().getPackageInfo( "put your package name here", PackageManager.GET_SIGNATURES); for (Signature signature : info.signatures) { MessageDigest md = MessageDigest.getInstance("SHA"); md.update(signature.toByteArray()); Log.d("KeyHash:", Base64.encodeToString(md.digest(), Base64.DEFAULT)); } } catch (PackageManager.NameNotFoundException e) { } catch (NoSuchAlgorithmException e) { } - Put this Key Hash in Facebook developer console and click on save changes button.
- Now from the left side menu, click on App Review option. You will see that currently, your app is not public.
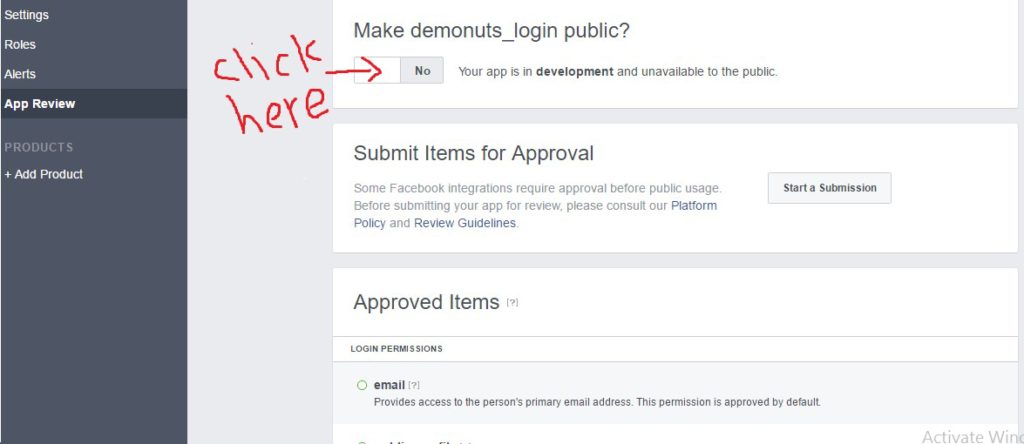
- To make your app public, just click on the upper switch as shown in the image. You will see that by default there three permissions are given email, public_profile, and user_image. To have more permissions click on start submission button and you have to give proper reasons to Facebook team why you need more permission. Right now default three permissions are enough for us.
Step 3: Updating build.gradle(Project: project_name)
add the following in gradle file
maven { url 'https://jitpack.io' }
in the
allprojects {
    repositories {
        jcenter()
}
structure. So final code for build.gradle(Project: project_name) will look like this:
// Top-level build file where you can add configuration options common to all sub-projects/modules.

buildscript {
    repositories {
        jcenter()
    }
    dependencies {
        classpath 'com.android.tools.build:gradle:1.5.0'

        // NOTE: Do not place your application dependencies here; they belong
        // in the individual module build.gradle files
    }
}

allprojects {
    repositories {
        jcenter()
        maven { url 'https://jitpack.io' }

    }
}

task clean(type: Delete) {
    delete rootProject.buildDir
}
Step 4: Updating build.gradle(Module:app)
Go to android studio project and add following in the build.gradle(Module:app) file under android{} section.
 repositories {
        mavenCentral()
    }
Now in the dependency {} section, add
 compile 'com.facebook.android:facebook-android-sdk:4.10.0'
 compile 'com.github.androidquery:androidquery:0.26.9'
So final code for build.gradle(Module:app) will look like this:
apply plugin: 'com.android.application'

android {
    compileSdkVersion 23
    buildToolsVersion "23.0.3"

    defaultConfig {
        applicationId "com.demonuts.fblogin"
        minSdkVersion 16
        targetSdkVersion 22
        versionCode 1
        versionName "1.0"
    }
    buildTypes {
        release {
            minifyEnabled false
            proguardFiles getDefaultProguardFile('proguard-android.txt'), 'proguard-rules.pro'
        }
    }
    repositories {
        mavenCentral()
    }
}

dependencies {
    compile fileTree(dir: 'libs', include: ['*.jar'])
    testCompile 'junit:junit:4.12'
    compile 'com.android.support:appcompat-v7:23.4.0'
    compile 'com.facebook.android:facebook-android-sdk:4.10.0'
    compile 'com.github.androidquery:androidquery:0.26.9'
}
check in your downloaded source code for exact results.
Step 5: Changing strings resource file
Now in the directory: res-> values -> strings.xml create one string resource and put your App ID(we saved it before, and if you have not, go to developer console get from there.)
<string name="app_id">Your app id</string>
Step 6: Adding activity
Go to AndroidManifest.xml file and add following inside <application>….. </application> tags.
 <meta-data android:name="com.facebook.sdk.ApplicationId" android:value="@string/app_id"/>
 <activity android:name="com.facebook.FacebookActivity"
           android:configChanges="keyboard|keyboardHidden|screenLayout|screenSize|orientation"
           android:theme="@android:style/Theme.Translucent.NoTitleBar"
           android:label="@string/app_name" />
Add internet permission between <manifest>….</manifest> tag.
<uses-permission android:name="android.permission.INTERNET"/>
Note: If you are targeting SDK version above 22 (Above Lollipop) then you need to ask a user for granting runtime permissions. Check marshmallow runtime permission for more information.
Complete AndroidManifest.xml:
<?xml version="1.0" encoding="utf-8"?>
<manifest xmlns:android="http://schemas.android.com/apk/res/android"
    package="com.demonuts.fblogin">

    <uses-permission android:name="android.permission.INTERNET"/>

    <application
        android:allowBackup="true"
        android:icon="@mipmap/ic_launcher"
        android:label="@string/app_name"
        android:supportsRtl="true"
        android:theme="@style/AppTheme">
        <activity android:name=".MainActivity">
            <intent-filter>
                <action android:name="android.intent.action.MAIN" />

                <category android:name="android.intent.category.LAUNCHER" />
            </intent-filter>
        </activity>

        <meta-data android:name="com.facebook.sdk.ApplicationId" android:value="@string/app_id"/>
        <activity android:name="com.facebook.FacebookActivity"
            android:configChanges="keyboard|keyboardHidden|screenLayout|screenSize|orientation"
            android:theme="@android:style/Theme.Translucent.NoTitleBar"
            android:label="@string/app_name" />

    </application>

</manifest>
Step 7: Updating activity_main
Put following code in activity_main.xml file:
<?xml version="1.0" encoding="utf-8"?>
<LinearLayout xmlns:android="http://schemas.android.com/apk/res/android"
    xmlns:tools="http://schemas.android.com/tools"
    android:layout_width="match_parent"
    android:layout_height="match_parent"
    android:orientation="vertical"
    tools:context="com.demonuts.fblogin.MainActivity">

    <TextView
        android:layout_width="wrap_content"
        android:layout_height="wrap_content"
        android:textColor="#000"
        android:layout_marginLeft="10dp"
        android:textAppearance="?android:attr/textAppearanceMedium"
        android:id="@+id/text"/>

    <ImageView
        android:layout_width="300dp"
        android:layout_height="300dp"
        android:layout_marginTop="10dp"
        android:layout_marginLeft="10dp"
        android:id="@+id/ivpic"
        android:src="@mipmap/ic_launcher"/>

    <com.facebook.login.widget.LoginButton
        android:id="@+id/btnfb"
        android:layout_gravity="center_horizontal"
        android:layout_marginTop="10dp"
        android:layout_width="wrap_content"
        android:layout_height="wrap_content" />

</LinearLayout>
Step 8: Changing MainActivity class
Copy following code in MainActivity.java
import android.content.Intent;
import android.support.v7.app.AppCompatActivity;
import android.os.Bundle;
import android.util.Log;
import android.widget.ImageView;
import android.widget.TextView;
import com.androidquery.AQuery;
import com.facebook.AccessToken;
import com.facebook.AccessTokenTracker;
import com.facebook.CallbackManager;
import com.facebook.FacebookCallback;
import com.facebook.FacebookException;
import com.facebook.FacebookSdk;
import com.facebook.GraphRequest;
import com.facebook.GraphResponse;
import com.facebook.Profile;
import com.facebook.ProfileTracker;
import com.facebook.login.LoginResult;
import com.facebook.login.widget.LoginButton;
import org.json.JSONException;
import org.json.JSONObject;
import java.util.Arrays;

public class MainActivity extends AppCompatActivity {

    private AQuery aQuery;
    private ImageView ivpic;
    private TextView tvdetails;
    private CallbackManager callbackManager;
    private AccessTokenTracker accessTokenTracker;
    private ProfileTracker profileTracker;
    private LoginButton loginButton;
    private FacebookCallback<LoginResult> callback = new FacebookCallback<LoginResult>() {
        @Override
        public void onSuccess(LoginResult loginResult) {
            GraphRequest request = GraphRequest.newMeRequest(
                    loginResult.getAccessToken(),
                    new GraphRequest.GraphJSONObjectCallback() {
                        @Override
                        public void onCompleted(JSONObject object, GraphResponse response) {
                            Log.v("LoginActivity", response.toString());

                            // Application code
                            try {
                                Log.d("tttttt",object.getString("id"));
                                String birthday="";
                                if(object.has("birthday")){
                                    birthday = object.getString("birthday"); // 01/31/1980 format
                                }

                                String fnm = object.getString("first_name");
                                String lnm = object.getString("last_name");
                                String mail = object.getString("email");
                                String gender = object.getString("gender");
                                String fid = object.getString("id");
                                tvdetails.setText("Name: "+fnm+" "+lnm+" \n"+"Email: "+mail+" \n"+"Gender: "+gender+" \n"+"ID: "+fid+" \n"+"Birth Date: "+birthday);
                                aQuery.id(ivpic).image("https://graph.facebook.com/" + fid + "/picture?type=large");
                                //https://graph.facebook.com/143990709444026/picture?type=large
                                Log.d("aswwww","https://graph.facebook.com/"+fid+"/picture?type=large");

                            } catch (JSONException e) {
                                e.printStackTrace();
                            }

                        }
                    });
            Bundle parameters = new Bundle();
            parameters.putString("fields", "id, first_name, last_name, email, gender, birthday, location");
            request.setParameters(parameters);
            request.executeAsync();

        }

        @Override
        public void onCancel() {

        }

        @Override
        public void onError(FacebookException error) {

        }
    };


    @Override
    protected void onCreate(Bundle savedInstanceState) {
        super.onCreate(savedInstanceState);

        FacebookSdk.sdkInitialize(this);
        setContentView(R.layout.activity_main);

        tvdetails = (TextView) findViewById(R.id.text);
        ivpic = (ImageView) findViewById(R.id.ivpic);

        loginButton = (LoginButton) findViewById(R.id.btnfb);
        aQuery = new AQuery(this);

        callbackManager = CallbackManager.Factory.create();

        accessTokenTracker= new AccessTokenTracker() {
            @Override
            protected void onCurrentAccessTokenChanged(AccessToken oldToken, AccessToken newToken) {

            }
        };

        profileTracker = new ProfileTracker() {
            @Override
            protected void onCurrentProfileChanged(Profile oldProfile, Profile newProfile) {

            }
        };

        accessTokenTracker.startTracking();
        profileTracker.startTracking();
        loginButton.setReadPermissions(Arrays.asList("public_profile", "email", "user_birthday", "user_friends"));
        loginButton.registerCallback(callbackManager, callback);

    }

    @Override
    public void onActivityResult(int requestCode, int resultCode, Intent data) {
        super.onActivityResult(requestCode, resultCode, data);
        callbackManager.onActivityResult(requestCode, resultCode, data);

    }

    @Override
    public void onStop() {
        super.onStop();
        accessTokenTracker.stopTracking();
        profileTracker.stopTracking();
    }

    @Override
    public void onResume() {
        super.onResume();
        Profile profile = Profile.getCurrentProfile();

    }

}
Description of MainActivity.java
When a user clicks the login button, a dialog interface will open, and the user will enter his details. After Facebook successfully detects the user, the code flow will come to
 @Override
    public void onActivityResult(int requestCode, int resultCode, Intent data) {
        super.onActivityResult(requestCode, resultCode, data);
        callbackManager.onActivityResult(requestCode, resultCode, data);

    }
from here as you can see, callback manager will come in to the picture and code flow will go to:
private FacebookCallback<LoginResult> callback = new FacebookCallback<LoginResult>() {
    @Override
    public void onSuccess(LoginResult loginResult) {
        GraphRequest request = GraphRequest.newMeRequest(
                loginResult.getAccessToken(),
                new GraphRequest.GraphJSONObjectCallback() {
                    @Override
                    public void onCompleted(JSONObject object, GraphResponse response) {
                        Log.v("LoginActivity", response.toString());

                        // Application code
                        try {
                            Log.d("tttttt",object.getString("id"));
                            String birthday="";
                            if(object.has("birthday")){
                                birthday = object.getString("birthday"); // 01/31/1980 format
                            }

                            String fnm = object.getString("first_name");
                            String lnm = object.getString("last_name");
                            String mail = object.getString("email");
                            String gender = object.getString("gender");
                            String fid = object.getString("id");
                            tvdetails.setText("Name: "+fnm+" "+lnm+" \n"+"Email: "+mail+" \n"+"Gender: "+gender+" \n"+"ID: "+fid+" \n"+"Birth Date: "+birthday);
                            aQuery.id(ivpic).image("https://graph.facebook.com/" + fid + "/picture?type=large");
                            //https://graph.facebook.com/143990709444026/picture?type=large
                            Log.d("aswwww","https://graph.facebook.com/"+fid+"/picture?type=large");

                        } catch (JSONException e) {
                            e.printStackTrace();
                        }

                    }
                });
        Bundle parameters = new Bundle();
        parameters.putString("fields", "id, first_name, last_name, email, gender, birthday, location");
        request.setParameters(parameters);
        request.executeAsync();

    }

    @Override
    public void onCancel() {

    }

    @Override
    public void onError(FacebookException error) {

    }
};
Finally, you will get Facebook details of the user in the string like fnm, lnm, mail, etc. and use it as per your requirement.
Logout from Facebook from custom button click
If you want to logout user by clicking on any custom button in any activity or fragment, put following in that button’s onclicklistener(),
LoginManager.getInstance().logOut();
You should also remove First name, last name, email-id etc. details from SharedPreferences if you stored it.
After Facebook you will need to integrate Google login in shortly.
You can learn Google Plus Login integration easily and smoothly: Google Plus Login sign in intagration
So that’s all for android facebook integration login tutorial, keep visiting for other examples.