
Welcome to Kotlin Android tutorial.
Recently, Google announce official support to Kotlin as programming language for Android application development.
This Kotlin Android tutorial will guide you some basic and important syntax of Kotlin.
You will learn about var vs val in kotlin, access any view programmatically using findViewById and to set click method of any view with setOnClickListener.
Kotlin has some unique features which can help us to shorten the classic Java source code.
Kotlin Android tutorial will teach how you can shorten findViewById and setOnClickListener.
You will also learn function’s syntax of Kotlin in this Kotlin Android tutorial.
First, check the output Kotlin Android tutorial then we will develop it.
Download Source Code for Kotlin Android tutorial
[sociallocker]Download BasicKotlinCode [/sociallocker]
How to get maximum benefit from Kotlin Android tutorial
Following link includes some tips.
Click to get maximum benefit
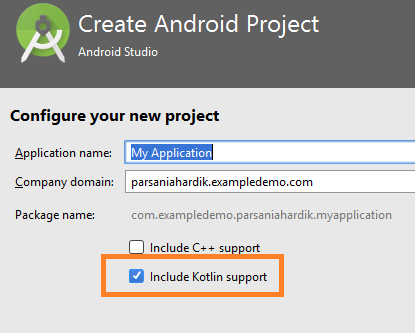
Step 1: Create an Android Studio project with Kotlin support.
If you are not using Android Studio 3.0 or above version then you need to upgrade your Android Studio.
I have downloaded Android Studio 3.0 version (canary version) from this link.
Follow steps in this link to run 3.0 version.
When you are creating new project, include kotlin support as per below image.
Step 2: Updating activity_main.xml file
Add below source code into activity_main.xml
<?xml version="1.0" encoding="utf-8"?>
<LinearLayout xmlns:android="http://schemas.android.com/apk/res/android"
    xmlns:app="http://schemas.android.com/apk/res-auto"
    xmlns:tools="http://schemas.android.com/tools"
    android:orientation="vertical"
    android:layout_width="match_parent"
    android:layout_height="match_parent"
    tools:context="com.exampledemo.parsaniahardik.basicskotlin.MainActivity">

    <Button
        android:layout_width="wrap_content"
        android:layout_height="wrap_content"
        android:id="@+id/btn"
        android:text="Hello World!"/>

    <TextView
        android:layout_width="wrap_content"
        android:layout_height="wrap_content"
        android:id="@+id/text"
        android:text="hello kotlin" />

    <Button
        android:layout_width="wrap_content"
        android:layout_height="wrap_content"
        android:id="@+id/btnfunction"
        android:text="What is 2 + 3 ?"/>

    <ImageView
        android:layout_width="wrap_content"
        android:layout_height="wrap_content"
        android:id="@+id/img"/>


</LinearLayout>
Step 3: Updating MainActivity.kt
Copy following source code into MainActivity.kt class
import android.app.Activity
import android.support.v7.app.AppCompatActivity
import android.os.Bundle
import android.support.annotation.IdRes
import android.view.View
import android.widget.Button
import android.widget.ImageView
import android.widget.TextView
import android.widget.Toast

class MainActivity : AppCompatActivity() {

    // replace findViewById() by following
    private val button: Button by bind(R.id.btn)
    private val buttonFunction: Button by bind(R.id.btnfunction)
    private val textview: TextView by bind(R.id.text)
    private val imageView: ImageView by bind(R.id.img)

    //declare variables like below
    private var stringVariable : String? = null //declaring string variable
    private var integerVariable : Int? = null //value of this variable can be changed
    private val readOnlyVariable: Int = 1 //value of this variable can not be changed

    override fun onCreate(savedInstanceState: Bundle?) {
        super.onCreate(savedInstanceState)
        setContentView(R.layout.activity_main)

        button.text = "give string to button by this way!"

        stringVariable = button.text as String //giving button's string to stringVariable

        textview.text = stringVariable //setting textview's text same as button's text

        integerVariable = 1  //giving any integer value to integer variable

        buttonFunction.setOnClickListener(){
            giveAddition(2,3)
           Toast.makeText(this, "This answer is from Kotlin function -->"+giveAddition(2,3), Toast.LENGTH_LONG).show()
        }

        imageView.setImageResource(R.mipmap.ic_launcher)

    }

    fun <T : View> Activity.bind(@IdRes res : Int) : Lazy<T> {
        @Suppress("UNCHECKED_CAST")
        return lazy(LazyThreadSafetyMode.NONE){ findViewById(res) as T }
    }

    fun giveAddition(a: Int, b: Int): Int {
        return a + b
    }

}
Step 4: Description of Various Syntaxes
Removing findViewById
Till now you are setting ids to views by findViewById. But you need to use findViewById for every single view in whole Java file. In Kotlin, you can say good bye to findViewById. But How?
First, put following function
fun <T : View> Activity.bind(@IdRes res : Int) : Lazy<T> {
        @Suppress("UNCHECKED_CAST")
        return lazy(LazyThreadSafetyMode.NONE){ findViewById(res) as T }
}
Now to give ids to every views, you just need to do is
private val button: Button by bind(R.id.btn)
Give id at the last and view type(Button, ImageView, TextView etc.) at middle as shown in above code.
Declaring Variables
Define variables in Kotlin as follow
String variable
 private var stringVariable : String? = null //declaring string variable
 private var stringVariables : String = "hello"
Integer variable
private var integerVariable : Int? = null //value of this variable can be changed
private val readOnlyVariable: Int = 1 //value of this variable can not be changed
Now take attention at above two lines. First line starts with var and second with val.
There are two types of variables in Kotlin. Mutable and Immutable.
var vs val in Kotlin
var is mutable variable, that means value of this type of variable can be changed.(Read and Write)
val is immutable variable, that means value of this type of variable can not be changed. (Read only)
Setting Button’s label or text
button.text = "give string to button by this way!"
conventional method setText() is not used here.
Giving button’s text to String Variable
stringVariable = button.text as String //giving button's string to stringVariable
Setting TextView’s text from String Variable
textview.text = stringVariable //setting textview's text same as button's text
Giving value to integer variable
integerVariable = 1 //giving any integer value to integer variable
No need of semicolon(;) at the end.
Reducing lines for setOnClickListener
 buttonFunction.setOnClickListener(){
            giveAddition(2,3)
           Toast.makeText(this, "This answer is from Kotlin function -->"+giveAddition(2,3), Toast.LENGTH_LONG).show()
}
Syntax for function
 fun giveAddition(a: Int, b: Int): Int {
        return a + b
    }
As you can see there is little difference than Java code. In Java, we used to give return type at starting where here it is written at the end of first line.
Void in Java is written as Unit in Kotlin. For example
fun printHello(name: String?): Unit {
    if (name != null)
        println("Hello ${name}")
    else
        println("Hi there!")
    // `return Unit` or `return` is optional
}
Setting Image Resource
imageView.setImageResource(R.mipmap.ic_launcher)
How to get exact Android tutorial while searching in Google
Click to get Important Google searching tips
End of Kotlin Android tutorial. Comment your queries and reviews in comment section below.
If you find this example useful, then SHARE it using various sharing options at left panel.
Thank you 🙂