
Let us develop Kotlin WebView Load HTML JavaScript From Asset In Android Example.
We will create an assets folder and will save HTML and JavaScript files in this assets folder.
There are some situations when you can not create complex designing only with android’s XML layout files. Here, you need to use HTML and JavaScript file for better look and feel of your android app.
We will also learn how we can interact between JavaScript and android file (Kotlin and JAVA classes). We can control the functions among these two files.
First of all, watch the following video for output.
Step 1. Perfect Project
To make this project successful at first attempt, I recommend you to make a new project in android studio so that We can avoid any unwanted code.
During making a new project, make sure that you have selected empty activity as the default activity and also be sure that you select Kotlin as the source language for the app.
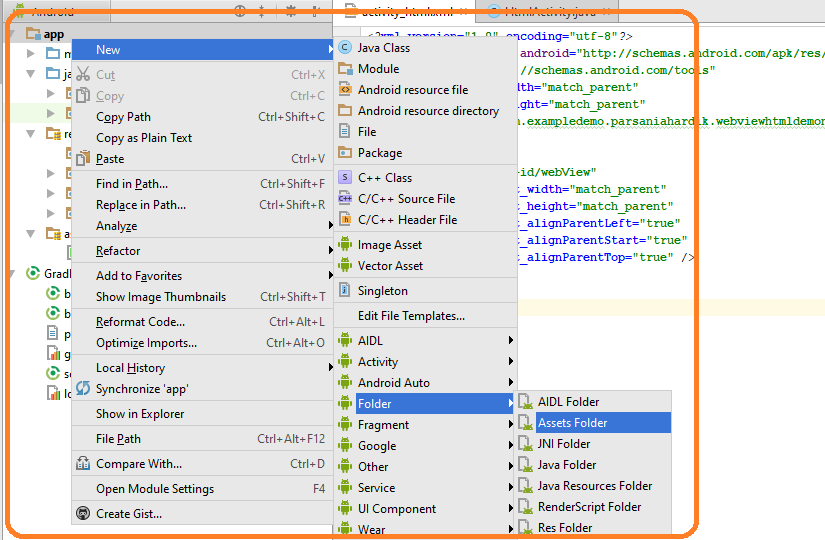
Step 2. Creating Assets Folder
Execute Rigth click on left menu bar->New Folder->Assets Folder as per below image
Making JavaScript file
Create a new text file and name it as load_JS_Demonuts.html
Copy below source code into it
<!DOCTYPE html>
<html>
<head>
<meta charset="UTF-8">
<meta name="viewport" content="width=device-width; user-scalable=0;" />
<title>JavaScript Interface</title>
</head>
<body style="background-color:#E6E6FA">
<h1>JavaScript Interface</h1>
<p id="mytext">JS view is controlled by Android code!!</p>
<input type="button" value="Show Toast!" onClick="showJSToast('Toast to JS Interface!')" />
<input type="button" value="Open Dialog" onClick="openAndroidDialog()" />
<script language="javascript">
   function showJSToast(toast) {
       AndroidFunction.showToast(toast);
   }

   function openAndroidDialog() {
       AndroidFunction.openAndroidDialog();
   }

   function callFromActivity(msg){
 document.getElementById("mytext").innerHTML = msg;
   }
</script>

</body>t
</html>
Copy and paste above file into the assets folder. We will load this file in the webview using kotlin.
Step 3. Making JavaScript Activity
Create a new activity and give it a name like JavaScriptActivity
Add the following source code into activity_java_script.xml
<?xml version="1.0" encoding="utf-8"?>
<LinearLayout xmlns:android="http://schemas.android.com/apk/res/android"
              android:orientation="vertical"
              android:layout_width="match_parent"
              android:layout_height="match_parent">

    <EditText
            android:id="@+id/msg"
            android:layout_width="wrap_content"
            android:layout_height="wrap_content" />
    <Button
            android:id="@+id/sendmsg"
            android:layout_width="wrap_content"
            android:layout_height="wrap_content"
            android:text="Msg to JavaScript"
    />
    <WebView
            android:id="@+id/mybrowser"
            android:layout_width="wrap_content"
            android:layout_height="wrap_content"
    />
</LinearLayout>
This code contains one edit text, one button and one web view.
JavaScriptActivity.kt file get the below source snippet
import android.content.Context
import android.content.res.AssetManager
import android.support.v7.app.AlertDialog
import android.support.v7.app.AppCompatActivity
import android.os.Bundle
import android.view.View
import android.webkit.JavascriptInterface
import android.webkit.WebView
import android.widget.Button
import android.widget.EditText
import android.widget.Toast
import java.io.BufferedReader
import java.io.InputStream
import java.io.InputStreamReader

class JavaScriptActivity : AppCompatActivity() {

    private var webView: WebView? = null
    private var editText: EditText? = null
    private var button: Button? = null

    private//Handle the exception here
    val htmlData: String
        get() {
            val html = StringBuilder()
            try {
                val assetManager = assets

                val input = assetManager.open("load_JS_Demonuts.html")
                val br = BufferedReader(InputStreamReader(input))
                var line: String
                while (( br.readLine().also{ line = it } != null ))  {
                    html.append(line)
                }
                br.close()
            } catch (e: Exception) {
            }

            return html.toString()
        }

    override fun onCreate(savedInstanceState: Bundle?) {
        super.onCreate(savedInstanceState)
        setContentView(R.layout.activity_java_script)

        webView = findViewById(R.id.mybrowser) as WebView

        val myJavaScriptInterface = MyJavaScriptInterface(this)
        webView!!.addJavascriptInterface(myJavaScriptInterface, "AndroidFunction")

        webView!!.settings.javaScriptEnabled = true
        webView!!.loadData(htmlData, "text/html", "UTF-8")

        editText = findViewById(R.id.msg) as EditText
        button = findViewById(R.id.sendmsg) as Button

        button!!.setOnClickListener {
            val msgToSend = editText!!.text.toString()
            webView!!.loadUrl("javascript:callFromActivity(\"$msgToSend\")")
        }

    }

    inner class MyJavaScriptInterface internal constructor(internal var mContext: Context) {

        @JavascriptInterface
        fun showToast(toast: String) {
            Toast.makeText(mContext, toast, Toast.LENGTH_SHORT).show()
        }

        @JavascriptInterface
        fun openAndroidDialog() {
            val myDialog = AlertDialog.Builder(this@JavaScriptActivity)
            myDialog.setTitle("Dialog of JS!")
            myDialog.setMessage("I am generated from Android Code but I am in Webview and html-JS file !!!")
            myDialog.setPositiveButton("Cool!", null)
            myDialog.show()
        }

    }
}
Details of This Activity
First of all, see the below
 private var webView: WebView? = null
    private var editText: EditText? = null
    private var button: Button? = null
Compiler will create the objects of web view, edit text and button classes.
Then see the below
  val myJavaScriptInterface = MyJavaScriptInterface(this)
        webView!!.addJavascriptInterface(myJavaScriptInterface, "AndroidFunction")

        webView!!.settings.javaScriptEnabled = true
        webView!!.loadData(htmlData, "text/html", "UTF-8")
First line will create the object of MyJavaScriptInterface class. Compiler will assign this object to the variable myJavaScriptInterface
Then we will add this myJavaScriptInterface variable to the web view.
After this, compiler will enable the java script into the web view.
At last, compiler will load the data into the web view. Here, it using htmlData method for this. Below is the code lines for htmlData method.
 val htmlData: String
        get() {
            val html = StringBuilder()
            try {
                val assetManager = assets

                val input = assetManager.open("load_JS_Demonuts.html")
                val br = BufferedReader(InputStreamReader(input))
                var line: String
                while (( br.readLine().also{ line = it } != null ))  {
                    html.append(line)
                }
                br.close()
            } catch (e: Exception) {
            }

            return html.toString()
        }
This method will simply load or initiate the HTML or JavaScript file which is present in the assets folder.
Here, we are initiating load_JS_Demonuts.html file.
When the user clicks the Msg to JavaScript button, compiler will run the following lines
   button!!.setOnClickListener {
            val msgToSend = editText!!.text.toString()
            webView!!.loadUrl("javascript:callFromActivity(\"$msgToSend\")")
        }
First of all, compiler will get the text message from the edit text.
Then it will load the URL into the web view. Here, it will send the text message and this message will be read by the java script file.
At this moment compiler will run the below method from load_JS_Demonuts.html file.
 function callFromActivity(msg){
 document.getElementById("mytext").innerHTML = msg;
   }
Step 4. Loading HTML in WebView
Let us make a new activity and give it a name like HtmlActivity
Source code for activity_html.xml is like the below
<?xml version="1.0" encoding="utf-8"?>
<RelativeLayout xmlns:android="http://schemas.android.com/apk/res/android"
                xmlns:tools="http://schemas.android.com/tools"
                android:layout_width="match_parent"
                android:layout_height="match_parent">

    <WebView
            android:id="@+id/webView"
            android:layout_width="match_parent"
            android:layout_height="match_parent"
            android:layout_alignParentLeft="true"
            android:layout_alignParentStart="true"
            android:layout_alignParentTop="true" />

</RelativeLayout>
There is just one web view in this XML file.
Below is the source code lines for HtmlActivity.kt file.
import android.support.v7.app.AppCompatActivity
import android.os.Bundle
import android.webkit.WebView

class HtmlActivity : AppCompatActivity() {

    private var webView: WebView? = null

    override fun onCreate(savedInstanceState: Bundle?) {
        super.onCreate(savedInstanceState)
        setContentView(R.layout.activity_html)

        webView = findViewById(R.id.webView)

        val htmlText = "" +
                "<html>" +
                "<head>" +
                "<style = 'text/css'>" +
                ".head{background: #cecb33;color: white;padding: 10px;border-radius: 7px;}" +
                ".body{background: #FF4081;height: 75%;color: white;padding: 10px;border-radius: 7px;}" +
                ".foot{background: #40ff56;color: white;padding: 10px;border-radius: 7px;}" +
                "</style>" +
                "</head>" +
                "<body>" +
                "<div class='head'>" +
                "<h1>This HTML is loaded in WebView</h1>" +
                "</div>" +
                "<br>" +
                "<div class='body'>" +
                "<p>Body of the page</p>" +
                "<h2>Header 2</h2>" +
                "<h3>Header 3</h3>" +
                "<h4>Header 4</h4>" +
                "<h5>Header 5</h5>" +
                "</div>" +
                "<br>" +
                "<div class='foot'>" +
                "<p>Footer of the page</p>" +
                "</div>" +
                "</body>" +
                "</html>"

        webView!!.loadData(htmlText, "text/html", null)

    }
}
Look at the variable htmlText. It has some HTML lines.
Now see the following code snippet
webView!!.loadData(htmlText, "text/html", null)
This line will simply load the variable htmlText in the web view. Thus, we have loaded HTML in the web view.
Step 5. Final Wordings
There should be two files when you have created a new project. activity_main.xml and MainActivity.kt
Write down the below codes in activity_main.xml file.
<?xml version="1.0" encoding="utf-8"?>
<RelativeLayout xmlns:android="http://schemas.android.com/apk/res/android"
                xmlns:tools="http://schemas.android.com/tools"
                android:layout_width="match_parent"
                android:layout_height="match_parent"
                android:padding="60dp">

    <Button
            android:layout_width="wrap_content"
            android:layout_height="wrap_content"
            android:id="@+id/btnHtml"
            android:textSize="20sp"
            android:text="Load HTML in WebView"/>

    <Button
            android:layout_width="wrap_content"
            android:layout_height="wrap_content"
            android:id="@+id/btnJS"
            android:textSize="20sp"
            android:layout_marginTop="70dp"
            android:text="Load JavaScript in WebView"/>

</RelativeLayout>
There are two buttons in this file.
Now you should add the following coding lines in the MainActivity.kt file.
import android.content.Intent
import android.support.v7.app.AppCompatActivity
import android.os.Bundle
import android.view.View
import android.widget.Button

class MainActivity : AppCompatActivity() {

    private var btnHTML: Button? = null
    private var btnJS: Button? = null

    override fun onCreate(savedInstanceState: Bundle?) {
        super.onCreate(savedInstanceState)
        setContentView(R.layout.activity_main)

        btnHTML = findViewById(R.id.btnHtml) as Button
        btnJS = findViewById(R.id.btnJS) as Button

        btnHTML!!.setOnClickListener {
            val intent = Intent(this@MainActivity, HtmlActivity::class.java)
            startActivity(intent)
        }
        btnJS!!.setOnClickListener {
            val intent = Intent(this@MainActivity, JavaScriptActivity::class.java)
            startActivity(intent)
        }

    }
}
Compiler will first find the two buttons using their ids.
When the user clicks the “LOAD HTML IN WEBVIEW” button, compiler will open HtmlActivity.
On the click of the “LOAD JAVASCRIPT IN WEBVIEW” BUTTON, a JavaScriptActivity will be opened by a compiler.
Download Code For Kotlin Webview HTML JavaScript
https://github.com/demonuts/Kotlin-WebView-Load-HTML-JavaScript-From-Asset-In-Android-Example-