Today’s article is about Laravel 5.8 Gmail SMTP Tutorial with Example.
You will learn how to Send Email from laravel 5.8 version web site.
We need to do some Gmail Configuration in laravel project to send email using gmail SMTP.
See the following video to understand the output of this example.
Step 1. New Laravel 5.8 Project
Let us create a new laravel 5.8 project. For this, run the following command in your terminal
composer create-project laravel/laravel=5.8 lara58mailgmail --prefer-dist
This command will create a new laravel project and it’s name would be “lara58mailgmail” and version would be 5.8
Step 2. Configuration for Gmail SMTP
To use Gmail as a SMTP, we need to write some configuration lines in our project.
Open your laravel project in editor like sublime or visual studio code and open .env file. Here, see the below lines
MAIL_DRIVER=smtp
MAIL_HOST=smtp.mailtrap.io
MAIL_PORT=2525
MAIL_USERNAME=null
MAIL_PASSWORD=null
MAIL_ENCRYPTION=null
We need to change above configuration details with the below one
MAIL_DRIVER=smtp
MAIL_HOST=smtp.googlemail.com
MAIL_PORT=465
MAIL_USERNAME=something@gmail.com
MAIL_PASSWORD=gmail password
MAIL_ENCRYPTION=ssl
You do not need to change Mail host, port number and encryption. Just enter your gmail address and password.
Now you are done with configuration task.
Note : Add the gmail address and password of the sender in the above lines.
Step 3. Turning On Less Secure App
Now this step little bit easy. We need to allow less secure app access to sender’s gmail address in order to use gmail smtp in laravel.
Sender’s email address means that an email which we have added in the .env file.
To grant this less secure access, see the below image first
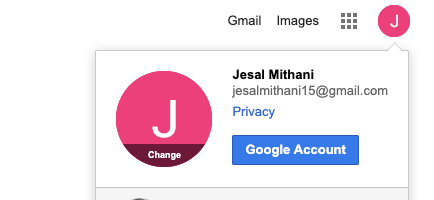
Login to your gmail account and click on profile picture. You will see the above pop up. From here, click on “Google Account” button and you will be redirected to below screen
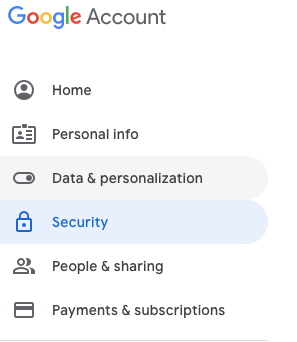
In the next screen, you will a menu bar like above image at the top left side. From this left menu bar, select the “Security” option. When you do this, system will open below screen
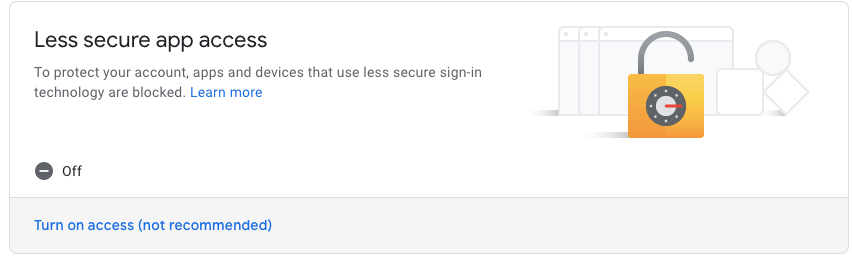
From the above screen, click on “Turn on access” tab and you will find the following image
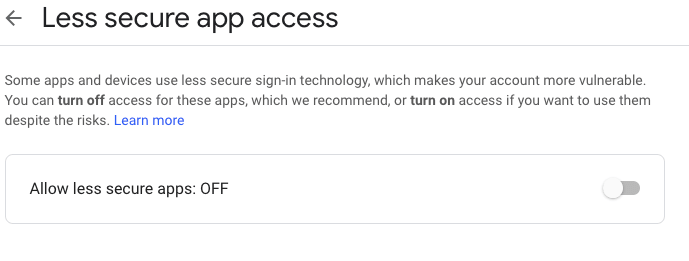
Just turn on the switch in above image and your work for allowing less secure app in complete.
Step 4. One and only Route Line
In this small example, we just need only one route.
So navigate to routes->web.php file and add the following line in it
Route::get('sendgmail58', 'SendGmailController@sendgmail58');
When the user execute http://127.0.0.1:8000/sendgmail58 URL in any web browser, compiler will use the above route line.
It will simply call the sendgmail58() function from SendGmailController.php file.
Step 5. Main Logic With Controller
Let us now create one controller file. Run the below command in your terminal screen
php artisan make:controller SendGmailController
After the successful execution of above command, go to app->Http->Controller directory.
Here, you will find a file with name SendGmailController.php
Write down the below source code lines in SendGmailController.php file.
<?php

namespace App\Http\Controllers;

use Illuminate\Http\Request;
use Mail;

class SendGmailController extends Controller
{
    //
    public function sendgmail58()
    {
        $data = array('name'=>"Hardik Parsania", "body" => "Gmail from Laravel");

        Mail::send('gmailview', $data, function($message) {
            $message->to('johndoesense12@gmail.com', 'John Doe')
            ->subject('From Laravel With Gmail');
            $message->from('jesalmithani15@gmail.com',' Jesal Mithani');

          });

          if (Mail::failures()) {
            return response()->Fail('Sorry! Please try again latter');
          }else{
            return response()->json('Yes, You have sent email to GMAIL from LARAVEL 5.8 !!');
          }
   }
}
Now let us see the above code in details.
First of all, see the below code lines
  Mail::send('gmailview', $data, function($message) {
            $message->to('johndoesense12@gmail.com', 'John Doe')
            ->subject('From Laravel With Gmail');
            $message->from('jesalmithani15@gmail.com',' Jesal Mithani');

          });
Look at the first line. It has two parameters. First parameter holds the name of the blade view file. So, it is referring the file named gmailview.blade.php
Compiler will use this gmailview.blade.php file, while making the look and feel of the email.
Now see the second line. It is defining the email address of the receiver. It also has two parameters. First one is the email address and second one is the name of the receiver.
Third line is writing the subject of the email. You can write any one of your choice.
Last line is writing the email address and name of the sender. Again, first parameter is the email address and second one is the name of the sender.
Step 6. Final coding of View file
Our last work in this example is to make a blade view file. So go to resources->views directory and create a new file with the name gmailview.blade.php
You should write down the below source code lines in this gmailview.blade.php file.
<!DOCTYPE html>
<html>
<style>
body {font-family: Arial, Helvetica, sans-serif;}

form {
  border: 3px solid #f1f1f1;
  font-family: Arial;
}

.container {
  padding: 20px;
  background-color: #f1f1f1;
}

input[type=text], input[type=submit] {
  width: 100%;
  padding: 12px;
  margin: 8px 0;
  display: inline-block;
  border: 1px solid #ccc;
  box-sizing: border-box;
}

input[type=checkbox] {
  margin-top: 16px;
}

input[type=submit] {
  background-color: #4CAF50;
  color: white;
  border: none;
}

input[type=submit]:hover {
  opacity: 0.8;
}
</style>
<body>

<h2>CSS Newsletter</h2>

<form >
  <div class="container">
    <h2>Subscribe to our Newsletter</h2>
    <p>Click the below button to subscribe.</p>
  </div>

  <div class="container" style="background-color:white">
    <input type="text" placeholder="Name" name="name" required>
    <input type="text" placeholder="Email address" name="mail" required>
    <label>
      <input type="checkbox" checked="checked" name="subscribe"> Daily Newsletter
    </label>
  </div>

  <div class="container">
    <input type="submit" value="Subscribe">
  </div>
</form>

</body>
</html>
System will use the above HTML code to generate the look and feel of the email.
You can customize this file as per your requirements and this is all for this tutorial.
Download Code From Github
https://github.com/demonuts/Laravel-5.8-Gmail-SMTP-Laravel-Send-Email-SMTP-Gmail-Configuration