Read about Laravel hasManyThrough Eloquent Example.
Laravel has several types of eloquent relationships by default. Such as one to one, one to many, many to many etc.
This various eloquent relationships helps developers to write efficient code in less time.
Laravel hasManyThrough Eloquent Relationship
Laravel hasManyThrough Eloquent relationship takes place among three tables of database.
Upper level table has relationship with many rows of middle level table and middle level table has relationship with many rows of lower level table.
For example, upper level table is shops , middle level table is products and lower level table is orders.
Any shop can have many types of products (electronic, furniture etc). Similarly, products can have more than of one type of order (single order, bulk order etc).
Now, with the use of hasManyThrough() function, we can fetch the records of lower level table orders with model of upper level table shops.
See the below image for live example.
shops have many products and products have many orders.
Now if you wish to get rows of orders table using Shop model, hasManyThrough relationship will help us for this.
Let us see how we can use above tables in live laravel project but before that take a look at the below video, which is the final output of our example.
Step 1. Fresh new project and database
First of all, run the following command
laravel new laramanythrough
Now, go to your database administration tool. I am using sequel pro for macbook. If you are using phpMyAdmin or any other, than it also compatible.
In your database tool, make a new database and give it a name like “laramanythrough”
Now we need to connect this database with our laravel project.
For that, open your editor and navigate to .env file.
You need to update below lines in your .env file.
DB_CONNECTION=mysql
DB_HOST=127.0.0.1
DB_PORT=3306
DB_DATABASE=laramanythrough
DB_USERNAME=root
DB_PASSWORD=
Update database name, username etc. above fields as per your computer configuration.
Now both our new laravel project and database have connected with each other.
Step 2. Creating Three Tables
We need to make three tables ( upper, middle and lower ) in database.
So first of all, run the below command
php artisan make:migration create_shops_table
Then, run the following command
php artisan make:migration create_products_table
Finally, trigger the below command
php artisan make:migration create_orders_table
Above three commands will create three tables like shops, products and orders respectively.
Now, Go to database->migrations directory and open timestamp_create_shops_table.php file.
Add the following source snippet in timestamp_create_shops_table.php file.
<?php

use Illuminate\Support\Facades\Schema;
use Illuminate\Database\Schema\Blueprint;
use Illuminate\Database\Migrations\Migration;

class CreateShopsTable extends Migration
{
    /**
     * Run the migrations.
     *
     * @return void
     */
    public function up()
    {
        Schema::create('shops', function (Blueprint $table) {
            $table->bigIncrements('id');
            $table->string('shop_name');
            $table->timestamps();
        });
    }

    /**
     * Reverse the migrations.
     *
     * @return void
     */
    public function down()
    {
        Schema::dropIfExists('shops');
    }
}
up() function in above code includes column names for shops table.
Now write down the below code in timestamp_create_products_table.php file.
<?php

use Illuminate\Support\Facades\Schema;
use Illuminate\Database\Schema\Blueprint;
use Illuminate\Database\Migrations\Migration;

class CreateProductsTable extends Migration
{
    /**
     * Run the migrations.
     *
     * @return void
     */
    public function up()
    {
        Schema::create('products', function (Blueprint $table) {
            $table->bigIncrements('id');
            $table->string('products_name');
            $table->bigInteger('shop_id')->unsigned()->index();
            $table->timestamps();
            $table->foreign('shop_id')->references('id')->on('shops')
                ->onDelete('cascade');
        });
    }

    /**
     * Reverse the migrations.
     *
     * @return void
     */
    public function down()
    {
        Schema::dropIfExists('products');
    }
}
Column names of products table are included in the up() method of above code.
It has shop_id as the foreign key. This foreign is referencing the id field of shops table.
Now open the timestamp_create_orders_table.php file and write the following source snippet in it.
<?php

use Illuminate\Support\Facades\Schema;
use Illuminate\Database\Schema\Blueprint;
use Illuminate\Database\Migrations\Migration;

class CreateOrdersTable extends Migration
{
    /**
     * Run the migrations.
     *
     * @return void
     */
    public function up()
    {
        Schema::create('orders', function (Blueprint $table) {
            $table->bigIncrements('id');
            $table->string("order_name");
            $table->bigInteger('product_id')->unsigned()->index();
            $table->timestamps();
            $table->foreign('product_id')->references('id')->on('products')
                ->onDelete('cascade');
        });
    }

    /**
     * Reverse the migrations.
     *
     * @return void
     */
    public function down()
    {
        Schema::dropIfExists('orders');
    }
}
This order table migration file uses product_id as the foreign key and it is representing id from the products table.
After setting up all three migrations file, run the following command
php artisan migrate
Now check your database. You should see all the tables.
Step 3. Writing Models
We need to create three model file in this example.
So, run the below command in terminal
php artisan make:model Shop
Then, go for below command
php artisan make:model Product
At last, trigger the following one
php artisan make:model Order
So, these three commands will create Shop.php , Product.php and Order.php model files respectively.
Here, we do not need to add anything in two models : Order.php and Product.php
Source code for Order.php is as the below
<?php

namespace App;

use Illuminate\Database\Eloquent\Model;

class Order extends Model
{
    //
}
Product.php should have the following code snippet
<?php

namespace App;

use Illuminate\Database\Eloquent\Model;

class Product extends Model
{
    //
}
So no need to do anything in above two files.
We will add main logic in Shop.php file. Below is the main source code for Shop.php file.
<?php

namespace App;

use Illuminate\Database\Eloquent\Model;

class Shop extends Model
{
    //
    public function orders()
    {
        return $this->hasManyThrough(
            Order::class,
            Product::class,
            'shop_id', // Foreign key on products table...
            'product_id', // Foreign key on orders table...
            'id', // Local key on countries table...
            'id' // Local key on users table...
        );
    }
}
This file uses hasManyThrough() function to define this relationship.
First parameter is the table from which we want to fetch records. For this record, we will use products table as a mediator.
Step 4. Filling Database
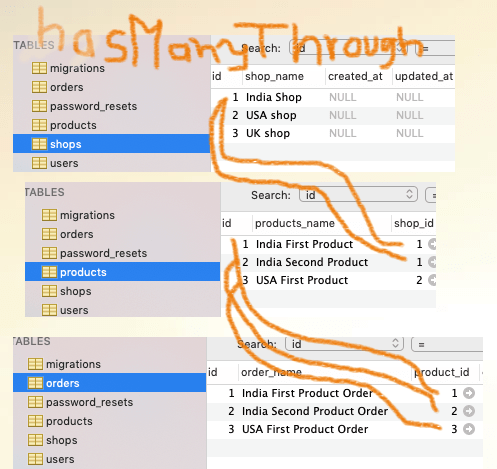
Let us manually add some rows in all three database tables.
Take a look at the following image
As per the image, add three rows in all three tables with values as per the above image.
Step 5. Controller and Route Tasks
Go to routes->web.php file and add the below source line in it
Route::get('manythrough','ShopsController@shopOrder');
It is defining one route. When the user visits “http://127.0.0.1:8000/manythrough” link in his browser, compiler will run this route.
Compiler will run the shopOrder() function from ShopsController.php file.
For making ShopsController.php file, run the following command
php artisan make:controller ShopsController
After this command, you will see that under app->Http->Controllers directory, your controller file has generated by the compiler.
Now write down the below source snippet in ShopsController.php file
<?php

namespace App\Http\Controllers;

use Illuminate\Http\Request;
use App\Shop;
use App\Order;

class ShopsController extends Controller
{
    //
    public function shopOrder()
    {

        $shops = Shop::find(1);
        $shopOrders = $shops->orders;

        $shops = Shop::find(2);
        $shopOrdersTwo = $shops->orders;

        $shops = Shop::find(3);
        $shopOrdersThree = $shops->orders;

        //dd($shops->orders);

        return view('index',compact('shopOrders','shopOrdersTwo','shopOrdersThree'));

    }
}
First line in the above snippet will give us the rows from the orders table. See that we are using Shop model for fetching records from orders table.
This line will fetch the rows where the value of id is 1 in shops table. Now question arise, there is no reference between shops and orders table then how we can do this ? For this see the below image
shops and orders have reference between each other via products table. orders table have product_id which referring id from products table. Now, products table have shop_id which is referring id from shops table.
You can see that orders table have 1,2 and 3 values as product_id. Now, check products table, among 1,2 and 3 values of id, 1 and 2 have value 1 as a shop_id.
Thus, a line $shop = Shop::find(1) will return first two rows from orders table.
Similarly, we will get the rows from orders table for shop_id 2 and 3.
At last, compiler will give one return statement, which will open the index.blade.php view file. Along with this file, it will send variables as a parameter.
Step 6. Last step of view file
Navigate to resources->views directory and make a new file index.blade.php
You need to add following source code in index.blade.php
<html>
<head>

</head>
<style>


</style>

<h1> Laravel  hasManyThrough Example </h1>

<h3> All Orders for India Shop </h3>

@foreach ($shopOrders as $order)
<li>

    {{ $order->order_name }}

</li>
@endforeach

<h3> All Orders for USA Shop </h3>

@foreach ($shopOrdersTwo as $order)
<li>

    {{ $order->order_name }}

</li>
@endforeach

<h3> All Orders for UK Shop </h3>

@foreach ($shopOrdersThree as $order)
<li>

    {{ $order->order_name }}

</li>
@endforeach


</html>
In this file, we will display all the records, that we have fetched from the orders table.
For this, we will use those variables which we have written in the return statement in the controller function.