
Laravel hasOneThrough Tutorial With Example For Beginners is today’s matter.
hasOneThrough is one types of laravel eloquent relationships. There are several types of eloquent relationships in laravel.
Below are some useful tutorials for eloquent relationships
Laravel hasOneThrough Relationship
The “has-one-through” relationship links models through a single intermediate relation.
For example, if each supplier has one product, and each product is associated with only one order, then the supplier model may access the product’s order through the product.
See the below image
Watch the following video first.
Step 1. Initial task as new project
First of all, go to your terminal and run the below command
laravel new larahasone
It will create a new laravel project and the name of the project will be “larahasone”
Now to connect this new laravel project with MySQL database, go to your database administration tool like sequel pro , phpMyAdmin etc. and make a new database and give it a name like “larahasone”
Now, open your laravel project in code editor and see the below lines in .env file.
DB_CONNECTION=mysql
DB_HOST=127.0.0.1
DB_PORT=3306
DB_DATABASE=larahasone
DB_USERNAME=root
DB_PASSWORD=
These lines are making configurations like username, password, database name etc.
Just add credentials as per your computer environment and then your laravel project and database is connected with each other.
Step 2. Add Tables in Database
Time to create three tables : products, suppliers and orders
Three commands are as the below
php artisan make:migration create_suppliers_table
For products,
php artisan make:migration create_products_table
And at last, for orders
php artisan make:migration create_orders_table
Now, Go to database->migrations directory. Here, you will find three new files.
Among them, first open timestamp_create_suppliers_table.php file and add the following code in it
<?php

use Illuminate\Support\Facades\Schema;
use Illuminate\Database\Schema\Blueprint;
use Illuminate\Database\Migrations\Migration;

class CreateSuppliersTable extends Migration
{
    /**
     * Run the migrations.
     *
     * @return void
     */
    public function up()
    {
        Schema::create('suppliers', function (Blueprint $table) {
            $table->bigIncrements('id');
            $table->string('supplier_name');
        });
    }

    /**
     * Reverse the migrations.
     *
     * @return void
     */
    public function down()
    {
        Schema::dropIfExists('suppliers');
    }
}
Look at the up() function in above snippet. It has two lines which is defining two column names as “id” and “supplier_name”
Now second migration file is timestamp_create_products_table.php file and it should contain the below source snippet
<?php

use Illuminate\Support\Facades\Schema;
use Illuminate\Database\Schema\Blueprint;
use Illuminate\Database\Migrations\Migration;

class CreateProductsTable extends Migration
{
    /**
     * Run the migrations.
     *
     * @return void
     */
    public function up()
    {
        Schema::create('products', function (Blueprint $table) {
            $table->bigIncrements('id');
            $table->string('product_name');
            $table->bigInteger('supplier_id')->unsigned()->index();
            $table->foreign('supplier_id')->references('id')->on('suppliers')
                ->onDelete('cascade');
        });
    }

    /**
     * Reverse the migrations.
     *
     * @return void
     */
    public function down()
    {
        Schema::dropIfExists('products');
    }
}
It’s up() function also includes some column names like id , product_name, supplier_id (a foreign key)
Final file is timestamp_create_orders_table.php file and you need to write below code lines in it
<?php

use Illuminate\Support\Facades\Schema;
use Illuminate\Database\Schema\Blueprint;
use Illuminate\Database\Migrations\Migration;

class CreateOrdersTable extends Migration
{
    /**
     * Run the migrations.
     *
     * @return void
     */
    public function up()
    {
        Schema::create('orders', function (Blueprint $table) {
            $table->bigIncrements('id');
            $table->string('order_name');
            $table->bigInteger('product_id')->unsigned()->index();
            $table->foreign('product_id')->references('id')->on('products')
                ->onDelete('cascade');
        });
    }

    /**
     * Reverse the migrations.
     *
     * @return void
     */
    public function down()
    {
        Schema::dropIfExists('orders');
    }
}
Column names for orders table are id, order_name, and product_id which is foreign key and it is referring to the id column of products table.
After writing all three migrations file, run the below command
php artisan migrate
This command will make three tables into the database.
Step 3. All the Model Works
Now it is time to make some model files.
First of all, run the below command in your terminal
php artisan make:model Supplier
Now for Product
php artisan make:model Product
And last one for Order
php artisan make:model Order
After triggering all three commands, system will create three model files in app folder.
So go to app folder and open Supplier.php file. Write down the following source lines in it
<?php

namespace App;

use Illuminate\Database\Eloquent\Model;

class Supplier extends Model
{
    //
    public function orders()
    {
        return $this->hasOneThrough(
            Order::class,
            Product::class,
            'supplier_id', // Foreign key on products table...
            'product_id', // Foreign key on orders table...
            'id', // Local key on suppliers table...
            'id' // Local key on products table...
        );
    }
}
orders() function includes the usage of hasOneThrough() method. This method is telling compiler that we can access the rows of orders table using Supplier model through products table.
hasOneThrough() method also defines the relations based on the foreign key between any two table.
Other two model classes Product.php and Order.php should not contain any manual code means that we do not need to write anything in these two classes.
Now open up Product.php file and you should see the code as the below
<?php

namespace App;

use Illuminate\Database\Eloquent\Model;

class Product extends Model
{
    //
}
And for Order.php , source snippet should look like the below
<?php

namespace App;

use Illuminate\Database\Eloquent\Model;

class Order extends Model
{
    //
}
Step 4. Completing Database
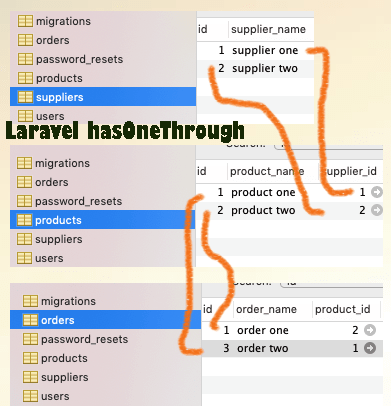
Add some rows in to all three tables as per shown in the below image
Step 5. One Route and One Controller
To add the route, go to routes->web.php file and the following line in it
Route::get('hasone','OneController@hasone');
When the user visits “http://127.0.0.1:8000/hasone” link in his browser, compiler will run this route. This route will execute hasone() function from OneController.php file.
Now let us create an controller file. For this, trigger the below command
php artisan make:controller OneController
After this command, you will see that under app->Http->Controllers directory, your controller file has generated by the compiler.
Now open OneController.php file and write the following source line snippet
<?php

namespace App\Http\Controllers;

use Illuminate\Http\Request;
use App\Supplier;
use App\Product;
use App\Order;

class OneController extends Controller
{
    //
    public function hasone()
    {
        $suppliers = Supplier::find(1);
        $supplier_one = $suppliers->orders;
        //dd($supplier_one);

        $suppliers = Supplier::find(2);
        $supplier_two = $suppliers->orders;

        return view('index',compact('supplier_one','supplier_two'));

    }
}
First, see the below image
First two lines will get the rows from orders table. It will get the rows for first supplier. For this, compiler will use products table as a mediator.
First of all, compiler will go to products table and will get the row where supplier_id is 1. It will note the product_id of this row. Here, it is 1 . After this, compiler will go to orders table and and will get the row where product_id is 1. Here, it is second row and order_name is order two . (You can see this whole scenario in above image)
Similarly, second and third lines will get the row from orders table for supplier 2.
At last, there is one return statement. This statement will redirect the compiler to the index view file. Return system will pass some variable as a parameter.
Step 6. Displaying the Final Results
After fetching the row from orders table, we are left with displaying them.
For this, go to resources->views directory and make a new file index.blade.php
You should add the below source code snippet in index.blade.php
<html>
<head>

</head>
<style>


</style>

<h1> Laravel  hasOneThrough Example </h1>

<h3> Order of Supplier one </h3>

<li>

    {{ $supplier_one->order_name }}

</li>

<h3> Order of Supplier two </h3>

<li>

    {{ $supplier_two->order_name }}

</li>


</html>
As you can see that I have used very simple html code to display results.
We are using variable which we have written in the return statement in the controller file.