Laravel One To Many Polymorphic Eloquent Relationship Example Tutorial.
Eloquent relationship is the most comfortable concept of laravel framework. It makes database work muck more easier for developers.
There are different types of eloquent relationships in laravel like :
- Laravel One to one relationship
- One to many eloquent relationship in Laravel
- Laravel Many to many relationship
Today, I will teach you about laravel one to Many Polymorphic relationship with example.
Laravel One to Many Polymorphic
It’s not uncommon in software development to have models that can belong to more than one entity. This type of model maintains the same structure that doesn’t change regardless of the other model it’s connected to.
A common example of this kind of scenario is comments. In a blog post with video for example, comments can go on a post or a video but maintain the same structure regardless if it’s a post or a video.
See the below image.
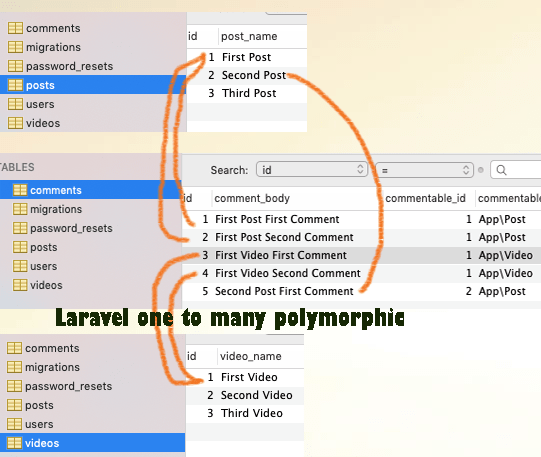
You can see that there is only one table for comments of both post and videos.
We can determine the whether comment is for post or for video using commentable_type column.
To determine which post or video is belongs to any comment, you can use commentable_id
Before starting, just see the below video which tells about output of this tutorial.
Step 1. New Laravel Project and Database
To create a new laravel project, run the following command
laravel new laraonetomanypoly
This command will make a new project and it’s name should be “laraonetomanypoly”
After making a new laravel project, we need to connect it with database.
For making a new database, go to your database administration tool like sequel pro or phpMyAdmin or whatever you are using.
Make a new database and set the name as “laraonetomanypoly”
Now open your code editor and open the laravel project. open .env file from newly created project.
You need to update following details in .env file.
DB_CONNECTION=mysql
DB_HOST=127.0.0.1
DB_PORT=3306
DB_DATABASE=laraonetomanypoly
DB_USERNAME=root
DB_PASSWORD=
Update database name, username, password etc. above details as per your configuration.
Once you do it, your laravel project is connected with the database.
Step 2. Some Tables in Database
After new project and database, let us create three tables in this database.
First of all, fire up the below command in your terminal.
php artisan make:migration create_posts_table
After this, also run the below two commands
php artisan make:migration create_comments_table
and another is
php artisan make:migration create_videos_table
These three commands are for creating new tables. After successful execution of above three commands, you will find three migration files inside database->migrations directory.
First of all, open timestamp_create_posts_table.php file in your editor and add the following source code in it.
<?php

use Illuminate\Support\Facades\Schema;
use Illuminate\Database\Schema\Blueprint;
use Illuminate\Database\Migrations\Migration;

class CreatePostsTable extends Migration
{
    /**
     * Run the migrations.
     *
     * @return void
     */
    public function up()
    {
        Schema::create('posts', function (Blueprint $table) {
            $table->bigIncrements('id');
            $table->string("post_name");
            $table->timestamps();
        });
    }

    /**
     * Reverse the migrations.
     *
     * @return void
     */
    public function down()
    {
        Schema::dropIfExists('posts');
    }
}
Above file is for posts table. up() function is defining the column names ( id and post_name ) of posts table.
Now, there is another file named timestamp_create_videos_table.php file in the same directory.
Write down the following source lines in timestamp_create_videos_table.php
<?php

use Illuminate\Support\Facades\Schema;
use Illuminate\Database\Schema\Blueprint;
use Illuminate\Database\Migrations\Migration;

class CreateVideosTable extends Migration
{
    /**
     * Run the migrations.
     *
     * @return void
     */
    public function up()
    {
        Schema::create('videos', function (Blueprint $table) {
            $table->bigIncrements('id');
            $table->string("video_name");
            $table->timestamps();
        });
    }

    /**
     * Reverse the migrations.
     *
     * @return void
     */
    public function down()
    {
        Schema::dropIfExists('videos');
    }
}
This migration file will help us to write column names ( id and video_name ) of videos table.
Last migration file is timestamp_create_comments_table.php and below is it’s source snippet
<?php

use Illuminate\Support\Facades\Schema;
use Illuminate\Database\Schema\Blueprint;
use Illuminate\Database\Migrations\Migration;

class CreateCommentsTable extends Migration
{
    /**
     * Run the migrations.
     *
     * @return void
     */
    public function up()
    {
        Schema::create('comments', function (Blueprint $table) {
            $table->bigIncrements('id');
            $table->string("comment_body");
            $table->integer('commentable_id');
            $table->string("commentable_type");
            $table->timestamps();
        });
    }

    /**
     * Reverse the migrations.
     *
     * @return void
     */
    public function down()
    {
        Schema::dropIfExists('comments');
    }
}
Above includes four column names ( id, comment_body, commentable_id and commentable_type ) in up() function for comments table.
After writing all three migration files, now run the below command
php artisan migrate
Now see your database administration tool, you should find three tables posts, comments and videos there.
Step 3. Define Three Models
Along with three migration files, we need to create three models which will define the one to many polymorphic relationship.
For this, run the following command
php artisan make:model Post
then also need to fire below two commands
php artisan make:model Video
and second one is
php artisan make:model Comment
First command will make a model Post.php , second will create Video.php and third one will make Comment.php file inside app folder.
In Post.php file, write down the below code
<?php

namespace App;

use Illuminate\Database\Eloquent\Model;

class Post extends Model
{
    //
    public function comments()
    {
        return $this->morphMany(Comment::class, 'commentable');
    }
}
This file uses morphMany() function to define one to many polymorphic relationship.
It is saying that post table can refer the records of comments table where column name starts with commentable keyword.
Now add the following source snippet in Video.php file.
<?php

namespace App;

use Illuminate\Database\Eloquent\Model;

class Video extends Model
{
    //
    public function comments()
    {
        return $this->morphMany(Comment::class, 'commentable');
    }
}
This model file also uses morphMany() method to have reference to comments table.
Now finally, write the below source code lines in Comment.php file.
<?php

namespace App;

use Illuminate\Database\Eloquent\Model;

class Comment extends Model
{
    //
    public function commentable()
    {
        return $this->morphTo();
    }
}
Now look closely at commentable() function. It uses morphTo() method means that it is other two tables can access comments table via commentable() and morphTo() method.
Step 4. Filling the Database
In order to create polymorphic one to many relationship, we need to add some rows in the database. We will manually add records in the database.
So go to your database administrator tool and add the rows as per the below image.
You need to add three rows in posts table, five rows in comments table and three rows in videos table as per the above image.
Step 5. Adding Route + Controller
Now it is time to write one route for our laravel project.
In your routes->web.php file, add the below line to define the route.
Route::get('onetomanypoly','OnemanypolyController@onemanypoly');
When the user runs “http://127.0.0.1:8000/onetomanypoly” in the browser, system will execute the onemanypoly() function from OnemanypolyController.php file.
Run the following command
php artisan make:controller OnemanypolyController
This command will create a controller file.
After inserting route, create a new file under app->Http->Controllers directory and give it a name like OnemanypolyController.php
In this newly created OnemanypolyController.php file, write the following coding lines
<?php

namespace App\Http\Controllers;

use Illuminate\Http\Request;
use App\Post;
use App\Comment;
use App\Video;

class OnemanypolyController extends Controller
{
    //
    public function onemanypoly()
    {

       $firstPost = Post::find(1);
       $commentsFirst = $firstPost->comments;

       $secondPost = Post::find(2);
       $commentsSecond = $secondPost->comments;

       $firstVideo = Video::find(1);
       $commentVideo = $firstVideo->comments;
       //dd($post->comments);

       return view('index',compact('commentsFirst','commentsSecond','commentVideo'));
    }
}
onemanypoly() function is the important part of the whole tutorial.
Look at the first line, it will fetch all the records from comments table where commentable_type is App\Post and commentable_id is 1
Similarly, third line will fetch rows from comments table where commentable_type is App\Post and commentable_id is 2
Fifth line is little different, it will read all the rows from comments table where commentable_id is equal to 1 and commentable_type is App\Video
Finally, a return statement will tell compiler to open view file whose name is index.blade.php
Step 6. Blade File to Display Result
In resources->views directory, make a new layout file and give it a name like “index.blade.php”
You need to write below code lines in index.blade.php
<html>
<head>

</head>
<style>


</style>

<h1> Laravel One to Many Polymorphic Example </h1>

<h3> First Post Comments </h3>

@foreach ($commentsFirst as $comments)
<li>

    {{ $comments->comment_body}}

</li>
@endforeach

<h3> Second Post Comments </h3>

@foreach ($commentsSecond as $comments)
<li>

    {{ $comments->comment_body}}

</li>
@endforeach

<h3> First Video Comments </h3>

@foreach ($commentVideo as $comments)
<li>

    {{ $comments->comment_body}}

</li>
@endforeach

</body>
</html>
We can access the variables which were passes as a parameter in the return statement of the controller file.
Using these variables, we can display results using foreach loops.