We will look on Laravel One To One Polymorphic Eloquent Example Tutorial today.
Laravel has rich in-built concept called “Eloquent relationship” , which allows us to maintain relationship among various tables easily.
Following are few articles for various types of eloquent relationships in laravel.
- Laravel one to many polymorphic example
- One to one eloquent relationship in laravel
- Laravel one to many eloquent relationship example
Today, you will have some useful information about one to one polymorphic example.
Laravel One to One Polymorphic Eloquent Example
This relationship enable us to use one single table for ant item which can be used for more than one purpose and which also have one to one in nature.
For example, let us assume that we are maintaining the goals for various teams and it’s players. Now note that each team and player can have maximum of only one goal. (One is not practically possible but we are just assuming for this tutorial )
As you can see that goals table have goals which belongs to teams and players. Every team and player can maximum have one goal.
You can decide whether goal belongs to team or player using the combination of goalable_id and goalable_type
Step 1. Initial Tasks
First task is to make a new project in laravel. For this, run the following command in your terminal
laravel new laraonetoonepoly
It will make a new project named “laraonetoonepoly”
Now we need to connect this new laravel project with database. For this, use your database administration tool like sequel pro, phpMyAdmin etc.
Just create a new database in your tool and give it a name like “laraOnetoOnePolym”
After this, open your laravel project in your favorite code editor. Mine is visual studio code. Now open .env file of your project.
You need to change below details in .env file.
DB_CONNECTION=mysql
DB_HOST=127.0.0.1
DB_PORT=3306
DB_DATABASE=laraOnetoOnePolym
DB_USERNAME=root
DB_PASSWORD=
Just change the above lines as per your computer configurations. Once you do this, your laravel project is successfully connected with the database.
Step 2. Adding Tables in Database
We will work with three tables in this example : teams, players and goals
To create these tables, trigger the below command first,
php artisan make:migration create_teams_table
Then, run the following
php artisan make:migration create_players_table
and finally, use this command
php artisan make:migration create_goals_table
All above commands will make one migration file inside database->migrations directory.
First of all, open the database->migrations->timestamp_create_teams_table.php file and add the below source code on it.
<?php

use Illuminate\Support\Facades\Schema;
use Illuminate\Database\Schema\Blueprint;
use Illuminate\Database\Migrations\Migration;

class CreateTeamsTable extends Migration
{
    /**
     * Run the migrations.
     *
     * @return void
     */
    public function up()
    {
        Schema::create('teams', function (Blueprint $table) {
            $table->bigIncrements('id');
            $table->string("team_name");
        });
    }

    /**
     * Reverse the migrations.
     *
     * @return void
     */
    public function down()
    {
        Schema::dropIfExists('teams');
    }
}
Above migration file is for teams table. I have defined two column names ( id and team_name ) inside up() function.
Now you need to write down the following source lines in database->migrations->timestamp_create_players_table.php file
<?php

use Illuminate\Support\Facades\Schema;
use Illuminate\Database\Schema\Blueprint;
use Illuminate\Database\Migrations\Migration;

class CreatePlayersTable extends Migration
{
    /**
     * Run the migrations.
     *
     * @return void
     */
    public function up()
    {
        Schema::create('players', function (Blueprint $table) {
            $table->bigIncrements('id');
            $table->string("player_name");
        });
    }

    /**
     * Reverse the migrations.
     *
     * @return void
     */
    public function down()
    {
        Schema::dropIfExists('players');
    }
}
This file is for players table. Similar to teams table, this table has also two columns ( id and player_name ) in up() method.
Now it is goals turn. Open the database->migrations->timestamp_create_goals_table.php file and write the below lines
<?php

use Illuminate\Support\Facades\Schema;
use Illuminate\Database\Schema\Blueprint;
use Illuminate\Database\Migrations\Migration;

class CreateGoalsTable extends Migration
{
    /**
     * Run the migrations.
     *
     * @return void
     */
    public function up()
    {
        Schema::create('goals', function (Blueprint $table) {
            $table->bigIncrements('id');
            $table->string("goal_body");
            $table->integer('goalable_id');
            $table->string("goalable_type");
        });
    }

    /**
     * Reverse the migrations.
     *
     * @return void
     */
    public function down()
    {
        Schema::dropIfExists('goals');
    }
}
Now up() function of this file has four lines for four columns ( id, goal_body, goalable_id, goalable_type ).
Migration files are complete now. Trigger the below command
php artisan migrate
This command will finally create all three tables with columns that we have defined in the various migration files.
You can see these tables in your database administration tool.
Step 3. Writing Model Files
Now we need to create model files for each table. This model files will define a function which will enable one to one polymorphic relationship in our laravel project.
First of all, run the below command
php artisan make:model Team
Then second command is like following
php artisan make:model Player
and last one will be
php artisan make:model Goal
These three commands will create three model files like Team.php , Player.php and Goal.php respectively inside app folder.
Now open your Team.php file and write the below lines in it
<?php

namespace App;

use Illuminate\Database\Eloquent\Model;

class Team extends Model
{
    //
     public function goals()
     {
         return $this->morphOne(Goal::class, 'goalable');
     }
}
There is a goals() function and it contains morphOne() function. It means that one team has one and only goal and we can fetch this goal from goals table using Team model (We will do this in controller file).
After this, open Player.php file and add the following lines
<?php

namespace App;

use Illuminate\Database\Eloquent\Model;

class Player extends Model
{
    //
    public function goals()
    {
        return $this->morphOne(Goal::class, 'goalable');
    }
}
This file is almost similar to Team.php file.
It also uses goals() function and morphOne() inside this goals() function. We can fetch the row from the goals table ( a goal belongs to any particular player) using Player model.
Finally, last model file is Goal.php and below is it’s source code lines
<?php

namespace App;

use Illuminate\Database\Eloquent\Model;

class Goal extends Model
{
    //
    public function goalable()
    {
        return $this->morphTo();
    }
}
It includes goalable() function and uses morphTo() method. goalable() function is representing two columns in goals table like goalable_id and goalable_type
Step 3. Adding rows to Database
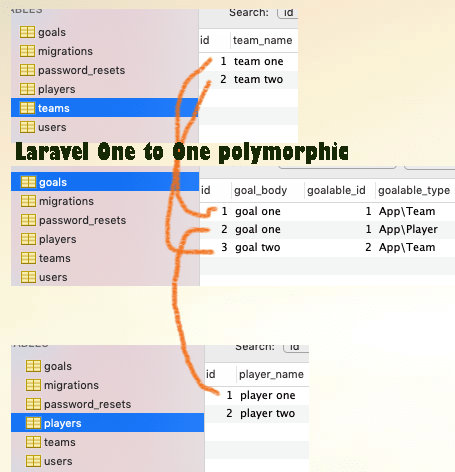
See the below image first,
Add rows into goals, teams and players table as per the above image.
Step 4. Writing Main Root and Controller file
We require only root line in this example so go on and add the following line in routes->web.php file.
Route::get('onetonepolym','OneonepolymController@oneonepolym');
When the user calls “http://127.0.0.1:8000/onetonepolym” in the browser, compiler will run the
<?php

/*
|--------------------------------------------------------------------------
| Web Routes
|--------------------------------------------------------------------------
|
| Here is where you can register web routes for your application. These
| routes are loaded by the RouteServiceProvider within a group which
| contains the "web" middleware group. Now create something great!
|
*/

Route::get('/', function () {
    return view('welcome');
});

Route::get('onetonepolym','OneonepolymController@oneonepolym');
To make a controller file, trigger the below command
php artisan make:controller OneonepolymController
Now navigate to app->Http->Controllers directory and open OneonepolymController.php file.
You should add the below code lines in this OneonepolymController.php file.
<?php

namespace App\Http\Controllers;

use Illuminate\Http\Request;
use App\Team;
use App\Player;
use App\Goal;

class OneonepolymController extends Controller
{
    //
    public function oneonepolym()
    {

       $firstTeam = Team::find(1);
       $goalFirstTeam = $firstTeam->goals;
       //dd($goalFirstTeam->goal_body);

       $firstPlayer = Player::find(1);
       $goalFirstPlayer = $firstPlayer->goals;

       $secondTeam = Team::find(2);
       $goalSecondTeam = $secondTeam->goals;

       return view('index',compact('goalFirstTeam','goalFirstPlayer','goalSecondTeam'));
    }
}
You can see that I have defined oneonepolym() function which system is calling when user runs http://127.0.0.1:8000/onetonepolym” in the browser.
First and second lines of this function is getting the rows from goals table using Team model. This line will fetch the row from goals table where goalable_id is 1 and goalable_type is App\Team
Then third and fourth lines will get the rows from goals table where goalable_id is 1 and goalable_type is App\Player
Here, compiler will use Player model.
Fifth and sixth lines are also getting rows from goals table where goalable_id is 2 and goalable_type is App\Team using Team Model.
Similarly, you can fetch the records for different id and types.
Finally, last line will return the compiler to one blade layout file. Here, it will also send some variables to this layout file.
Step 5. Final Layout Blade File
In resources->views directory, make a new layout file and give it a name like “index.blade.php”
Insert the below source codes in this file.
<html>
<head>

</head>
<style>


</style>

<h1> Laravel One to One Polymorphic Example </h1>

<h3> First Team Goal </h3>

<li>
    {{ $goalFirstTeam->goal_body}}
</li>

<h3> First Player Goal </h3>

<li>
    {{ $goalFirstPlayer->goal_body}}
</li>

<h3> Second Team Goal </h3>

<li>
    {{ $goalSecondTeam->goal_body}}
</li>


</body>
</html>
This is using simple HTML code to print the final results.
We are using variables which compiler has sent us in the return statement from the controller file.