Laravel one to one relationship example is explained here.
As you might know that laravel uses eloquent ORM model to maintain relation between two or more tables of the database.
Relation between database records have certain types like :
- One to One
- One to Many
- Many to Many etc.
All the types has different concept as their name suggests.
Today, I will teach you about one to one relationship of laravel in detail.
One to One Eloquent Relationship
Laravel eloquent one to one relationship is based on the relation between two records in the database.
It primary tells that one row of one table has relation with only one row of another table.
For example, we have two tables : Users and Bikes
Now one user must have maximum of only one bike but it may happen that any user has no bikes. So user can have zero or one bike.
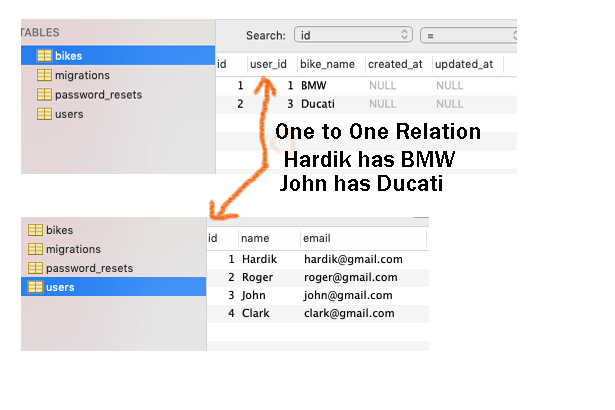
User table will have rows which contains the id and name of the user. Bike table have id, user_id and name of the bike.
Here, user_id from Bikes table represents the id column from the Users table.
So, if the name of the user is Hardik and id is 1 then in the Bikes table, user_id will be 1 and a bike name will be associated with this row.
See the below image to understand this whole scenario.
Here is the official documentation about one to one relationship.
Let us create a new practical laravel example which uses one to one relationship concept.
Check the below video which is the result of this Laravel one to one relationship example.
Step 1. Project and Database Works
Trigger the below command first,
laravel new laraonetoone
It will simply make a new laravel project.
Now go to your database administration tool. I will use sequel pro but if you are using something else like phpMyAdmin then it is also ok.
Process of database will be same for all king of database administration tool.
Make a new database in your tool and give it a name like “laraonetoone”
Now to connect this database with your laravel project, you need to update .env file of your project.
So open your editor and navigate to .env file. See the below lines
DB_CONNECTION=mysql
DB_HOST=127.0.0.1
DB_PORT=3306
DB_DATABASE=laraonetoone
DB_USERNAME=root
DB_PASSWORD=
You need to modify these lines as the configuration of your database credentials.
My username is root and password is empty.
After this, you have successfully connected your database and laravel project.
Step 2. Making Two Tables in Database
Let us create two tables in the database to establish one to one relationship between them.
In your terminal, run the below command
php artisan make:migration create_bikes_table
This command will make a new migration file. You can navigate to this file via timestamp_create_bikes_table.php file.
Write down the below source lines in this migration file.
<?php

use Illuminate\Support\Facades\Schema;
use Illuminate\Database\Schema\Blueprint;
use Illuminate\Database\Migrations\Migration;

class CreateBikesTable extends Migration
{
    /**
     * Run the migrations.
     *
     * @return void
     */
    public function up()
    {
        Schema::create('bikes', function (Blueprint $table) {
            $table->bigIncrements('id');
            $table->integer('user_id')->unsigned();
            $table->string('bike_name');
            $table->timestamps();

            $table->foreign('user_id')->references('id')->on('users')
                  ->onDelete('cascade');
        });
    }

    /**
     * Reverse the migrations.
     *
     * @return void
     */
    public function down()
    {
        Schema::dropIfExists('bikes');
    }
}
Look at the up() function in above file.
It contains the column names which Bikes table will have. Column are id, user_id, bike_name and timestamps.
Now run the following command
php artisan migrate
Above command will create some tables in our “laraonetoone” database.
We will work with two tables : users and bikes
Step 3. Working with Models
Open the app->User.php file. You will see that there are some functions are already there.
You need to add below function in this file.
  public function bike()
    {
        return $this->hasOne('App\Bike');
    }
This functions contains the hasOne() method. This method says that users table has relation with one row in the bikes table.
This method will enable us to fetch row from bikes table.
So, final code for User.php file is as the below
<?php

namespace App;

use Illuminate\Notifications\Notifiable;
use Illuminate\Contracts\Auth\MustVerifyEmail;
use Illuminate\Foundation\Auth\User as Authenticatable;

class User extends Authenticatable
{
    use Notifiable;

    /**
     * The attributes that are mass assignable.
     *
     * @var array
     */
    protected $fillable = [
        'name', 'email', 'password',
    ];

    /**
     * The attributes that should be hidden for arrays.
     *
     * @var array
     */
    protected $hidden = [
        'password', 'remember_token',
    ];

    /**
     * The attributes that should be cast to native types.
     *
     * @var array
     */
    protected $casts = [
        'email_verified_at' => 'datetime',
    ];

 /**
     * Get the bike record associated with the user.
     */
    public function bike()
    {
        return $this->hasOne('App\Bike');
    }

}
Bike Model
Now we need to create another model called “Bike.php”
For that, run the below command in terminal
php artisan make:model Bike
It will create a model in app->Bike.php directory.
Inside this new model, add the below source writings
<?php

namespace App;

use Illuminate\Database\Eloquent\Model;

class Bike extends Model
{


    public $table = "bikes";
    /**
     * Get the user that owns the bike.
     */
    public function user()
    {
        return $this->belongsTo('App\User');
    }
}
First line will help us to perform some eloquent tasks on bikes tables using this model class.
Inverse One to One Relationship
Then, there is user() function.
This function uses belongsTo() method. This method says that any row from bikes table is connected with any one row of users table.
So this belongsTo() method is the inverse of hasOne() method or this is the concept of inverse one to one relation in laravel.
Step 4. Add Records in Database
Now we need to add some records in our database manually.
Add four rows in users table and two rows in bikes table.
After adding records in users and bikes table, your both the tables should look like the below image.
Now we will fetch the records from these tables using one to one relationship concept.
Step 5. Route and Controller Task
Open up your app->routes->web.php file.
We will add only one route line in this file. Final source snippet for this file is as the below
<?php

/*
|--------------------------------------------------------------------------
| Web Routes
|--------------------------------------------------------------------------
|
| Here is where you can register web routes for your application. These
| routes are loaded by the RouteServiceProvider within a group which
| contains the "web" middleware group. Now create something great!
|
*/

Route::get('/', function () {
    return view('welcome');
});

Route::get('users','BikesController@usersWithBike');
I have added last line manually. Other things are pre written.
When you open http://127.0.0.1:8000/users in your browser, compiler will call usersWithBike() function from BikesController.php file.
We do not have created BikesController.php file, so let’s do this first.
Trigger the below command first,
php artisan make:controller BikesController
After this, you will find a BikesController.php file inside app->Http->Controllers directory.
Add the below source code snippet in this controller file.
<?php

namespace App\Http\Controllers;

use App\User;
use App\Bike;
use Illuminate\Http\Request;

class BikesController extends Controller
{
    //

    public function usersWithBike()
    {

        $user_1_bike = User::find(1)->bike;
        $user_3_bike = User::find(3)->bike;
        $user_1_name = Bike::find(1)->user;
        $user_2_name = Bike::find(2)->user;
        //dd($user_2_bike);

        $users = User::all();
        $allbikes = Bike::all();
        return view('index',compact('users','allbikes','user_1_bike',
        'user_3_bike','user_1_name','user_2_name'));
    }
}
- Now usersWithBike() method is the heart of this example.
- It’s first line will get the row from bikes table. (System will try to fetch the row from bikes table where user_id is equals to 1 which is the row of BMW)
- So you can see that we have fetched the row from bikes table using User model, this is the practical example of one to one relationship.
- Similarly, second line will fetch the row from bikes table where user_id is 3.
- Now, third line is little different. It will fetch the row from users table where id is 1. Here, we are using Bike model to get row from users table, so this is the inverse of one to one relationship.
- And finally, fourth line will get the row from users table where id is 3.
- Finally, we have seen that user_id (bikes table) has one to one relationship with id (users table)
Now consider the following lines
 $users = User::all();
 $allbikes = Bike::all();
First line is fetching all the records from users table.
Second line will insert all the rows from bikes table into the $allbikes
See the below return statement.
return view('index',compact('users','allbikes','user_1_bike',
        'user_3_bike','user_1_name','user_2_name'));
At last, compiler will return the index.blade.php file. We will create this view file in the next step.
Along with view file, compiler will send variables like users, allbikes etc. to this view file so that we can retrieve values from them.
Step 6. Last View file
Let us create index.blade.php file.
Under resources->views directory, make a new file and give it a name like index.blade.php
Write the below source code structure in this file.
</<!DOCTYPE html>
<html>
<head>

</head>
<style>


</style>
<body>

<h1> One to One relationship In Laravel </h1>

<h2>

<p> Names from Users Table </p>

@foreach ($users as $user)
<li>

    {{ $user->name}}

</li>
@endforeach

<p> Bike Names from Bike Table </p>

@foreach ($allbikes as $allbike)
<li>

    {{ $allbike->bike_name}}

</li>
@endforeach

<p> User_1 ({{ $user_1_name->name }}) has {{ $user_1_bike->bike_name }} </p>

<p> User_3 ({{ $user_2_name->name }}) has {{ $user_3_bike->bike_name }} </p>


</body>
</html>
We have passed several variables in the previous step in this file. (see the return statement in step 5)
Here, we are using these variables to get required fields like bike name and user name at required places.