
We will talk about Android Linearlayout in tutorial example of today.
If you are beginner and has not any basic idea about LinearLayout in android, then this tutorial perfectly suits you.
This example will teach you android layout design from scratch.
LinearLayout in Android is used to create Layout Design of every Page. Basically there are two types of Layout :
1.) LinearLayout and
2.) RelativeLayout
LinearLayout is used to design various elements like Button, EditText, TextView etc. in separate blockwise method.
Blobkwise method means these elements can not cover each other as they can cover each other in Relative Layout.
In short, LinearLayout is a view group that aligns all children in a single direction, vertically or horizontally in Android App.
Orientation of LinearLayout In Android
LinearLayout has attribute named Orientation which is used to set children of LinearLayout in vertical or horizontal manner.
Let us take Two Buttons and set them with Linear Layout in Android Layout.
1.) Set Horizontally
Look below source code
<?xml version="1.0" encoding="utf-8"?>
<LinearLayout xmlns:android="http://schemas.android.com/apk/res/android"

    android:layout_width="match_parent"
    android:layout_height="wrap_content"
    android:orientation="horizontal">

    <Button
        android:layout_width="wrap_content"
        android:layout_height="wrap_content"
        android:layout_weight="1"
        android:text="Button" />

    <Button
        android:id="@+id/button"
        android:layout_width="wrap_content"
        android:layout_height="wrap_content"
        android:layout_weight="1"
        android:text="Button" />
</LinearLayout>
Output of Above code will generate layout like below image.
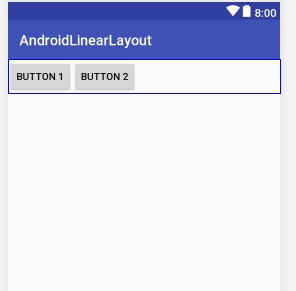
As you can see that two button are set horizontally.
In LinearLayout, orientation is set as horizontal and two buttons are it’s children.
These two buttons will no overlap each other in any situation.
2.) Set Vertically
Look below source code
<?xml version="1.0" encoding="utf-8"?>
<LinearLayout xmlns:android="http://schemas.android.com/apk/res/android"

    android:layout_width="match_parent"
    android:layout_height="wrap_content"
    android:orientation="vertical">

    <Button
        android:layout_width="wrap_content"
        android:layout_height="wrap_content"
        android:text="Button 1" />

    <Button
        android:id="@+id/button"
        android:layout_width="wrap_content"
        android:layout_height="wrap_content"
        android:text="Button 2" />
</LinearLayout>
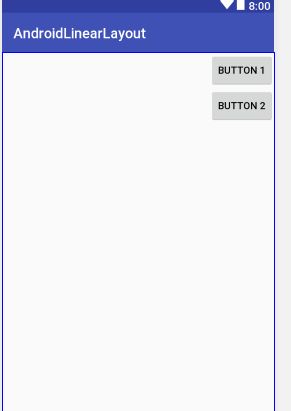
Output of Above code will generate layout like below image.

As you can see that two button are set vertically.
In LinearLayout orientation is set as vertical and two buttons are it’s children.
You can add TextView, EditText, CheckBox etc. UI widgets same as we have added button in the above code.
You can set all layouts like Linearlayout, Relativelayout, Framelayout, TableLayout, GridLayout etc. as child of each other.
Important Attributes of LinearLayout
Different attributes are there to control LinearLayout as below.
1.) layout_width and layout_height
It will control the width and height of the linearlayout.
- If you want to give full width and height then set layout_width and layout_height as match_parent.
- Set layout_width and layout_height as wrap_content if you want to have width of linearlayout as per requirements of children widgets.
- You can set layout_width in units also. For example 50dp, 40dp etc.
- The higher the dp number the more width is there.
2.) layout_weight
layput_weight attribute can be used in the children of linearlayout.
- It will set height or width of children as per given weight.
- If orientation of linearlayout is horizontal, then weight will decide width of the children widgets and if orientation is vertical then weight will set the height of the children widgets.
Weight for width
Look at below code
<?xml version="1.0" encoding="utf-8"?>
<LinearLayout xmlns:android="http://schemas.android.com/apk/res/android"

    android:layout_width="match_parent"
    android:layout_height="wrap_content"
    android:orientation="horizontal">

    <Button
        android:layout_width="0dp"
        android:layout_height="wrap_content"
        android:layout_weight="2"
        android:text="Button 1" />

    <Button
        android:id="@+id/button"
        android:layout_width="0dp"
        android:layout_height="wrap_content"
        android:layout_weight="1"
        android:text="Button 2" />
</LinearLayout>
Output of above code
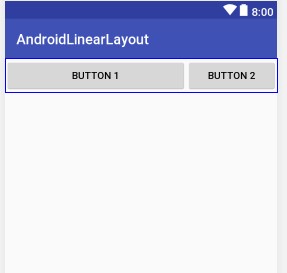
Here orientation is horizontal so weight will decide button’s width.
- weight is given value 2 for Button 1 and value 1 for button 2. So easily you can see that Button 1 has double width than Button 2.
Similarly, you can play with weight by giving different values to different children.
- In this case we have to set both button’s layout_width as “0dp”
Weight for height
Look at below code
<?xml version="1.0" encoding="utf-8"?>
<LinearLayout xmlns:android="http://schemas.android.com/apk/res/android"

    android:layout_width="match_parent"
    android:layout_height="match_parent"
    android:orientation="vertical">

    <Button
        android:layout_width="wrap_content"
        android:layout_height="0dp"
        android:layout_weight="2"
        android:text="Button 1" />

    <Button
        android:id="@+id/button"
        android:layout_width="wrap_content"
        android:layout_height="0dp"
        android:layout_weight="1"
        android:text="Button 2" />
</LinearLayout>
Output of above code
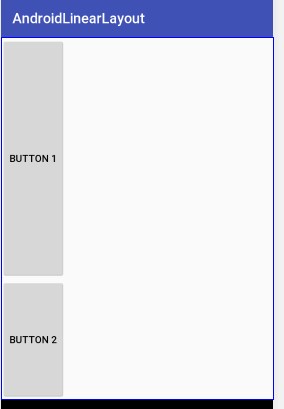
Here orientation is vertical so height will decide button’s width.
- weight is given value 2 for Button 1 and value 1 for button 2. So easily you can see that Button 1 has double height than Button 2.
Similarly, you can play with weight by giving different values to different children.
- In this case we have to set both button’s layout_height as “0dp”
3.) gravity
gravity value (center, bottom, top, left, right) of linearlayout will set linearlayout’s child accordingly.
Consider below code
<?xml version="1.0" encoding="utf-8"?>
<LinearLayout xmlns:android="http://schemas.android.com/apk/res/android"

    android:layout_width="match_parent"
    android:layout_height="match_parent"
    android:gravity="center"
    android:orientation="vertical">

    <Button
        android:layout_width="wrap_content"
        android:layout_height="50dp"
        android:text="Button 1" />

    <Button
        android:id="@+id/button"
        android:layout_width="wrap_content"
        android:layout_height="50dp"
        android:text="Button 2" />

</LinearLayout>
This is output
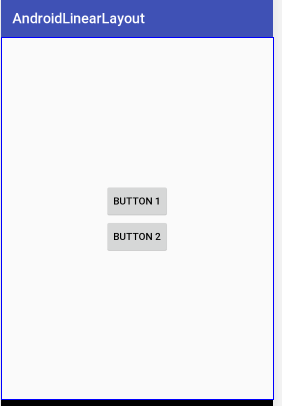
As you can see that value of gravity in linearlayout is center, so both buttons (Children of linearlayout) are at exact center in the whole linearlayout.
Now if you give value of gravity as “right“,
<LinearLayout xmlns:android="http://schemas.android.com/apk/res/android"

    android:layout_width="match_parent"
    android:layout_height="match_parent"
    android:gravity="right"
    android:orientation="vertical">
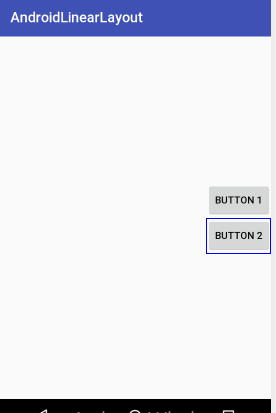
output will be like this
Both buttons are at the right side of the screen.
- Notice one thing that buttons are at right but not in the center.
You can give multiple values to gravity like below
android:gravity="right|center"
Output will be like below
Now you can play around with various gravity values for android linearlayout for it’s children.
Practical Example
First of all, make a new project in android studio with empty activity.
We will play with weight property in this example to create view which is responsive across all the screen size.
This example will help you to understand the functionality of linearlayout in an easy manner.
You will be able to use linearlayout in your app after you learn the below example carefully.
In the activity_main.xml file, add the following source code
<?xml version="1.0" encoding="utf-8"?>
<LinearLayout xmlns:android="http://schemas.android.com/apk/res/android"
    android:orientation="vertical"
    android:layout_width="match_parent"
    android:layout_height="match_parent">

    <LinearLayout
        android:layout_width="match_parent"
        android:layout_height="match_parent"
        android:layout_weight="1"
        android:orientation="horizontal">

        <LinearLayout
            android:layout_width="match_parent"
            android:layout_height="match_parent"
            android:layout_weight="1"
            android:orientation="vertical">

            <LinearLayout
                android:layout_width="match_parent"
                android:layout_height="match_parent"
                android:layout_weight="1"
                android:orientation="horizontal">

                <View
                    android:layout_width="match_parent"
                    android:layout_height="match_parent"
                    android:layout_weight="1"
                    android:background="#1b27da">

                </View>
                <View
                    android:layout_width="match_parent"
                    android:layout_height="match_parent"
                    android:layout_weight="1"
                    android:background="#070707">

                </View>

            </LinearLayout>

            <LinearLayout
                android:layout_width="match_parent"
                android:layout_height="match_parent"
                android:layout_weight="1"
                android:orientation="vertical">


                <View
                    android:layout_width="match_parent"
                    android:layout_height="match_parent"
                    android:layout_weight="1"
                    android:background="#eee60a">

                </View>
                <View
                    android:layout_width="match_parent"
                    android:layout_height="match_parent"
                    android:layout_weight="1"
                    android:background="#f22121">

                </View>

            </LinearLayout>

        </LinearLayout>

        <LinearLayout
            android:layout_width="match_parent"
            android:layout_height="match_parent"
            android:layout_weight="1"
            android:orientation="vertical">

            <LinearLayout
                android:layout_width="match_parent"
                android:layout_height="match_parent"
                android:layout_weight="1"
                android:orientation="horizontal">


                <LinearLayout
                    android:layout_width="match_parent"
                    android:layout_height="match_parent"
                    android:layout_weight="1">

                </LinearLayout>
                <LinearLayout
                    android:layout_width="match_parent"
                    android:layout_height="match_parent"
                    android:layout_weight="1"
                    android:orientation="vertical">

                    <View
                        android:layout_width="match_parent"
                        android:layout_height="match_parent"
                        android:layout_weight="1"
                        android:background="#f21515">

                    </View>
                    <View
                        android:layout_width="match_parent"
                        android:layout_height="match_parent"
                        android:layout_weight="1"
                        android:background="#f2df0c">

                    </View>

                </LinearLayout>

            </LinearLayout>
            <View
                android:layout_width="match_parent"
                android:layout_height="match_parent"
                android:layout_weight="3"
                android:background="#2fe425">


            </View>
        </LinearLayout>


    </LinearLayout>
    <LinearLayout
        android:layout_width="match_parent"
        android:layout_height="match_parent"
        android:layout_weight="1"
        android:orientation="horizontal">

        <LinearLayout
            android:layout_width="match_parent"
            android:layout_height="match_parent"
            android:layout_weight="1"
            android:orientation="vertical">

            <LinearLayout
                android:layout_width="match_parent"
                android:layout_height="match_parent"
                android:layout_weight="1"
                android:orientation="horizontal">


                <View
                    android:layout_width="match_parent"
                    android:layout_height="match_parent"
                    android:layout_weight="1"
                    android:background="#0a0a0a">

                </View>
                <LinearLayout
                    android:layout_width="match_parent"
                    android:layout_height="match_parent"
                    android:layout_weight="1">

                </LinearLayout>
                <View
                    android:layout_width="match_parent"
                    android:layout_height="match_parent"
                    android:layout_weight="1"
                    android:background="#0c0b0b">

                </View>

            </LinearLayout>
            <View
                android:layout_width="match_parent"
                android:layout_height="match_parent"
                android:layout_weight="1"
                android:background="#635d5d">

            </View>

        </LinearLayout>
        <LinearLayout
            android:layout_width="match_parent"
            android:layout_height="match_parent"
            android:layout_weight="1"
            android:orientation="horizontal">

            <LinearLayout
                android:layout_width="match_parent"
                android:layout_height="match_parent"
                android:layout_weight="1">

            </LinearLayout>
            <LinearLayout
                android:layout_width="match_parent"
                android:layout_height="match_parent"
                android:layout_weight="1"
                android:orientation="vertical">


                <View
                    android:layout_width="match_parent"
                    android:layout_height="match_parent"
                    android:layout_weight="1"
                    android:background="#f00b0b">

                </View>
                <View
                    android:layout_width="match_parent"
                    android:layout_height="match_parent"
                    android:layout_weight="1"
                    android:background="#e6cb1d">

                </View>

            </LinearLayout>

        </LinearLayout>

    </LinearLayout>

</LinearLayout>
Above file will generate the below output
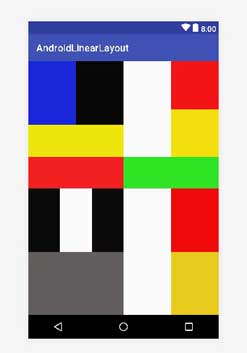
This is the responsive structure through different screen sizes.
Now let us understand how to develop above layout.
Mainly, there are two parts in the above layout. See the below image
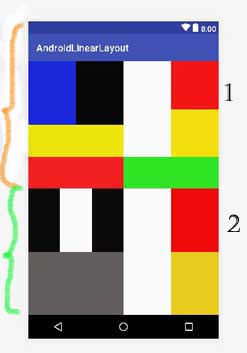
There are two vertical parts in the above image. (1. Orange part – top , 2. Green part- bottom)
So, our in the activity_main.xml code, first linearlayout has vertical orientation and there are two children.
These two children are also linearlayouts.
Now focus on the first part. (1. Orange part – top)
This part have mainly 2 horizontal parts (left and right). (So this linearlayout has two children and horizontal orientation)
Left part have two main parts (up with [blue and black] and down with [yellow and red] ) (this linearlayout has two children and vertical orientation)
up part with [blue and black] has the orientation horizontal and two children. (First children with blue background and second with black background.)
down with [yellow and red] has the orientation vertical and two children. (First child with yellow background and second with red background
Right part has also 2 vertical parts. (Up with white,red,yellow and Down with green. )
(Up with white,red,yellow) has two horizontal parts. (left with white background and right with vertical orientation. (right has two children (vertical orientation), up with red background and down with yellow background))
Down with green has only one child with green background.
Now focus on the Second part. (2. Green part- bottom)
I have explained the first part. Read it and develop it’s code with reference to the code of activity_main.xml
This second part is your exercise. Develop it yourself and learn from above words if you find any difficulties.
If you want to master in other Android basic concepts, then visit following tutorials