
Android navigation drawer will add menu items in toolbar or action bar or header bar.
Android navigation drawer example guides to show different menu items in the toolbar or actionbar for a different fragment.
This Navigation drawer Android example is the second part of basic navigation drawer in Android tutorial.
Complete all the steps from that example, then follow steps of this tutorial.
Visit the official link for more information about navigation drawer.
First, watch the output of Android navigation drawer example, then we will prepare it.
Download Source Code For Android Navigation Drawer tutorial
[sociallocker]Download DrawerMenuDemonuts[/sociallocker]
Step 1: Follow all the steps from basic navigation drawer in Android tutorial.
After you have completed above tutorial, you will have one android project with navigation drawer.
This step is must so make sure you have complete working project made from above tutorial.
Now follow below steps.
Step 2: Adding images to drawable
Download images and copy them into “drawable” directory.
Step 3: Creating menu resource directory
Create a new resource directory named “menu” inside the “res” directory as per below image.
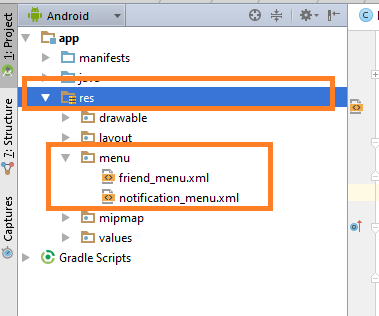
Inside “menu,” make two xml files and name them as friend_menu.xml and notification_menu.xml
Add below source code in friend_menu.xml
<?xml version="1.0" encoding="utf-8"?>
<menu xmlns:android="http://schemas.android.com/apk/res/android"
    xmlns:app="http://schemas.android.com/apk/res-auto">

    <item
        android:id="@+id/action_message"
        android:orderInCategory="100"
        android:title="Message"
        android:icon="@drawable/message"
        app:showAsAction="always" />
    <item
        android:id="@+id/action_block"
        android:orderInCategory="100"
        android:title="Block"
        app:showAsAction="always" />

</menu>
Copy following in notification_menu.xml
<?xml version="1.0" encoding="utf-8"?>
<menu xmlns:android="http://schemas.android.com/apk/res/android"
    xmlns:app="http://schemas.android.com/apk/res-auto">
    <item
        android:id="@+id/action_update"
        android:orderInCategory="100"
        android:title="Update Profile"
        app:showAsAction="never" />
    <item
        android:id="@+id/action_logout"
        android:orderInCategory="100"
        android:title="Logout"
        app:showAsAction="never" />
</menu>
Step 4: Updating FriendListFragment
Update FriendListFragment.java as below
import android.os.Bundle;
import android.support.v4.app.Fragment;
import android.view.LayoutInflater;
import android.view.Menu;
import android.view.MenuInflater;
import android.view.MenuItem;
import android.view.View;
import android.view.ViewGroup;
import android.widget.Toast;

public class FriendListFragment extends Fragment {

    public FriendListFragment() {
        // Required empty public constructor
    }

   @Override
    public void onCreate(Bundle savedInstanceState) {
        super.onCreate(savedInstanceState);
       setHasOptionsMenu(true);
    }

    @Override
    public View onCreateView(LayoutInflater inflater, ViewGroup container,
                             Bundle savedInstanceState) {
        // Inflate the layout for this fragment
        return inflater.inflate(R.layout.fragment_friend_list, container, false);
    }

    @Override
    public void onCreateOptionsMenu(Menu menu, MenuInflater inflater) {

        inflater.inflate(R.menu.friend_menu, menu);

        super.onCreateOptionsMenu(menu, inflater);
    }

    @Override
    public boolean onOptionsItemSelected(MenuItem item) {
        // Handle action bar item clicks here. The action bar will
        // automatically handle clicks on the Home/Up button, so long
        // as you specify a parent activity in AndroidManifest.xml.
        int id = item.getItemId();

        //noinspection SimplifiableIfStatement
        if (id == R.id.action_message) {
            Toast.makeText(getActivity(), "Message clicked!", Toast.LENGTH_SHORT).show();
            return true;

        }else if(id == R.id.action_block){
            Toast.makeText(getActivity(), "Block clicked!", Toast.LENGTH_SHORT).show();
            return true;
        }

        return super.onOptionsItemSelected(item);
    }

}
Step 5: Describing update
In onCreate() method, setHasOptionsMenu() is called.
This method is necessary for implementing menu items in Toolbar.
This method must be present in the every fragments for which you want options in actionbar.
Two methods are override. One is onCreateOptionsMenu() and second is onOptionsItemSelected()
Step 6: Updating NotificationFragment
Replace source code of NotificationFragment with following
import android.os.Bundle;
import android.support.v4.app.Fragment;
import android.view.LayoutInflater;
import android.view.Menu;
import android.view.MenuInflater;
import android.view.MenuItem;
import android.view.View;
import android.view.ViewGroup;
import android.widget.Toast;

public class NotificationFragment extends Fragment {

    public NotificationFragment() {
        // Required empty public constructor
    }

    @Override
    public void onCreate(Bundle savedInstanceState) {
        super.onCreate(savedInstanceState);
        setHasOptionsMenu(true);
    }

    @Override
    public View onCreateView(LayoutInflater inflater, ViewGroup container,
                             Bundle savedInstanceState) {
        // Inflate the layout for this fragment
        return inflater.inflate(R.layout.fragment_notification, container, false);
    }

    @Override
    public void onCreateOptionsMenu(Menu menu, MenuInflater inflater) {

        inflater.inflate(R.menu.notification_menu, menu);

        super.onCreateOptionsMenu(menu, inflater);
    }

    @Override
    public boolean onOptionsItemSelected(MenuItem item) {
        // Handle action bar item clicks here. The action bar will
        // automatically handle clicks on the Home/Up button, so long
        // as you specify a parent activity in AndroidManifest.xml.
        int id = item.getItemId();

        //noinspection SimplifiableIfStatement
        if (id == R.id.action_update) {
            Toast.makeText(getActivity(), "Update clicked!", Toast.LENGTH_SHORT).show();
            return true;

        }else if(id == R.id.action_logout){
            Toast.makeText(getActivity(), "Logout clicked!", Toast.LENGTH_SHORT).show();
            return true;
        }

        return super.onOptionsItemSelected(item);
    }

}
This small demo is the base for every application for all your future applications in which you want different menu items in toolbar or action bar for each fragments.
You also have access to onclick method of every items of toolbar. You can put logic in this onclick method.
Use comment section for your queries and reviews. Thank you 🙂