
We will talk about Relativelayout in android tutorial today.
RelativeLayout in Android is used to create Layout Design of Android Application. Basically there are two types of Layout :
1.) LinearLayout and
2.) RelativeLayout
LinearLayout is used to design various elements like Button, EditText, TextView etc. in relative to position of each other.
Relativelayout has various attributes which can set elements with proper position and distance to each other.
Relative Layout is flexible layout in android designing for custom layout designing.
With the help of Relativelayout, you can put two elements such that one element covers other or partially covers or as per your layout requirements.
In RelativeLayout, you can use “above, below, left and right” to arrange the element position, for example, display a “button1” below “button2”, or display “button3” on left of the “button1”.
You can set all layouts like Linearlayout, Relativelayout, Framelayout, TableLayout, GridLayout etc. as child of each other.
Let us learn some technical matters now.
1.) layout_width and layout_height
It will control the width and height of the relativelayout.
If you want to give full width and height then set layout_width and layout_height as match_parent.
Set layout_width and layout_height as wrap_content if you want to have width of relativelayout as per requirements of children.
You can set layout_width in units also. For example 50dp, 40dp etc. The higher the dp number the more width is there.
2.) RelativeLayout’s layout_toRightOf and layout_toLeftOf attributes
Consider below source code
<?xml version="1.0" encoding="utf-8"?>
<RelativeLayout xmlns:android="http://schemas.android.com/apk/res/android"

    android:layout_width="match_parent"
    android:layout_height="match_parent">

    <Button
        android:layout_width="wrap_content"
        android:layout_height="wrap_content"
        android:id="@+id/btn1"
        android:background="@color/colorAccent"
        android:text="Button 1" />

    <Button
        android:id="@+id/button2"
        android:layout_width="wrap_content"
        android:layout_height="wrap_content"
        android:layout_toRightOf="@+id/btn1"
        android:background="@color/colorPrimary"
        android:text="Button 2" />

</RelativeLayout>
Output is below
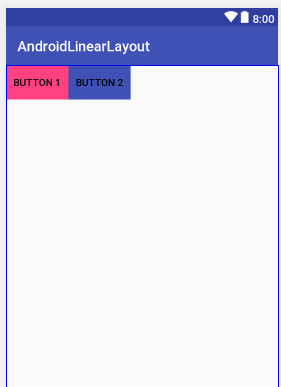
In above source code, we have taken a RelativeLayout, which contains two buttons (1 & 2).
Now, as per below code, an attribute named layout_toRightOf is used in Button2’s code to put Button2 at the right side of Button1.
android:layout_toRightOf="@+id/btn1"
Similarly, you can use layout_toLeftOf attribute to put any element at the left side other element.
3.) RelativeLayout’s layout_below and layout_above attributes
Look at following code
<?xml version="1.0" encoding="utf-8"?>
<RelativeLayout xmlns:android="http://schemas.android.com/apk/res/android"

    android:layout_width="match_parent"
    android:layout_height="match_parent">

    <Button
        android:layout_width="wrap_content"
        android:layout_height="wrap_content"
        android:id="@+id/btn1"
        android:background="@color/colorAccent"
        android:text="Button 1" />

    <Button
        android:id="@+id/button2"
        android:layout_width="wrap_content"
        android:layout_height="wrap_content"
        android:layout_below="@+id/btn1"
        android:background="@color/colorPrimary"
        android:text="Button 2" />

</RelativeLayout>
Output is like
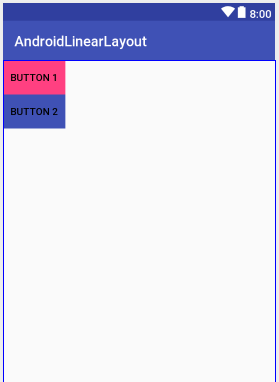
In above source code, we have taken a RelativeLayout, which contains two buttons (1 & 2).
Now, as per below code, an attribute named layout_below is used in Button2’s code to put Button2 below the Button1.
android:layout_below="@+id/btn1"
Similarly, you can use layout_above attribute to put any element above other element.
4.) Other Useful attributes
RelativeLayout has several other attributes, which can power android layout seamlessly.
4.1) layout_centerInParent
What if you want put an element in the exact middle of the Whole RelativeLayout?
Solution is in below source code
<?xml version="1.0" encoding="utf-8"?>
<RelativeLayout xmlns:android="http://schemas.android.com/apk/res/android"

    android:layout_width="match_parent"
    android:layout_height="match_parent">

    <Button
        android:layout_width="wrap_content"
        android:layout_height="wrap_content"
        android:id="@+id/btn1"
        android:background="@color/colorAccent"
        android:layout_centerInParent="true"
        android:text="Button 1" />


</RelativeLayout>
Output of above code is below
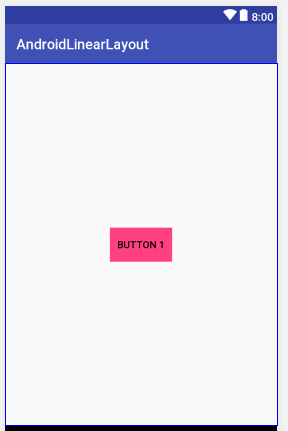
Here, we have put Button1 in the center of it’s parent, which is RelativeLayout.
Following line in Button1 does the trick
android:layout_centerInParent="true"
4.2) layout_centerHorizontal
This attribute set element at a horizontally center.
But element will not be center at vertical position as per below image.

Source code for above image is as below
<?xml version="1.0" encoding="utf-8"?>
<RelativeLayout xmlns:android="http://schemas.android.com/apk/res/android"

    android:layout_width="match_parent"
    android:layout_height="match_parent">

    <Button
        android:layout_width="wrap_content"
        android:layout_height="wrap_content"
        android:id="@+id/btn1"
        android:background="@color/colorAccent"
        android:layout_centerHorizontal="true"
        android:text="Button 1" />
</RelativeLayout>
Look at this line
android:layout_centerHorizontal="true"
This line is written in Button’s code and parent of button is Relativelayout.
So button is set as horizontally center in it’s parent.
4.3) layout_centerVerticle
This attribute set element at a vertically center.
But element will not be center at horizontal position as per below image.

Source code for above image is as below
<?xml version="1.0" encoding="utf-8"?>
<RelativeLayout xmlns:android="http://schemas.android.com/apk/res/android"

    android:layout_width="match_parent"
    android:layout_height="match_parent">

    <Button
        android:layout_width="wrap_content"
        android:layout_height="wrap_content"
        android:id="@+id/btn1"
        android:background="@color/colorAccent"
        android:layout_centerVertical="true"
        android:text="Button 1" />

</RelativeLayout>
Look at this line
android:layout_centerVertical="true"
This line is written in Button’s code and parent of button is Relativelayout.
So button is set as vertically center in it’s parent.
4.5) layout_alignParentBottom
This property helps us to put the widget at the bottom side of the whole area covered by it’s parent.
See the below source code
<?xml version="1.0" encoding="utf-8"?>
<RelativeLayout xmlns:android="http://schemas.android.com/apk/res/android"
    android:layout_width="match_parent"
    android:layout_height="match_parent"
    xmlns:tools="http://schemas.android.com/tools"
    tools:context=".MainActivity">

    <Button
        android:layout_width="wrap_content"
        android:layout_height="wrap_content"
        android:background="@color/colorAccent"
        android:layout_alignParentBottom="true"
        android:textColor="#fff"
        android:text="Button!"/>


</RelativeLayout>
Parent is the RelativeLayout with full height and width.
Button inside the Relativelayout holds the layout_alignParentBottom property with “True” value.
So it will produce the below output
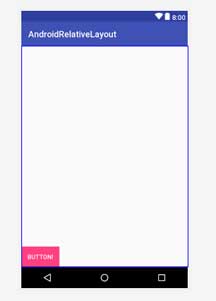
In the above image, you can clearly see that the button is at the bottom side in the parent layout.
4.6) layout_alignParentRight
This property will push the widget to the right end of the parent layout.
Watch the following source code
<?xml version="1.0" encoding="utf-8"?>
<RelativeLayout xmlns:android="http://schemas.android.com/apk/res/android"
    android:layout_width="match_parent"
    android:layout_height="match_parent"
    xmlns:tools="http://schemas.android.com/tools"
    tools:context=".MainActivity">

    <Button
        android:layout_width="wrap_content"
        android:layout_height="wrap_content"
        android:background="@color/colorAccent"
        android:layout_alignParentRight="true"
        android:textColor="#fff"
        android:text="Button!"/>


</RelativeLayout>
Relativelayout which is the parent have full width and height.
It’s child,a button have the layout_alignParentRight property with “True” value.
So below screen has the output of above code
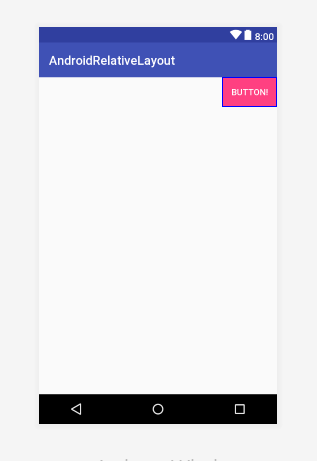 As per the above image, button is set at the right end of the parent layout.
4.7) layout_marginTop and layout_marginLeft
layout_marginTop property will set the top margin as per the it’s value.
If layout_marginTop’s value is 10dp and system will leave the space equals to the 10dp at the top of the widget.
layout_marginLeft property will set the left margin as per the it’s value.
If layout_marginLeft’s value is 20dp and system will leave the space equals to the 20dp at the left side of the widget.
See the following code
<?xml version="1.0" encoding="utf-8"?>
<RelativeLayout xmlns:android="http://schemas.android.com/apk/res/android"
    android:layout_width="match_parent"
    android:layout_height="match_parent"
    xmlns:tools="http://schemas.android.com/tools"
    tools:context=".MainActivity">

    <Button
        android:layout_width="wrap_content"
        android:layout_height="wrap_content"
        android:background="@color/colorPrimary"
        android:layout_marginTop="20dp"
        android:layout_marginLeft="20dp"
        android:textColor="#fff"
        android:text="Button 2!"/>


</RelativeLayout>
Parent is with full screen.
Now button has both layout_marginTop and layout_marginLeft property with 20dp value.
So it will create the below layout structure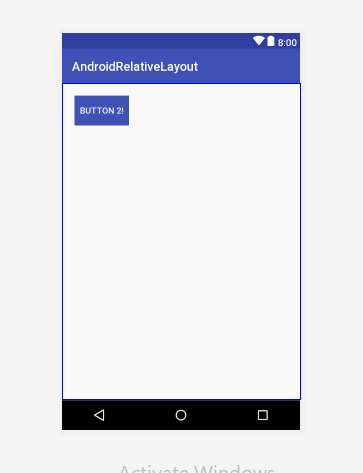
As you can see that, from the upper left corner, button have 20dpspace from top and left side.
4.7) layout_marginBottom and layout_marginRight
layput_marginBottom will keep space according to it’s value from the bottom side.
layput_marginRight will keep the space at the right side according to value.
Consider the following code snippet
<?xml version="1.0" encoding="utf-8"?>
<RelativeLayout xmlns:android="http://schemas.android.com/apk/res/android"
    android:layout_width="match_parent"
    android:layout_height="match_parent"
    xmlns:tools="http://schemas.android.com/tools"
    tools:context=".MainActivity">

    <Button
        android:layout_width="wrap_content"
        android:layout_height="wrap_content"
        android:background="@color/colorPrimary"
        android:layout_alignParentBottom="true"
        android:layout_alignParentRight="true"
        android:layout_marginBottom="20dp"
        android:layout_marginRight="20dp"
        android:textColor="#fff"
        android:text="Button 2!"/>


</RelativeLayout>
Code will produce the below layout
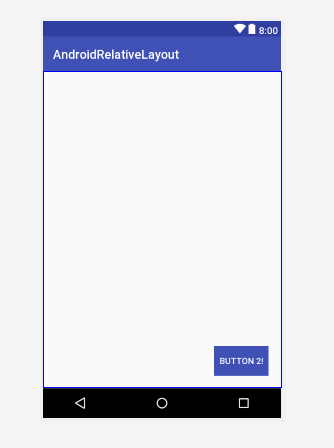
This Button has layout_alignParentBottom and layout_alignParentRight properties with “True” value, so that the button is kept at the bottom right side.
Now, layput_marginBottom property has 20 dp value, so you can see that button is a little (20dp) upside from the bottom.
Because of layput_marginRight property, button is 20dp away from the Right End.
4.9) Elements covering each other
One of the most efficient use of RelativeLayout is that you can set elements such that they can cover each other as per your android app’s requirement.
This covering facility can not be served by Linearlayout.
Look below image
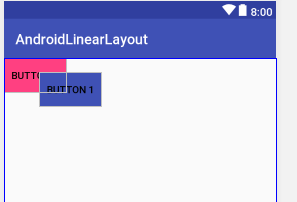
Here, Blue button is covering pink button. The covered part can be seen as rectangle with thin white border.
Source code for above image
<?xml version="1.0" encoding="utf-8"?>
<RelativeLayout xmlns:android="http://schemas.android.com/apk/res/android"

    android:layout_width="match_parent"
    android:layout_height="match_parent">

    <Button
    android:layout_width="wrap_content"
    android:layout_height="wrap_content"
    android:id="@+id/btn1"
    android:background="@color/colorAccent"
    android:text="Button 1" />

    <Button
        android:layout_width="wrap_content"
        android:layout_height="wrap_content"
        android:id="@+id/btn2"
        android:layout_marginLeft="50dp"
        android:layout_marginTop="20dp"
        android:background="@color/colorPrimary"
        android:text="Button 1" />


</RelativeLayout>
4.6) clickable
By default, RelativeLayout is clickable in Android app.
You can programmatically set click effect in Java Code.
If you do not want to keep RelativeLayout clickable, then you can do it by this way
android:clickable="false"
You can give value as true to clickable attribute to again make element clickable.
If you want to master in other Android basic concepts, then visit following tutorials