We will learn about tablayout android studio example.
Tablayout android studio tutorial will guide you to make different actionbar/toolbar menuitems for different colors.
In whatsapp, when you slide fragments menu items are also changing. We will develop this functionality in tablayout android tutorial.
If you don’t have go through basic tablayout tutorial, then visit android tablayout tutorial.
You can make Custom Tablayout In Android with customizable tab name, tab color and various relative positions between tab name and tab icon.
Develop basic tablayout example from above link then follow steps of this tutorial.
First, check the output of this example.
Download Source Code for Tablayout Android example
[sociallocker]Download TabMenuItemDemonuts [/sociallocker]
Step 1: Creating Base Project
Follow all the steps from basic tablayout Android tutorial.
After you have completed above tutorial, you will have one android project with simple tablayout.
Now follow below steps.
Step 2: Adding images to drawable
Download images and copy them into “drawable” directory
Step 3: Updating styles.xml
Update styles.xml file as per below source code
<resources>
    <!-- Base application theme. -->
    <style name="AppTheme" parent="Theme.AppCompat.Light.DarkActionBar">
        <!-- Customize your theme here. -->
        <item name="windowNoTitle">true</item>
        <item name="windowActionBar">false</item>
        <item name="colorPrimary">@color/colorPrimary</item>
        <item name="colorPrimaryDark">@color/colorPrimaryDark</item>
        <item name="colorAccent">@color/colorAccent</item>
    </style>

</resources>
Step 4: Creating toolbar.xml file
Create a new resource file named toolbar.xml and paste below
<?xml version="1.0" encoding="utf-8"?>
<android.support.v7.widget.Toolbar xmlns:android="http://schemas.android.com/apk/res/android"
    xmlns:local="http://schemas.android.com/apk/res-auto"
    android:id="@+id/toolbar"
    android:layout_width="match_parent"
    android:layout_height="wrap_content"
    android:minHeight="?attr/actionBarSize"
    android:background="?attr/colorPrimary"
    local:theme="@style/ThemeOverlay.AppCompat.Dark.ActionBar"
    local:popupTheme="@style/ThemeOverlay.AppCompat.Light" />
Step 5: Developing OneActivity
Create a new activity named “OneActivity.”
Copy following in activity_one.xml
<?xml version="1.0" encoding="utf-8"?>
<LinearLayout xmlns:android="http://schemas.android.com/apk/res/android"
    xmlns:tools="http://schemas.android.com/tools"
    android:layout_width="match_parent"
    android:layout_height="match_parent"
    android:orientation="vertical"
    tools:context="com.exampledemo.parsaniahardik.tabmenuitem.OneActivity">

    <include
        android:id="@+id/toolbar"
        layout="@layout/toolbar" />

    <TextView
        android:layout_width="match_parent"
        android:layout_height="match_parent"
        android:gravity="center"
        android:background="#f12a1f"
        android:textSize="25sp"
        android:textColor="#fff"
        android:text="This is One Activity. Similarly you can create activity for two and three fragments." />

</LinearLayout>
Add following source code into OneActivity.java class
import android.support.v7.app.AppCompatActivity;
import android.os.Bundle;
import android.support.v7.widget.Toolbar;
import android.view.MenuItem;

public class OneActivity extends AppCompatActivity {

    private Toolbar toolbar;

    @Override
    protected void onCreate(Bundle savedInstanceState) {
        super.onCreate(savedInstanceState);
        setContentView(R.layout.activity_one);

        toolbar = (Toolbar) findViewById(R.id.toolbar);
        setSupportActionBar(toolbar);
        getSupportActionBar().setTitle("One Activity");
        getSupportActionBar().setDisplayHomeAsUpEnabled(true);

    }
    @Override
    public boolean onOptionsItemSelected(MenuItem item) {
        if (item.getItemId() == android.R.id.home) {
            onBackPressed();
            return true;
        }
        return false;
    }
}
Step 6: Creating menu resource directory
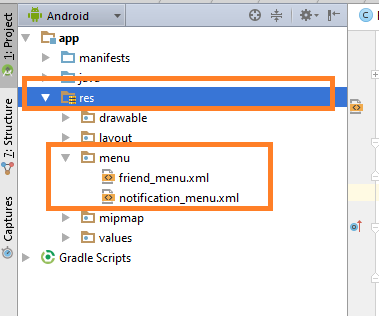
Create a new resource directory named “menu” inside the “res” directory as per below image.
Inside “menu,” make three new xml files and name them as one_menu.xml,two_menu.xml and three_menu.xml
Add below source code in one_menu.xml
<?xml version="1.0" encoding="utf-8"?>
<menu xmlns:android="http://schemas.android.com/apk/res/android"
    xmlns:app="http://schemas.android.com/apk/res-auto">

    <item
        android:id="@+id/action_message"
        android:orderInCategory="100"
        android:title="Message"
        android:icon="@drawable/message"
        app:showAsAction="always" />

</menu>
Add following in two_menu.xml
<?xml version="1.0" encoding="utf-8"?>
<menu xmlns:android="http://schemas.android.com/apk/res/android"
    xmlns:app="http://schemas.android.com/apk/res-auto">

    <item
        android:id="@+id/action_car"
        android:orderInCategory="100"
        android:title="Message"
        android:icon="@drawable/car"
        app:showAsAction="always" />

</menu>
Add below in three_menu.xml
<?xml version="1.0" encoding="utf-8"?>
<menu xmlns:android="http://schemas.android.com/apk/res/android"
    xmlns:app="http://schemas.android.com/apk/res-auto">

    <item
        android:id="@+id/action_logout"
        android:orderInCategory="100"
        android:title="Logout"
        app:showAsAction="never" />
</menu>
Step 7: Updating all fragments
Update OneFragment.java as per below code
import android.content.Intent;
import android.os.Bundle;
import android.support.v4.app.Fragment;
import android.view.LayoutInflater;
import android.view.Menu;
import android.view.MenuInflater;
import android.view.MenuItem;
import android.view.View;
import android.view.ViewGroup;
import android.widget.TextView;
import android.widget.Toast;

public class OneFragment extends Fragment {

    private View view;
    private TextView textView;

    public OneFragment() {
        // Required empty public constructor
    }

    @Override
    public void onCreate(Bundle savedInstanceState) {
        super.onCreate(savedInstanceState);
        setHasOptionsMenu(true);
    }

    @Override
    public View onCreateView(LayoutInflater inflater, ViewGroup container,
                             Bundle savedInstanceState) {
        // Inflate the layout for this fragment
        view = inflater.inflate(R.layout.fragment_one, container, false);

        textView = (TextView) view.findViewById(R.id.tv);

        textView.setOnClickListener(new View.OnClickListener() {
            @Override
            public void onClick(View v) {
                Intent intent = new Intent(getActivity(),OneActivity.class);
                startActivity(intent);
            }
        });

        return view;
    }
    @Override
    public void onCreateOptionsMenu(Menu menu, MenuInflater inflater) {

        inflater.inflate(R.menu.one_menu, menu);

        super.onCreateOptionsMenu(menu, inflater);
    }

    @Override
    public boolean onOptionsItemSelected(MenuItem item) {
        // Handle action bar item clicks here. The action bar will
        // automatically handle clicks on the Home/Up button, so long
        // as you specify a parent activity in AndroidManifest.xml.
        int id = item.getItemId();

        //noinspection SimplifiableIfStatement
        if (id == R.id.action_message) {
            Toast.makeText(getActivity(), "Message clicked!", Toast.LENGTH_SHORT).show();
            return true;

        }

        return super.onOptionsItemSelected(item);
    }

}
Update TwoFragment.java as per following
import android.os.Bundle;
import android.support.v4.app.Fragment;
import android.view.LayoutInflater;
import android.view.Menu;
import android.view.MenuInflater;
import android.view.MenuItem;
import android.view.View;
import android.view.ViewGroup;
import android.widget.Toast;

public class TwoFragment extends Fragment {

    public TwoFragment() {
        // Required empty public constructor
    }

    @Override
    public void onCreate(Bundle savedInstanceState) {
        super.onCreate(savedInstanceState);
        setHasOptionsMenu(true);
    }

    @Override
    public View onCreateView(LayoutInflater inflater, ViewGroup container,
                             Bundle savedInstanceState) {
        // Inflate the layout for this fragment
        return inflater.inflate(R.layout.fragment_two, container, false);
    }

    @Override
    public void onCreateOptionsMenu(Menu menu, MenuInflater inflater) {

        inflater.inflate(R.menu.two_menu, menu);

        super.onCreateOptionsMenu(menu, inflater);
    }

    @Override
    public boolean onOptionsItemSelected(MenuItem item) {
        // Handle action bar item clicks here. The action bar will
        // automatically handle clicks on the Home/Up button, so long
        // as you specify a parent activity in AndroidManifest.xml.
        int id = item.getItemId();

        //noinspection SimplifiableIfStatement
        if (id == R.id.action_car) {
            Toast.makeText(getActivity(), "Car clicked!", Toast.LENGTH_SHORT).show();
            return true;

        }

        return super.onOptionsItemSelected(item);
    }
}
Update ThreeFragment.java like below
import android.os.Bundle;
import android.support.v4.app.Fragment;
import android.view.LayoutInflater;
import android.view.Menu;
import android.view.MenuInflater;
import android.view.MenuItem;
import android.view.View;
import android.view.ViewGroup;
import android.widget.Toast;

public class ThreeFragment extends Fragment {

    public ThreeFragment() {
        // Required empty public constructor
    }

    @Override
    public void onCreate(Bundle savedInstanceState) {
        super.onCreate(savedInstanceState);
        setHasOptionsMenu(true);
    }

    @Override
    public View onCreateView(LayoutInflater inflater, ViewGroup container,
                             Bundle savedInstanceState) {
        // Inflate the layout for this fragment
        return inflater.inflate(R.layout.fragment_three, container, false);
    }

    @Override
    public void onCreateOptionsMenu(Menu menu, MenuInflater inflater) {

        inflater.inflate(R.menu.three_menu, menu);

        super.onCreateOptionsMenu(menu, inflater);
    }

    @Override
    public boolean onOptionsItemSelected(MenuItem item) {
        // Handle action bar item clicks here. The action bar will
        // automatically handle clicks on the Home/Up button, so long
        // as you specify a parent activity in AndroidManifest.xml.
        int id = item.getItemId();

        //noinspection SimplifiableIfStatement
        if (id == R.id.action_logout) {
            Toast.makeText(getActivity(), "Logout clicked!", Toast.LENGTH_SHORT).show();
            return true;

        }

        return super.onOptionsItemSelected(item);
    }
}
Kotlin Version
Kotlin version of this example : Tablayout Kotlin Android
Feel free to use comment section for queries and reviews.
Thank you and share our tutorials with others to help them in their learnings.

