Hello Coders, Welcome to Videoview android kotlin tutorial example. Today you will learn how to play videos in android’s Videoview from a raw folder of android studio directory.
You will also learn how to play video continuously in this tutorial.
First of all checkout output of this videoview android kotlin example then we will implement it.
Creating Videoview Android Studio Example
Step 1: Create a new project in android studio.
Step 2: Updating activity_main.xml file
Add below code in activity_main.xml file
<?xml version="1.0" encoding="utf-8"?>
<LinearLayout xmlns:android="http://schemas.android.com/apk/res/android"
    xmlns:tools="http://schemas.android.com/tools"
    android:layout_width="match_parent"
    android:layout_height="match_parent"
    android:orientation="vertical"
    tools:context="com.example.parsaniahardik.kotlin_videoview.MainActivity">

    <LinearLayout
        android:layout_width="wrap_content"
        android:layout_height="wrap_content"
        android:orientation="horizontal">

        <Button
            android:layout_width="wrap_content"
            android:layout_height="wrap_content"
            android:id="@+id/btnonce"
            android:text="Once"/>
        <Button
            android:layout_width="wrap_content"
            android:layout_height="wrap_content"
            android:id="@+id/btnconti"
            android:text="continuously"/>
        <Button
            android:layout_width="wrap_content"
            android:layout_height="wrap_content"
            android:id="@+id/btnstop"
            android:text="Stop"/>

    </LinearLayout>
    <RelativeLayout
        android:layout_width="match_parent"
        android:layout_height="match_parent">

        <VideoView
            android:layout_width="match_parent"
            android:layout_height="match_parent"
            android:layout_alignParentBottom="true"
            android:layout_alignParentEnd="true"
            android:layout_alignParentLeft="true"
            android:layout_alignParentRight="true"
            android:layout_alignParentStart="true"
            android:layout_alignParentTop="true"
            android:id="@+id/vv"/>

    </RelativeLayout>

</LinearLayout>
Step 3: Adding resource directory “raw” under “res” directory.
Now we need to create raw directory, in which we will save our video.
Follow below steps
- One left left click on res directory at left menu side of android studio.
- One Right click on res directory, one menu will open.
- From that menu, follow New-> Android resource directory
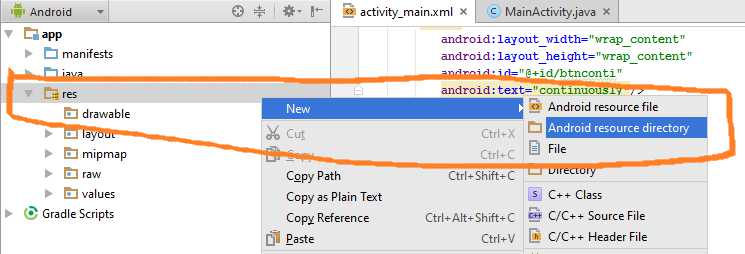
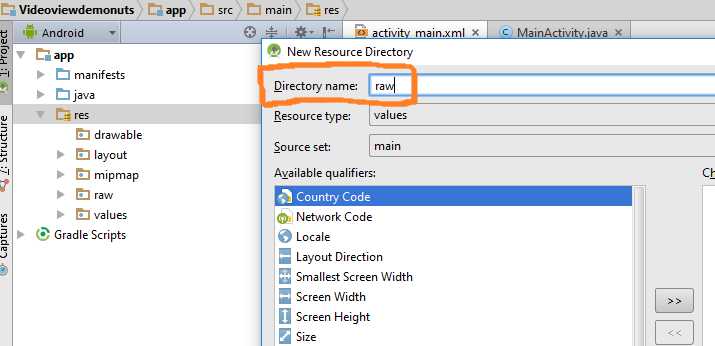
- When you click on Android resource directory, one dialog will open.
- In Directory name give value as “raw.“
Now save your video in the raw directory.
Step 4: Updating MainActivity.kt class :
Add below code to MainActivity.kt
import android.net.Uri
import android.support.v7.app.AppCompatActivity
import android.os.Bundle
import android.view.View
import android.widget.Button
import android.widget.MediaController
import android.widget.VideoView

class MainActivity : AppCompatActivity() {

    private var btnonce: Button? = null
    private var btncontinuously: Button? = null
    private var btnstop: Button? = null
    private var vv: VideoView? = null
    private var mediacontroller: MediaController? = null
    private var uri: Uri? = null
    private var isContinuously = false

    override fun onCreate(savedInstanceState: Bundle?) {
        super.onCreate(savedInstanceState)
        setContentView(R.layout.activity_main)

        btnonce = findViewById(R.id.btnonce) as Button
        btncontinuously = findViewById(R.id.btnconti) as Button
        btnstop = findViewById(R.id.btnstop) as Button
        vv = findViewById(R.id.vv) as VideoView

        mediacontroller = MediaController(this)
        mediacontroller!!.setAnchorView(vv)
        val uriPath = "android.resource://com.example.parsaniahardik.kotlin_videoview/" + R.raw.funn  //update package name
        uri = Uri.parse(uriPath)

        vv!!.setOnCompletionListener {
            if (isContinuously) {
                vv!!.start()
            }
        }

        btnstop!!.setOnClickListener { vv!!.stopPlayback() }

        btnonce!!.setOnClickListener {
            isContinuously = false
            vv!!.setMediaController(mediacontroller)
            vv!!.setVideoURI(uri)
            vv!!.requestFocus()
            vv!!.start()
        }

        btncontinuously!!.setOnClickListener {
            isContinuously = true
            vv!!.setMediaController(mediacontroller)
            vv!!.setVideoURI(uri)
            vv!!.requestFocus()
            vv!!.start()
        }

    }
}
Step 5: Updating AndroidManifest.xml file
add internet permission between <manifest>….</manifest> tag.
<uses-permission android:name="android.permission.INTERNET" />
Note: If you are targeting SDK version above 22 (Above Lollipop) then you need to ask a user for granting runtime permissions. Check marshmallow runtime permission for more information.
Step 6: Description of MainActivity.kt
- Below code
 mediacontroller = MediaController(this)
        mediacontroller!!.setAnchorView(vv)
- will set mediacontrollers(previous, pause, play, next buttons) to videoview.
- Below code
val uriPath = "android.resource://com.example.parsaniahardik.kotlin_videoview/" + R.raw.funn //update package name
- Here you need to update your package name.
- Replace your package name with com.exampledemo.parsaniahardik.videoviewdemonuts
- Also replace name of your video with funn in R.raw.funn
- Following code will run when video has finished it’s run.
vv!!.setOnCompletionListener {
            if (isContinuously) {
                vv!!.start()
            }
        }
- As you can see we are using boolean isContinuously to detect which button is pressed, Either “ONCE” or “Continuously “.
- We are managing isContinuously and starting video on both button’s click method as below.
btnonce!!.setOnClickListener {
    isContinuously = false
    vv!!.setMediaController(mediacontroller)
    vv!!.setVideoURI(uri)
    vv!!.requestFocus()
    vv!!.start()
}

btncontinuously!!.setOnClickListener {
    isContinuously = true
    vv!!.setMediaController(mediacontroller)
    vv!!.setVideoURI(uri)
    vv!!.requestFocus()
    vv!!.start()
}
Java Version
Java vesion of this tutorial : Android Videoview Tutorial
So that is all for this videoview android studio kotlin example. Thank you for your interest, keep visiting for more cutting edge tutorials. 🙂
Download Source Code For Videoview Android Kotlin
[sociallocker]Download Android Kotlin_VideoView[/sociallocker]