Hello Coders, Welcome to Android Videoview tutorial with example in android studio.
One of the primary uses for smartphones and tablets is to enable the user to access and consume content. One key form of content widely used, especially in the case of tablet devices, is video.
Videoview is used to play a video file (.mp4, .avi, .mkv etc formats) in an android application.
Every android app consisting a video player is using a videoview to display a video file.
Two practical example are covered in this tutorial.
Videoview provides some in build features like play, pause, stop, next, previous etc. features.
This is a visual component which, when added to the layout of an activity, provides a surface onto which a video may be played.
The simplest possible way to play a video clip in your app, is to use the videoview class to play the video, and the MediaController class as the UI to control it.
Your app can play media files from a variety of sources, including embedded in the app’s resources, stored on external media such as an SD card, or streamed from the internet.
Android VideoView class has several methods, using which, you can control the media and video player.
Following are the methods of the Android VideoView class.
VideoView Methods
You need to add VideoView via two ways. First one is to add User Interface in .xml file and second one is to defined it’s variable in Java or Kotlin File.
You can add UI in xml file with below code
 <VideoView
            android:layout_width="match_parent"
            android:layout_height="match_parent"
            android:layout_alignParentBottom="true"
            android:layout_alignParentEnd="true"
            android:layout_alignParentLeft="true"
            android:layout_alignParentRight="true"
            android:layout_alignParentStart="true"
            android:layout_alignParentTop="true"
            android:id="@+id/vv"/>
Now let us see some useful methods of VideoView class.
You can set height and width of the video player with the help of the properties like layout_height and layout_width respectively.
1. public void setMediaController (MediaController controller) :
This method will set media control object for videoview. This will add controls to our video player. Below are the coding lines
 mediacontroller = new MediaController(this);
 mediacontroller.setAnchorView(vv);
 vv.setMediaController(mediacontroller);
If we do not set mediacontroller, then the video will run till the end every time. User can not pause or stop the video because there are no controls are attached with video view.
I will describe setAnchorView() method later in this tutorial itself.
2. setVideoURI(Uri uri) :
When you want to load video from the local resource, you need to give path to that local video file. This method will use this path as an URI.
String uriPath = "android.resource://com.exampledemo.parsaniahardik.videoviewdemonuts/"+R.raw.funn;  //update package name
uri = Uri.parse(uriPath);
vv.setVideoURI(uri);
As you can see, path is stored in string variable first and then it is converted into uri format, This uri format is then set into the setVideoURI method.
3. requestFocus() :
This method will request focus for specific videoview. If you have more than one video on single page then this method will help to start specific video.
vv.requestFocus();
4. setVideoPath(String path):
This method is used to set path of video which is stored in internal or external storage of android device.
vv.setVideoPath("/sdcard/mwwyt.mpg");
vv.setVideoPath("android.resource://" + getPackageName() + "/" + R.raw.sample);

String s="https://firebasestorage.googleapis.com/v0/b/lifesaver-18f28.appspot.com/o/flood.mp4?alt=media&token=179d7e4e-7171-4a87-b1f8-b1fc3d976c60";
vv.setVideoPath(s);
5. start() :
This method simply orders videoview to start the video.
Below source code shows how to start the video programmatically.
vv.start();
6. stopPlayBack() :
The current running Video will be stopped when this method is called.
Below lines show how to stop the current running video programmatically.
vv.stopPlayBack();
7. seekTo(int milliSec) :
This method moves the media to specified time position by considering the given mode.
When seekTo is finished, the user will be notified via OnSeekComplete supplied by the user. There is at most one active seekTo processed at any time. If there is a to-be-completed seekTo, new seekTo requests will be queued in such a way that only the last request is kept. When current seekTo is completed, the queued request will be processed if that request is different from just-finished seekTo operation.
8. pause() :
This method will tell the videoview to pause the video at the current position and timeline.
Following code shows how to pause the current video playback programmatically.
vv.pause();
9. resume():
Resume method will start the paused video when it is called. Video should be start from the time where it was paused earlier.
Following lines shows usage of this method.
vv.resume();
10. isPlaying(): If you want to check if the video is playing or not, then this method will help you out.
This method gives boolean (true or false) output. If the video is playing,then it will return true otherwise false.
Example code for this method:
Boolean isPlaying = vv.isPlaying();
11. canPause(): This method will tell you whether the videoview is able to pause currently running video or not.
It will also return boolean value. If video is able to be paused then it will return true, otherwise false.
Below are the coding details.
Boolean canPause = vv.canPause();
12. canSeekForward():
This method will return true value if video view is able to seek forward, false otherwise.
boolean value will be returned by this method.
Boolean canSeekForward = vv.canSeekForward();
13. canSeekBackward():
If video view is not able to seek backward then this method will return false.
It will return true if video is able to seek backward.
Boolean canSeekBackward = vv.canSeekBackward();
14. getDuration():
This method is used to get the total duration of video view.
Duration will be returned in integer format.
int duration = vv.getDuration();
15. setOnCompletionListener():
What if you want to do some awesome thing when video is completed? This method will give you an opportunity to accomplish your goal.
Define your set of actions in this method as per below
vv.setOnCompletionListener(new MediaPlayer.OnCompletionListener() {
            @Override
            public void onCompletion(MediaPlayer mp) {
                   vv.start();
            }
        });
Above video will restart the video when it has finished it’s streaming.
Methods of MediaController
A video player app without any media control is almost useless for the user.
User always want to control the currently playing video as per various requirements.
Video view class does not provide any controls by default but MediaController class is responsible to add media control buttons into the videoview.
To use a MediaController view, you don’t define it in your layout as you would other views. Instead you instantiate it programmatically in your app’s onCreate() method and then attach it to a media player.
Media controls will flop up at the bottom of the screen.
1.setAnchorView():
This method will help mediacontroller to set anchor view for all the controls like pause, stop, forward, backward etc.
Example lines are like below
MediaController mediacontroller = new MediaController(this);
mediacontroller.setAnchorView(vv);
2. show()
Use this method to show the controller on the screen.
It will go away automatically after 3 seconds of inactivity.
Usage is as follows
MediaController mediaController = new MediaController(this);
mediaController.show();
3. show(int timeout)
Show the controller on the screen with this method. It will go away automatically after ‘timeout‘ milliseconds of inactivity.
Use 0 to show the controller until the hide() method is called.
MediaController mediaController = new MediaController(this);
mediaController.show(5000);
If you write above, then controls go away after 5 seconds.
4. hide()
Use this method to remove the controller from the screen.
If you do not want to allow user to interrupt the stream, use this method.
MediaController mediaController = new MediaController(this);
mediaController.hide();
5. isShowing()
This method returns a boolean value about whether the controller is visible to user or not.
If it returns true then controller is visible otherwise not.
Boolean isShowing = mediaController.isShowing();
6. onTouchEvent()
Implement this method to handle touch screen motion events.
If you have read these method description, then let us make a practical example with android videoview.
1. Android Play Video in VideoView Programmatically
Today you will learn how to play videos in android’s Videoview from a raw folder of android studio directory.
You will also learn how to play video continuously in this tutorial.
First of all checkout output of this videoview android studio example then we will implement it.
Step 2: Updating activity_main.xml file
Add below code in activity_main.xml file
<?xml version="1.0" encoding="utf-8"?>
<LinearLayout xmlns:android="http://schemas.android.com/apk/res/android"
    xmlns:tools="http://schemas.android.com/tools"
    android:layout_width="match_parent"
    android:layout_height="match_parent"
    android:orientation="vertical"
    tools:context="com.exampledemo.parsaniahardik.videoviewdemonuts.MainActivity">

   <LinearLayout
       android:layout_width="wrap_content"
       android:layout_height="wrap_content"
       android:orientation="horizontal">

       <Button
           android:layout_width="wrap_content"
           android:layout_height="wrap_content"
           android:id="@+id/btnonce"
           android:text="Once"/>
       <Button
           android:layout_width="wrap_content"
           android:layout_height="wrap_content"
           android:id="@+id/btnconti"
           android:text="continuously"/>
       <Button
           android:layout_width="wrap_content"
           android:layout_height="wrap_content"
           android:id="@+id/btnstop"
           android:text="Stop"/>

   </LinearLayout>
    <RelativeLayout
        android:layout_width="match_parent"
        android:layout_height="match_parent">

        <VideoView
            android:layout_width="match_parent"
            android:layout_height="match_parent"
            android:layout_alignParentBottom="true"
            android:layout_alignParentEnd="true"
            android:layout_alignParentLeft="true"
            android:layout_alignParentRight="true"
            android:layout_alignParentStart="true"
            android:layout_alignParentTop="true"
            android:id="@+id/vv"/>

    </RelativeLayout>

</LinearLayout>
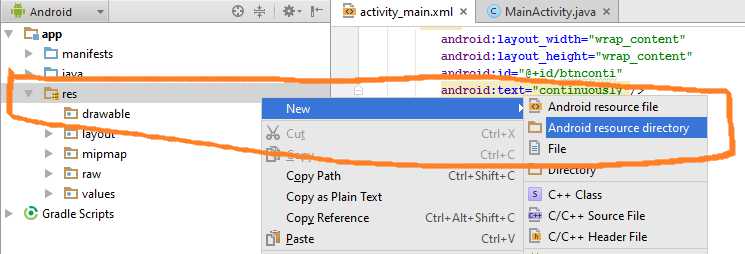
Step 3: Adding resource directory “raw” under “res” directory.
Now we need to create raw directory, in which we will save our video.
Follow below steps
One left left click on res directory at left menu side of android studio.
One Right click on res directory, one menu will open.
From that menu, follow New-> Android resource directory
When you click on Android resource directory, one dialog will open.
In Directory name give value as “raw.“
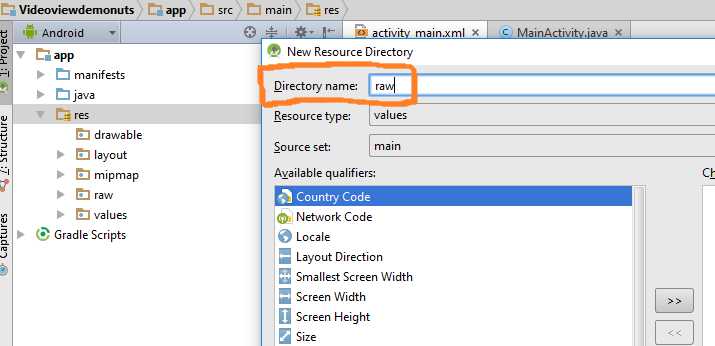
Now save your video in the raw directory.
Step 4: Updating MainActivity.java class :
Add below code to MainActivity.java
import android.media.MediaPlayer;
import android.net.Uri;
import android.support.v7.app.AppCompatActivity;
import android.os.Bundle;
import android.view.View;
import android.widget.Button;
import android.widget.MediaController;
import android.widget.VideoView;

public class MainActivity extends AppCompatActivity {

    private Button btnonce, btncontinuously, btnstop;
    private VideoView vv;
    private MediaController mediacontroller;
    private Uri uri;
    private boolean isContinuously = false;

    @Override
    protected void onCreate(Bundle savedInstanceState) {
        super.onCreate(savedInstanceState);
        setContentView(R.layout.activity_main);

        btnonce = (Button) findViewById(R.id.btnonce);
        btncontinuously = (Button) findViewById(R.id.btnconti);
        btnstop = (Button) findViewById(R.id.btnstop);
        vv = (VideoView) findViewById(R.id.vv);

        mediacontroller = new MediaController(this);
        mediacontroller.setAnchorView(vv);
        String uriPath = "android.resource://com.exampledemo.parsaniahardik.videoviewdemonuts/"+R.raw.funn;  //update package name
        uri = Uri.parse(uriPath);

        vv.setOnCompletionListener(new MediaPlayer.OnCompletionListener() {
            @Override
            public void onCompletion(MediaPlayer mp) {
                if(isContinuously){
                    vv.start();
                }
            }
        });

        btnstop.setOnClickListener(new View.OnClickListener() {
            @Override
            public void onClick(View v) {
                vv.stopPlayback();
            }
        });

        btnonce.setOnClickListener(new View.OnClickListener() {
            @Override
            public void onClick(View v) {
                isContinuously = false;
                vv.setMediaController(mediacontroller);
                vv.setVideoURI(uri);
                vv.requestFocus();
                vv.start();
            }
        });

        btncontinuously.setOnClickListener(new View.OnClickListener() {
            @Override
            public void onClick(View v) {
                isContinuously = true;
                vv.setMediaController(mediacontroller);
                vv.setVideoURI(uri);
                vv.requestFocus();
                vv.start();
            }
        });

    }
}
Step 5: Updating AndroidManifest.xml file
add internet permission between <manifest>….</manifest> tag.
| 1 | <uses-permission android:name=”android.permission.INTERNET” /> |
Step 6: Description of MainActivity.java
- Below code
 mediacontroller = new MediaController(this);
        mediacontroller.setAnchorView(vv);
- will set mediacontrollers(previous, pause, play, next buttons) to videoview.
- Below code
String uriPath = "android.resource://com.exampledemo.parsaniahardik.videoviewdemonuts/"+R.raw.funn; //update package name
Here you need to update your package name.
Replace your package name with com.exampledemo.parsaniahardik.videoviewdemonuts
Also replace name of your video with funn in R.raw.funn
Following code will run when video has finished it’s run. vv.setOnCompletionListener(new MediaPlayer.OnCompletionListener() { @Override public void onCompletion(MediaPlayer mp) { if(isContinuously){ vv.start(); } } }); As you can see we are using boolean isContinuously todetect which button is pressed, Either “ONCE” or “Continuously “.
We are managing isContinuously and starting video on both button’s click method as below.
 btnonce.setOnClickListener(new View.OnClickListener() {
            @Override
            public void onClick(View v) {
                isContinuously = false;
                vv.setMediaController(mediacontroller);
                vv.setVideoURI(uri);
                vv.requestFocus();
                vv.start();
            }
        });

        btncontinuously.setOnClickListener(new View.OnClickListener() {
            @Override
            public void onClick(View v) {
                isContinuously = true;
                vv.setMediaController(mediacontroller);
                vv.setVideoURI(uri);
                vv.requestFocus();
                vv.start();
            }
        });