I will describe Android Baseadapter Tutorial With Example in this article.
Base adapter is the core class to make various adapters like array adapter, simple adapter or cursor adapter.
If you do not know what is the adapter in android then visit android adapter tutorial.
Basically, Adapter is the bridge between the data source and a final views like listview, gridview or spinner.
Adapter will retrieve the data from the data source and will transfer this data to the UI widgets like istview, gridview or spinner.
We can compare adapter with electrical adapter. Mobile device which need electricity is listview while electricity is a data source.
Adapter will provide the electricity (Data) to the mobile device (Listview, GridView, Spinner).
Basics about Android BaseAdapter
Base adapter is the main source of classes provided by android built in system to make any other custom adapters.
For example, when you want to make custom adapter with your custom requirements you need to extend the Base adapter.
Base adapter will provide the core methods, which we can override with our custom code and functions.
ListView, GridView or Spinner with complex structure will require custom version of the base adapter.
By extending the Base Adapter, you can create any kind of custom adapter that is required in Listview, GridView or spinner implementation.
Methods
Following is the sample code of any custom adapter who extends the Base adapter
public class CustomeAdapter extends BaseAdapter {

     public CustomeAdapter(Context context) {

          }

    @Override
    public int getViewTypeCount() {
        return getCount();
    }
    @Override
    public int getItemViewType(int position) {

        return position;
    }

    @Override
    public int getCount() {
        return imageModelArrayList.size();
    }

    @Override
    public Object getItem(int position) {
        return imageModelArrayList.get(position);
    }

    @Override
    public long getItemId(int position) {
        return 0;
    }

    @Override
    public View getView(int position, View convertView, ViewGroup parent) {
        return convertView;
    }
As above code says that custom adapter is extending the base adapter and overriding the necessary methods.
Let us now understand the working of the methods of the Base Adapter.
1. areAllItemsEnabled()
Indicates whether all the items in this adapter are enabled. If the value returned by this method changes over time, there is no guarantee it will take effect. If true, it means all items are selectable and clickable (there is no separator.)
2. getItemViewType(int position)
Get the type of View that will be created by getView(int, View, ViewGroup) for the specified item.
ListView can be have more than one type of row (For example, header row, sub header row, child row etc.) . This method will return which type of row it is.
Code example can be like the below
 @Override
    public int getItemViewType(int position) {

        return position;
    }
3. getViewTypeCount()
Returns the number of types of Views that will be created by getView(int, View, ViewGroup).
It will return the total number of view types in the list. If listview have header row, sub header row, child item and sub child item than this method will return 4.
You can write this method as the following
@Override
    public int getViewTypeCount() {
        return getCount();
}
4. getCount()
How many items are in the data set represented by this Adapter.
This method will return the total number of row in the listview.
For grid view it will return the total number of images present in it.
In spinner, it will return the total number of spinner drop down options.
Following line says how this method looks a like
@Override
    public int getCount() {
        return listItemArrayList.size();
 }
5. getItem(int position)
Get the data item associated with the specified position in the data set.
For example, If the data set is arraylist of string and position is 5th, then this method will return the string available at 5th position of arraylist.
@Override
    public Object getItem(int position) {
        return listItemArrayList.get(position);
 }
6. getItemId(int position)
Get the row id associated with the specified position in the list.
 @Override
    public long getItemId(int position) {
        return 0;
    }
7. getView(int i, View view, ViewGroup viewGroup)
This method will return the final view that a listview will set to it’s row’s ith (first parameter) position.
If listview has six rows then compiler will this method for six times.
In every iteration, compiler will fetch or inflate the XML file which will provide UI widgets (Textview, Button, ImageView etc.) for the row item.
Then it will set the appropriate values to the UI widgets (Textview, Button, ImageView etc.)
@Override
public View getView(int i, View view, ViewGroup viewGroup) {

     view = inflter.inflate(R.layout.lv_item, null);//layout file for displaying items
     ImageView preview = (ImageView) view.findViewById(R.id.icon);//find id for image view
         preview.setImageResource(animals[i]);

     return view;
}
8. public CharSequence[] getAutofillOptions ()
Gets a string representation of the adapter data that can help AutofillService autofill the view backed by the adapter.
9. public View getDropDownView (int position, View convertView, ViewGroup parent)
Gets a View that displays in the drop down popup the data at the specified position in the data set.
This method is mostly used in the spinner implementation.
10.public void notifyDataSetChanged ()
Notifies the attached observers that the underlying data has been changed and any View reflecting the data set should refresh itself.
When you change value of any UI widget like checkbox or any other, you should call this method to tell compiler that the data is changed.
11. public void notifyDataSetInvalidated ()
Notifies the attached observers that the underlying data is no longer valid or available. Once invoked this adapter is no longer valid and should not report further data set changes.
Base Adapter Example
Step 1. XML files
Make a new project in android studio.
Now in the activity_main.xml file, add the below source code
<?xml version="1.0" encoding="utf-8"?>
<RelativeLayout xmlns:android="http://schemas.android.com/apk/res/android"
    xmlns:tools="http://schemas.android.com/tools"
    android:layout_width="match_parent"
    android:layout_height="match_parent">

    <ListView
        android:layout_width="wrap_content"
        android:layout_height="wrap_content"
        android:id="@+id/listView"
        android:divider="@null"
        />
</RelativeLayout>
Just one listview in the main layout.
Make a new XML layout resource file and give it a name lv_item.xml
Write down the below code in the lv_item.xml
<?xml version="1.0" encoding="utf-8"?>
<LinearLayout xmlns:android="http://schemas.android.com/apk/res/android"
    android:layout_width="match_parent"
    android:layout_height="match_parent"
    android:orientation="vertical">

    <LinearLayout
        android:layout_width="match_parent"
        android:layout_height="wrap_content"
        android:orientation="horizontal">

        <ImageView
            android:id="@+id/imgView"
            android:layout_width="100dp"
            android:layout_height="100dp"
            android:layout_marginLeft="10dp"
            android:layout_marginTop="10dp" />

        <TextView
            android:id="@+id/name"
            android:layout_width="match_parent"
            android:layout_height="110dp"
            android:gravity="center_vertical"
            android:textAppearance="?android:attr/textAppearanceMedium"
            android:paddingLeft="10dp"
            android:text="Name" />

    </LinearLayout>


    <View
        android:layout_width="match_parent"
        android:layout_height="1dp"
        android:layout_marginTop="10dp"
        android:layout_marginLeft="10dp"
        android:layout_marginRight="10dp"
        android:background="@color/colorAccent"/>

</LinearLayout>
This file is the core view file for the listview.
Adapter will use this file to generate the layout of the each cell of the listview.
I have taken one textview and imageview in this file.
Click the below link to download images.
download demonuts_images_listview
After downloading the images, copy them into the res->drawable directory.
Step 2. Model and Images
Now make a new JAVA class and name it as ImageModel.java
Code block for ImageModel.java is as the following
/**
 * Created by Parsania Hardik on 03-Jan-17.
 */
public class ImageModel {

    private String name;
    private int image_drawable;

    public String getName() {
        return name;
    }

    public void setName(String name) {
        this.name = name;
    }

    public int getImage_drawable() {
        return image_drawable;
    }

    public void setImage_drawable(int image_drawable) {
        this.image_drawable = image_drawable;
    }
}
This file has main two variable.
One is string variable and other one is integer, which will hold the reference of the images present in the drawable folder.
Getter and setter methods for both of this variables are also there.
Step 3. Adapter and Main classes
Now we will create the adapter class. Prepare a new JAVA class called CustomeAdapter.java
Copy the following code in CustomeAdapter.java
import android.content.Context;
import android.view.LayoutInflater;
import android.view.View;
import android.view.ViewGroup;
import android.widget.BaseAdapter;
import android.widget.ImageView;
import android.widget.TextView;
import java.util.ArrayList;

/**
 * Created by Parsania Hardik on 03-Jan-17.
 */
public class CustomeAdapter extends BaseAdapter {

    private Context context;
    private ArrayList<ImageModel> imageModelArrayList;

    public CustomeAdapter(Context context, ArrayList<ImageModel> imageModelArrayList) {

        this.context = context;
        this.imageModelArrayList = imageModelArrayList;
    }

    @Override
    public int getViewTypeCount() {
        return getCount();
    }
    @Override
    public int getItemViewType(int position) {

        return position;
    }

    @Override
    public int getCount() {
        return imageModelArrayList.size();
    }

    @Override
    public Object getItem(int position) {
        return imageModelArrayList.get(position);
    }

    @Override
    public long getItemId(int position) {
        return 0;
    }

    @Override
    public View getView(int position, View convertView, ViewGroup parent) {
        ViewHolder holder;

        if (convertView == null) {
            holder = new ViewHolder();
            LayoutInflater inflater = (LayoutInflater) context
                    .getSystemService(Context.LAYOUT_INFLATER_SERVICE);
            convertView = inflater.inflate(R.layout.lv_item, null, true);

            holder.tvname = (TextView) convertView.findViewById(R.id.name);
            holder.iv = (ImageView) convertView.findViewById(R.id.imgView);

            convertView.setTag(holder);
        }else {
            // the getTag returns the viewHolder object set as a tag to the view
            holder = (ViewHolder)convertView.getTag();
        }

        holder.tvname.setText(imageModelArrayList.get(position).getName());
        holder.iv.setImageResource(imageModelArrayList.get(position).getImage_drawable());

        return convertView;
    }

    private class ViewHolder {

        protected TextView tvname;
        private ImageView iv;

    }

}
You can see that I have made a custom adapter by extending the base adapter.
I have also override the methods of base adapter like getCount(), getView(), getItem(), getItemId() etc.
Finally, code block for MainActivity.java is looking like the below
import android.support.v7.app.AppCompatActivity;
import android.os.Bundle;
import android.widget.ListView;

import java.util.ArrayList;

public class MainActivity extends AppCompatActivity {

    private ListView lv;
    private CustomeAdapter customeAdapter;
    private ArrayList<ImageModel> imageModelArrayList;
    private int[] myImageList = new int[]{R.drawable.benz, R.drawable.bike,
            R.drawable.car,R.drawable.carrera
            ,R.drawable.ferrari,R.drawable.harly,
            R.drawable.lamborghini,R.drawable.silver};
    private String[] myImageNameList = new String[]{"Benz", "Bike",
            "Car","Carrera"
            ,"Ferrari","Harly",
            "Lamborghini","Silver"};

    @Override
    protected void onCreate(Bundle savedInstanceState) {
        super.onCreate(savedInstanceState);
        setContentView(R.layout.activity_main);

        lv = (ListView) findViewById(R.id.listView);

        imageModelArrayList = populateList();

        customeAdapter = new CustomeAdapter(this,imageModelArrayList);
        lv.setAdapter(customeAdapter);

    }

    private ArrayList<ImageModel> populateList(){

        ArrayList<ImageModel> list = new ArrayList<>();

        for(int i = 0; i < 8; i++){
            ImageModel imageModel = new ImageModel();
            imageModel.setName(myImageNameList[i]);
            imageModel.setImage_drawable(myImageList[i]);
            list.add(imageModel);
        }

        return list;
    }

}
Here, I have created the object of the CustomeAdapter class.
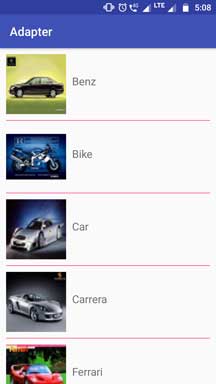
After attaching this object with listview, we will be able to populate our listview.
After this much work, when you run the app, you should get the below output