
Topic of today is Android Spinner Tutorial With Example For Beginners.
In android development, spinner widget gives us facility to create a drop down menu with multiple options.
User can select any option from this drop down menu and we can track the selection of the user and can write logic with selected option.
Spinner allows user to select only one value. Spinner doe not support multiple selection from the drop down list.
In the default state, a spinner shows its currently selected value. Touching the spinner displays a drop down menu with all other available values, from which the user can select a new one.
Just like ListView or RecyclerView, spinner is also associated with the Adapter. Hence, we need to attach the adapter class to the spinner to populate it with various options.
Methods to create spinner
Generally, developers create spinner with one of the following method.
- Using Array Adapter
- Or with the help of the Custom Adapter
When you want to develop very basic spinner with only text options, you should use the first method.
You can use second method when you want to customize your spinner heavily. For example, you want to add images along with the text in the spinner.
Functions Of Spinner
Android provides some predefined methods which helps developers to make spinner within no time.
1. setAdapter(SpinnerAdapter adapter)
Using this method we can set the SpinnerAdapter to our Spinner.
Adapter will provide data to the spinner.
2. setGravity(int gravity)
Describes how the selected item view is positioned.
3. setEnabled(boolean enabled)
Set the enabled state of this view.
4. onTouchEvent(MotionEvent event)
Implement this method to handle touch screen motion events.
5. performClick()
Call this view’s OnClickListener, if it is defined.
6. getDropDownWidth()
Get the configured width of the spinner’s popup window of choices in pixels.
7. getPopupBackground()
Get the background drawable for the spinner’s popup window of choices.
8. setDropDownWidth(int pixels)
Set the width of the spinner’s popup window of choices in pixels.
Example of Spinners
Let us create two examples of spinner in the android studio.
First example will contain spinner with text options. It will be a simple example where we will use array adapter.
In the second example, we will add image along with the text in every drop down option of spinner.
So let’s make first example step by step.
Step 1. XML file writings
First of all, create a new project in android studio.
Now add the following source code in activity_main.xml file
<?xml version="1.0" encoding="utf-8"?>
<LinearLayout
    xmlns:android="http://schemas.android.com/apk/res/android"
    xmlns:app="http://schemas.android.com/apk/res-auto"
    xmlns:tools="http://schemas.android.com/tools"
    android:layout_width="match_parent"
    android:layout_height="match_parent"
    tools:context=".MainActivity">

    <Spinner
        android:layout_width="match_parent"
        android:layout_height="wrap_content"
        android:id="@+id/spinner"
        android:layout_marginTop="200dp"
        android:layout_marginLeft="50dp"
        android:layout_marginRight="50dp"
        android:text="Hello World!"
         />

</LinearLayout>
I have taken spinner in the main layout file. Do not forget to give id to the spinner.
Now in the MainActivity.java file, you should write down the below code block
import android.support.v7.app.AppCompatActivity;
import android.os.Bundle;
import android.view.View;
import android.widget.AdapterView;
import android.widget.ArrayAdapter;
import android.widget.Spinner;
import android.widget.Toast;
import java.util.ArrayList;
import java.util.List;

public class MainActivity extends AppCompatActivity {

    private Spinner spinner;

    @Override
    protected void onCreate(Bundle savedInstanceState) {
        super.onCreate(savedInstanceState);
        setContentView(R.layout.activity_main);

        spinner = findViewById(R.id.spinner);

        final List<String> categories = new ArrayList<String>();

        categories.add("Lenovo");
        categories.add("Dell");
        categories.add("Asus");
        categories.add("Sony");
        categories.add("HP");
        categories.add("Toshiba");

        ArrayAdapter<String> dataAdapter = new ArrayAdapter<String>(this, android.R.layout.simple_spinner_item, categories);
        spinner.setAdapter(dataAdapter);
        dataAdapter.setDropDownViewResource(android.R.layout.simple_spinner_dropdown_item);

        spinner.setOnItemSelectedListener(new AdapterView.OnItemSelectedListener() {
            @Override
            public void onItemSelected(AdapterView<?> parent, View view, int position, long id) {

                Toast.makeText(MainActivity.this, "Selected : "+ categories.get(position), Toast.LENGTH_SHORT).show();
            }

            @Override
            public void onNothingSelected(AdapterView<?> parent) {

            }
        });


    }
}
Let us understand the above code deeply.
Compiler will first create the object of the spinner and will associate a id using findViewById() method.
Then below code will create a simple list.
 final List<String> categories = new ArrayList<String>();

        categories.add("Lenovo");
        categories.add("Dell");
        categories.add("Asus");
        categories.add("Sony");
        categories.add("HP");
        categories.add("Toshiba");
A list of string called “categories” will have the name of the laptop manufacture companies in the string format.
This list will work as the data source to populate our spinner. User will have options from this category list in the drop down menu.
To set this category list in the spinner, we need one adapter.
Now look at the below coding lines
 ArrayAdapter<String> dataAdapter = new ArrayAdapter<String>(this, android.R.layout.simple_spinner_item, categories);
        spinner.setAdapter(dataAdapter);
        dataAdapter.setDropDownViewResource(android.R.layout.simple_spinner_dropdown_item);
Compiler will create the object of the Array Adapter class. As you can see that it has three parameters.
First parameter is just a context of the application.
Second parameter is asking for the layout which will help to create the UI of the drop down items. I have used default layout in the above code. You can also make custom file when you are using custom adapter (We will create this in second example).
Last parameter contains the data source which is “categories” list.
After this, compiler will set the adapter to the spinner.
Now read the following code structure
  spinner.setOnItemSelectedListener(new AdapterView.OnItemSelectedListener() {
            @Override
            public void onItemSelected(AdapterView<?> parent, View view, int position, long id) {

                Toast.makeText(MainActivity.this, "Selected : "+ categories.get(position), Toast.LENGTH_SHORT).show();
            }

            @Override
            public void onNothingSelected(AdapterView<?> parent) {

            }
        });
Compiler will run the above code when the user selects any option from the spinner.
Android will show one toast when the user selects the option. Toast will have text like “Selected : Dell”
Watch the output in the below video
Download First Example
Click the below link to download the first spinner example source code.
Download Spinner First Source Code
Second Example Of Spinner
In this second project, we will insert image in the drop down option.
Make another new project in the android studio.
Step 1. Layout file and changes
Following is the code structure for activity_main.xml file.
<?xml version="1.0" encoding="utf-8"?>
<LinearLayout xmlns:android="http://schemas.android.com/apk/res/android"
    xmlns:app="http://schemas.android.com/apk/res-auto"
    xmlns:tools="http://schemas.android.com/tools"
    android:layout_width="match_parent"
    android:layout_height="match_parent"
    android:gravity="center"
    tools:context=".MainActivity">

    <Spinner
        android:layout_width="wrap_content"
        android:layout_height="wrap_content"
        android:id="@+id/spinner" />

</LinearLayout>
Again, there is only one spinner in the main layout code.
We will create custom base adapter in this example. For this, we need one separate XML file to create view of the drop down items.
So go ahead and make a new XML file under res->layout directory.
Set the name of this file as sp_item.xml and add the following coding lines in it
<?xml version="1.0" encoding="utf-8"?>
<LinearLayout xmlns:android="http://schemas.android.com/apk/res/android"
    android:layout_width="match_parent"
    android:layout_height="wrap_content"
    android:orientation="horizontal">

    <ImageView
        android:id="@+id/imageView"
        android:layout_width="50dp"
        android:layout_height="50dp"
        android:padding="5dp"
        android:src="@mipmap/ic_launcher" />

    <TextView
        android:id="@+id/textView"
        android:layout_width="fill_parent"
        android:layout_height="wrap_content"
        android:paddingLeft="10dp"
        android:paddingRight="10dp"
        android:layout_gravity="center"
        android:text="Custom Text"
        android:textColor="#000" />

</LinearLayout>
I have added one image view and one text view in this file. They are under linearlayout with horizontal orientation.
So these both UI widgets will be added side by side.
Every drop down option will contain this image view and text view.
Step 2. Adding Images
Click the following link to download the images.
Add these images inside the res->drawable folder.
Step 3. Adapter For Spinner
Create a new JAVA class and give it a name like SpinnerAdapter.java
Code lines for this is as the following
import android.content.Context;
import android.view.LayoutInflater;
import android.view.View;
import android.view.ViewGroup;
import android.widget.BaseAdapter;
import android.widget.ImageView;
import android.widget.TextView;

public class SpinnerAdapter extends BaseAdapter {

    Context context;
    int images[];
    String[] fruit;
    LayoutInflater inflter;

    public SpinnerAdapter (Context applicationContext, int[] flags, String[] fruit) {

        this.context = applicationContext;
        this.images = flags;
        this.fruit = fruit;
        inflter = (LayoutInflater.from(applicationContext));
    }

    @Override
    public int getCount() {
        return images.length;
    }

    @Override
    public Object getItem(int i) {
        return null;
    }

    @Override
    public long getItemId(int i) {
        return 0;
    }

    @Override
    public View getView(int i, View view, ViewGroup viewGroup) {
        view = inflter.inflate(R.layout.sp_item, null);
        ImageView icon = (ImageView) view.findViewById(R.id.imageView);
        TextView names = (TextView) view.findViewById(R.id.textView);
        icon.setImageResource(images[i]);
        names.setText(fruit[i]);
        return view;
    }
}
Read the constructor in the above code block.
Constructor of adapter have three parameters. First parameter will give us context of the application.
Second one giving us the integer array. This integer array holds the reference to the images that we have added in the drawable folder in step 2.
Third parameter have string array. String array contains the name of the fruits in the text format.
We will create both integer array and string array in the MainActivity.java file. Then we will pass them while creating the object of the SpinnerAdapter.class in the MainActivity.java file only.
In the getView() method, compiler will inflate the sp_item.xml method, which we have created in the first step.
Then it will set the text in the text view and an image in the image view.
Step 4. Last Java File
At last, add the following coding lines in MainActivity.java file.
import android.support.v7.app.AppCompatActivity;
import android.os.Bundle;
import android.view.View;
import android.widget.AdapterView;
import android.widget.Spinner;
import android.widget.Toast;
public class MainActivity extends AppCompatActivity {
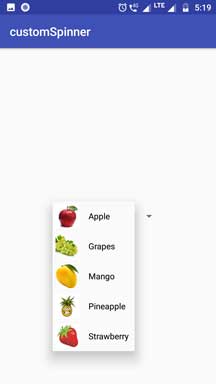
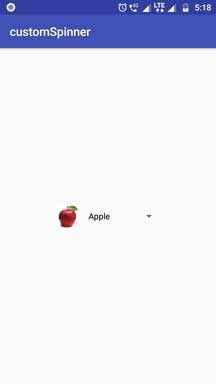
String[] fruits={"Apple","Grapes","Mango","Pineapple","Strawberry"};
int images[] = {R.drawable.apple,R.drawable.grapes, R.drawable.mango, R.drawable.pineapple, R.drawable.strawberry };
@Override
protected void onCreate(Bundle savedInstanceState) {
super.onCreate(savedInstanceState);
setContentView(R.layout.activity_main);
Spinner spin = (Spinner) findViewById(R.id.spinner);
spin.setOnItemSelectedListener(new AdapterView.OnItemSelectedListener() {
@Override
public void onItemSelected(AdapterView<?> parent, View view, int position, long id) {
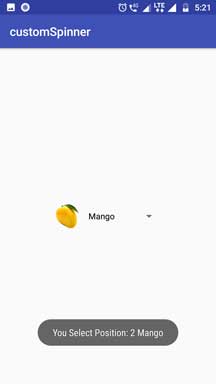
Toast.makeText(MainActivity.this, "You Select Position: "+position+" "+fruits[position], Toast.LENGTH_SHORT).show();
}
@Override
public void onNothingSelected(AdapterView<?> parent) {
}
});
SpinnerAdapter customAdapter = new SpinnerAdapter(getApplicationContext(),images,fruits);
spin.setAdapter(customAdapter);
}
}
First two lines are creating an integer array and string array.
Then compiler will create the object of the SpinnerAdapter.java class.
Here, it will pass the integer and string array as the second and third parameter respectively.
Following images are the outcome of the example.
Download Source code
Click the following line to download source code for second spinner example
Download Spinner Image Source Code
Useful Spinner Tutorials
Once you are ready to make basic spinner, you can read following tutorial to enhance your skill in spinner.