I will Talk about Laravel Autocomplete TextBox in AJAX JQuery UI Example in this article.
Many times you need to present plenty of data rows in the tabular form.
Here, the user may want to see specific data based on his search query.
We can help users find the data by providing an auto-complete search filter in the textbox.
Laravel enables us to use JQuery UI and AJAX to implement dropdown which suggests results based on the text that the user has entered into the text box.
A searchable dropdown saves time and simplifies the process for the user to find accurate data he desires.
For example, you are asking the user to select or type his country.
Here, if he types “in” then country names which include “in” like “India, Indonesia etc.,” will be shown in a dropdown autocomplete using ajax jquery.
Outcome Of this Example
The following are the images that show how our laravel autocomplete search textbox from database example tutorial looks.
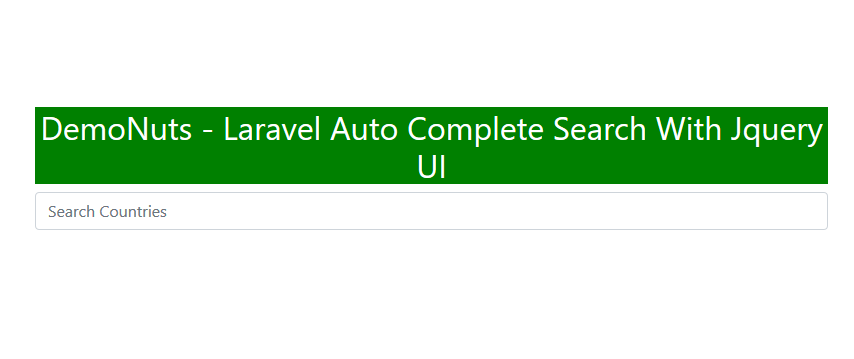
You can see in the above image that the user can type the name of the country in the textbox.

Now when a user types “m” in the textbox, the system will suggest to him the countries which include “m” in their name.
Below are the steps to create the laravel example.
Step 1. Fresh New Project With MySQL Database
Use the below command to make a new laravel project.
laravel new laraautocomplete
This should create a new project. Now go to phpMyAdmin or other database management tool and make a new database.
Give a name as “laraautosearch” to your new database.
Open your laravel project in a code editor and go to .env file.
Find the following lines inside the .env file.
DB_CONNECTION=mysql
DB_HOST=127.0.0.1
DB_PORT=3306
DB_DATABASE=laraautosearch
DB_USERNAME=root
DB_PASSWORD=
You need to fill the above details as per the configuration of your computer.
Once you do this, your laravel project will be connected with the database.
Step 2. New Table In Database
First of all, fire the below command
php artisan make:migration create_country_table
This command should make a new migration file. You can find this file at app->database->migrations->timestamp_create_country_table.php directory.
timestamp_create_country_table.php file should contain the below coding lines
<?php
use Illuminate\Database\Migrations\Migration;
use Illuminate\Database\Schema\Blueprint;
use Illuminate\Support\Facades\Schema;
class CreateCountryTable extends Migration
{
    /**
     * Run the migrations.
     *
     * @return void
     */
    public function up()
    {
        Schema::create('country', function (Blueprint $table) {
            $table->id();
            $table->text('country');
            $table->timestamps();
        });
    }
    /**
     * Reverse the migrations.
     *
     * @return void
     */
    public function down()
    {
        Schema::dropIfExists('country');
    }
}
up() function in the above file includes the names of the column you want to add to the “county” table.
There are three columns: id, country, and timestamp.
Now run the migration command
php artisan migrate
After firing the above command, check your database, you should have a table “country“.
Step 3. Filling the Database
Run the following to create the model “Country“
php artisan make:model Country
Now go to the app->Country.php file which is our model created by the above command.
Write down the below code block in it
<?php
namespace App;
use Illuminate\Database\Eloquent\Model;
class Country extends Model
{
    //
    public $table = "country";
}
Now it is time to add some data records into the database.
For this, go to the app->database->factories->UserFactory.php file and add the below code lines in it
$factory->define(Country::class, function (Faker $faker) {
    return [
        'country' => $faker->country,

    ];
});
You also need to write ” use App\Country; ” at the top of the UserFactory.php file.
So final code for UserFactory.php file is as the below
<?php
/** @var \Illuminate\Database\Eloquent\Factory $factory */
use App\User;
use App\Country;
use Faker\Generator as Faker;
use Illuminate\Support\Str;
/*
|--------------------------------------------------------------------------
| Model Factories
|--------------------------------------------------------------------------
|
| This directory should contain each of the model factory definitions for
| your application. Factories provide a convenient way to generate new
| model instances for testing / seeding your application's database.
|
*/
$factory->define(User::class, function (Faker $faker) {
    return [
        'name' => $faker->name,
        'email' => $faker->unique()->safeEmail,
        'email_verified_at' => now(),
        'password' => '$2y$10$92IXUNpkjO0rOQ5byMi.Ye4oKoEa3Ro9llC/.og/at2.uheWG/igi', // password
        'remember_token' => Str::random(10),
    ];
});
$factory->define(Country::class, function (Faker $faker) {
    return [
        'country' => $faker->country,

    ];
});
So now run the below tinker command
php artisan tinker
Then again run the below line
factory(App\Employee::class, 50)->create();
The above command will create 50-row data into the “county” table.
Step 4. Controller with Route and Blade
Run the below command to create a controller file.
php artisan make:controller AutoCompleteController
Now go to the app/Http/Controllers/AutoCompleteController.php file and write the below source lines in it
<?php
namespace App\Http\Controllers;
use Illuminate\Http\Request;
use App\Country;
class AutoCompleteController extends Controller
{
    public function index()
    {
        return view('search');
    }
    public function autocomplete(Request $request)
    {
      //  dd('yess');
        $search = $request->get('term');

          $result = Country::where('country', 'LIKE', '%'. $search. '%')->get();
          return response()->json($result);

    }
}
In the above file, autocomplete() function will be called when the user enters any word (or ” search query “) in the textbox.
This function will fetch the data which includes “search query” and then it will send this data to the search.blade.php file.
Now let us create search.blade.php file. First, Navigate to the app->resources->views directory.
Inside views folder, make a new file and give it a name as ” search.blade.php” and add the following code in it
<!DOCTYPE html>
<html>
<head>
  <meta charset="UTF-8">
  <meta name="viewport" content="width=device-width, initial-scale=1.0">
  <meta http-equiv="X-UA-Compatible" content="ie=edge">
  <meta name="csrf-token" content="{{ csrf_token() }}">
  <title>DemoNuts - Laravel AutoComplete Search With Jquery UI</title>
  <link rel="stylesheet" href="//code.jquery.com/ui/1.12.1/themes/base/jquery-ui.css">
  <link href="//maxcdn.bootstrapcdn.com/bootstrap/4.1.1/css/bootstrap.min.css" rel="stylesheet" id="bootstrap-css">
  <script src="https://code.jquery.com/jquery-1.12.4.js"></script>
  <script src="https://code.jquery.com/ui/1.12.1/jquery-ui.js"></script>
 <style>
    .container{
    padding: 10%;
    text-align: center;
   }
 </style>
</head>
<body>

<div class="container">
    <div class="row">
        <div class="col-11"><h2 style="background-color:green;"><font color="white">DemoNuts - Laravel Auto Complete Search With Jquery UI</font></h2></div>
        <div class="col-11">
            <div id="custom-search-input">
                <div class="input-group">
                    <input id="search" name="search" type="text" class="form-control" placeholder="Search Countries" />
                </div>
            </div>
        </div>
    </div>
</div>
<script>
 $(function() {

   $( "#search" ).autocomplete({
        source: function(request, response) {
            $.ajax({
            url: "{{url('autocomplete')}}",
            data: {
                    term : request.term
             },
            dataType: "json",
            success: function(data){
               var resp = $.map(data,function(obj){
                    console.log(obj);
                    return obj.country;
               });
               response(resp);
            }
        });
    },

 });
});
</script>
</body>
</html>
Finally, define the routes in the app->routes->web.php file.
Route::get('search', 'AutoCompleteController@index');
Route::get('autocomplete', 'AutoCompleteController@autocomplete');
Now start your project in the browser by using “php artisan serve” command.
Thus, we have created laravel autocomplete search filter using ajax and jquery.