Laravel Get All Data Records From Database Using Eloquent Model is today’s topic.
You will learn how to fetch or retrieve all data from database using model and controller in laravel.
We will use laravel’s built in ORM called eloquent to query the database table using model.
Final Views Of All Records
Some of Pre Request
You need to know how to make new database and table in laravel before reading this tutorial.
If do not know about this than consider reading this laravel new database and table tutorial first.
Now follow all the below steps.
Step 1. Creating a Table
Our primary need for using an eloquent in laravel is to create a model class which will represent our database table.
Now run the below command
php artisan make:migration create_devices_table
Above command will generate one migration file in database->migrations directory.
Migration file for this table is as the below
<?php

use Illuminate\Support\Facades\Schema;
use Illuminate\Database\Schema\Blueprint;
use Illuminate\Database\Migrations\Migration;

class CreateDevicesTable extends Migration
{
    /**
     * Run the migrations.
     *
     * @return void
     */
    public function up()
    {
        Schema::create('devices', function (Blueprint $table) {
            $table->increments('id');
            $table->string('name');
            $table->text('description');
            $table->timestamps();
        });
    }

    /**
     * Reverse the migrations.
     *
     * @return void
     */
    public function down()
    {
        Schema::dropIfExists('devices');
    }
}
I have added two new below lines in Schema::create() function.
$table->string('name');
$table->text('description');
Above two lines will create two columns “name” and “description” in the devices table.
Now run the following command
php artisan migrate
So we have created a fresh new table named (devices) with two extra columns : “name” and “description”
Now add some rows in this table. I have added two rows. Look at the below image
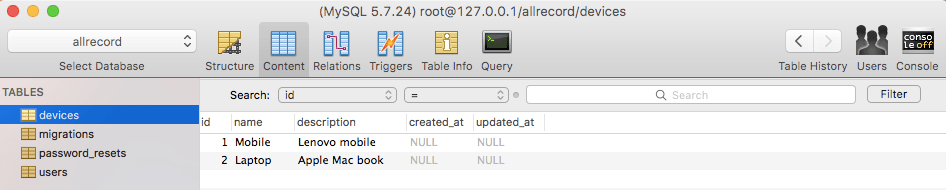
So now we have a table with two rows. Now let us fetch these records.
Step 2. Making Model
We need a model class which will represent our devices table.
Name of this model class should be the singular form of the table name. So in our case model name should be “Device”
Now run the below command to make Device model.
php artisan make:model Device
With the help of above command, System will generate new file Device.php in app directory. Source code for this model class is as the below
<?php

namespace App;

use Illuminate\Database\Eloquent\Model;

class Device extends Model
{
    //
}
Step 3. Creating Controller Class
Now it is time create an controller class. For this first open the web.php file which is inside routes folder.
Code for this web.php is as the below
<?php

/*
|--------------------------------------------------------------------------
| Web Routes
|--------------------------------------------------------------------------
|
| Here is where you can register web routes for your application. These
| routes are loaded by the RouteServiceProvider within a group which
| contains the "web" middleware group. Now create something great!
|
*/

Route::get('/', function () {
    return view('welcome');
});

Route::get('/devices','DevicesController@index');
Look at the last line, you need to add this line in your web.php file.
This line is saying to system that we call homepage/devices in browser, system should execute the index function in the DevicesController.php file.
Now to create DevicesController.php file hit the below command
php artisan make:controller DevicesController
Now system must have created a DevicesController.php file in app->Http->Controllers directory.
Source code snippet for this file is as the below
<?php

namespace App\Http\Controllers;

use Illuminate\Http\Request;

class DevicesController extends Controller
{
    public function index(){

        $devices = \App\Device::all();

        return view('devices.index',compact('devices'));
    }
}
Now, look at the below line
$devices = \App\Device::all();
variable $devices will get all the values from the devices table.
\App\Device is giving reference to the Model class Device.php
Now consider below line
return view('devices.index',compact('devices'));
Above line will return the view file called index.blade.php file in devices folder.
compact(‘devices’) will pass $devices variable in index.blade.php file.
So we need to create both devices folder and index.blade.php file.
Make a new folder named devices under resources->views directory.
Inside this devices folder, make a new file named index.blade.php
Step 4. Final Writings
Now in your index.blade.php file, add the below source code
</<!DOCTYPE html>
<html>
<head>

</head>
<body>

<h1>All Information About Devices</h1>

@foreach ($devices as $device)
<li> {{ $device}}  </li>
@endforeach

<h1>Only Names Of Devices</h1>

@foreach ($devices as $device)

<li> {{ $device->name}}  </li>

@endforeach

<h1>Only Description Of Devices</h1>

@foreach ($devices as $device)

<li> {{ $device->description}}  </li>

@endforeach

</body>
</html>
Consider the below code
<h1>All Information About Devices</h1>

@foreach ($devices as $device)
<li> {{ $device}}  </li>
@endforeach
h1 will simply print a header.
Second line is iterating one foreach loop.
Then we will use <li> tag to put results in list items. We will simple print $device meaning is that system will print all the records from devices table.
Now read the below code block
<h1>Only Names Of Devices</h1>

@foreach ($devices as $device)

<li> {{ $device->name}}  </li>

@endforeach
As the <h1> tag suggests, we will print only the name column of the devices table using the above code.
Now go through the below snippet
<h1>Only Description Of Devices</h1>

@foreach ($devices as $device)

<li> {{ $device->description}}  </li>

@endforeach
We will fetch all the description items and then we will arrange them in the list items.
Now finally, run the below command
php artisan serve
When above command gives you the address, run it in browser. You need to run address/devices in browser.
My address is http://127.0.0.1:8000/devices and you should get the output like output video.