Laravel Many To Many Polymorphic Tutorial Example is today’s article.
Polymorphic behavior of eloquent relationship in laravel allows us to manage complex database structures in an easy manner.
Below are some tutorial about various eloquent relationships
Laravel Many To Many Polymorphic Relationship
When database tables have many to many relationship among them, we can apply polymorphic concept on them to simplify the things.
For example, let us take an example of blog post, video and tags. A post and video may associated with some common tags.
Single post and single video may associated with one or more than one tags. Now to manage this scenario in database, we need to take one table for tag, one to post, one for video and another for the management among these three tables.
Take a look at the below image
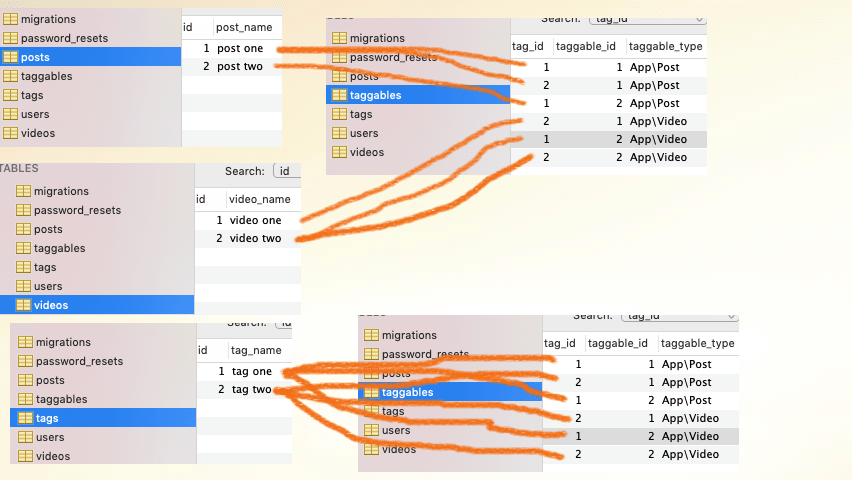
There are three table for posts, videos and tags. Now to inter-connect these three tables with each other, we need to create one pivot table. Here, taggable is the pivot table.
taggable_id and taggable_type will help to decide which post or video is represented in that row. Now tag_id represents the row from the tags table.
Check the output of this example in the below video.
Step 1. Opening of example
Our first task is to create a new laravel project. For this, use the below command
laravel new laramanytomanypoly
After making a fresh new laravel project, let us connect it with MySQL database.
For this purpose, go to your database administration tool like sequel pro or phpMyAdmin or any other.
Here, just make a new database and set the name of the database as “laramanytomanypoly”
Now to integrate this new database into our laravel project, open project in your code editor.
Now open .env file of your laravel project and modify the below details.
DB_CONNECTION=mysql
DB_HOST=127.0.0.1
DB_PORT=3306
DB_DATABASE=laramanytomanypoly
DB_USERNAME=root
DB_PASSWORD=
As you can see that there few configuration lines are there. Just update then as per your computer settings.
So now you have successfully integrated your database with laravel project.
Step 2. Making Four Tables
In total , we need four tables in this example : posts, videos, tags and taggables (pivot table)
So we will run four commands in terminal. Below are them
For posts table,
php artisan make:migration create_posts_table
for videos table
php artisan make:migration create_videos_table
tags table
php artisan make:migration create_tags_table
taggables table
php artisan make:migration create_taggables_table
All above commands will make one migration file inside database->migrations directory.
Now go to database->migrations directory and find timestamp_create_posts_table.php file.
Add the following source snippet in this file
<?php

use Illuminate\Support\Facades\Schema;
use Illuminate\Database\Schema\Blueprint;
use Illuminate\Database\Migrations\Migration;

class CreatePostsTable extends Migration
{
    /**
     * Run the migrations.
     *
     * @return void
     */
    public function up()
    {
        Schema::create('posts', function (Blueprint $table) {
            $table->bigIncrements('id');
            $table->string("post_name");
        });
    }

    /**
     * Reverse the migrations.
     *
     * @return void
     */
    public function down()
    {
        Schema::dropIfExists('posts');
    }
}
up() function in above code includes the column names for posts table. It has only two columns : id and post_name
Now in the same directory, there should be a file called timestamp_create_videos_table.php file.
Write down the below source snippet in timestamp_create_videos_table.php file.
<?php

use Illuminate\Support\Facades\Schema;
use Illuminate\Database\Schema\Blueprint;
use Illuminate\Database\Migrations\Migration;

class CreateVideosTable extends Migration
{
    /**
     * Run the migrations.
     *
     * @return void
     */
    public function up()
    {
        Schema::create('videos', function (Blueprint $table) {
            $table->bigIncrements('id');
            $table->string("video_name");
        });
    }

    /**
     * Reverse the migrations.
     *
     * @return void
     */
    public function down()
    {
        Schema::dropIfExists('videos');
    }
}
videos table has two columns : id and video_name so two lines are there in the up() function.
Now for tags table, there is a file timestamp_create_tags_table.php inside same directory.
Code lines for this file is as the following
<?php

use Illuminate\Support\Facades\Schema;
use Illuminate\Database\Schema\Blueprint;
use Illuminate\Database\Migrations\Migration;

class CreateTagsTable extends Migration
{
    /**
     * Run the migrations.
     *
     * @return void
     */
    public function up()
    {
        Schema::create('tags', function (Blueprint $table) {
            $table->bigIncrements('id');
            $table->string("tag_name");
        });
    }

    /**
     * Reverse the migrations.
     *
     * @return void
     */
    public function down()
    {
        Schema::dropIfExists('tags');
    }
}
Again, only two columns : id and tag_name
And last migration file is timestamp_create_taggables_table.php and it’s coding is as the following
<?php

use Illuminate\Support\Facades\Schema;
use Illuminate\Database\Schema\Blueprint;
use Illuminate\Database\Migrations\Migration;

class CreateTaggablesTable extends Migration
{
    /**
     * Run the migrations.
     *
     * @return void
     */
    public function up()
    {
        Schema::create('taggables', function (Blueprint $table) {
            $table->integer('tag_id');
            $table->integer('taggable_id');
            $table->string("taggable_type");
            $table->timestamps();
        });
    }

    /**
     * Reverse the migrations.
     *
     * @return void
     */
    public function down()
    {
        Schema::dropIfExists('taggables');
    }
}
It has four lines in up() function for four columns : tag_id , taggable_id , taggable_type and timestamps.
Make sure to use column type as integer for tag_id and taggable_id There is no primary or auto increment column in taggables table.
After writing all the migration file, hit the following command
php artisan migrate
After this, you can see that four tables are present in your database administration tool.
Step 3. Defining Model Files
Same as migration files, we will create model files to define polymorphic relationship.
There are three commands for three different models and they are as the following
For Post
php artisan make:model Post
Video
php artisan make:model Video
Last one is Tag
php artisan make:model Tag
Now navigate to app folder. You can see that there are three files like Post.php , Video.php and Tag.php
Open Post.php and write the below snippet in it
<?php

namespace App;

use Illuminate\Database\Eloquent\Model;

class Post extends Model
{
    //
    public function tags()
    {
        return $this->morphToMany(Tag::class, 'taggable');
    }
}
tags() function has morphToMany() method. It is telling compiler that using Post model, user can access tags table records.
In his process, taggable table will work as a mediator or agent.
Now below is the source snippet lines for Video.php file
<?php

namespace App;

use Illuminate\Database\Eloquent\Model;

class Video extends Model
{
    //
    public function tags()
    {
        return $this->morphToMany(Tag::class, 'taggable');
    }
}
This file also have the morphToMany() method. It also indicates same concept as of Post.php that Video model can fetch the records from tags table with the help of the taggables table.
Now final file is Tag.php and it should contain the following code lines
<?php

namespace App;

use Illuminate\Database\Eloquent\Model;

class Tag extends Model
{
    //
    public function posts()
    {
        return $this->morphedByMany(Post::class, 'taggable');
    }

    /**
     * Get all of the videos that are assigned this tag.
     */
    public function videos()
    {
        return $this->morphedByMany(Video::class, 'taggable');
    }
}
There are two functions are there. posts() function is telling compiler that Post model can fetch the tags table records with the help of taggable table. Similarly, videos() function is doing the same thing for Video model.
Step 4. Work on Database
Fill the database tables manually as per the below image
Step 5. Controller and Route Coding
Now it is time to add one route line. First of all, go to routes->web.php file.
Add the below line in web.php file.
Route::get('manymanypoly','ManymanypolyController@manymanypoly');
When the user calls “http://127.0.0.1:8000/manymanypoly” in the browser, compiler will run the manymanypoly() function from ManymanypolyController.php file.
Final source code for web.php file is as the below
<?php

/*
|--------------------------------------------------------------------------
| Web Routes
|--------------------------------------------------------------------------
|
| Here is where you can register web routes for your application. These
| routes are loaded by the RouteServiceProvider within a group which
| contains the "web" middleware group. Now create something great!
|
*/

Route::get('/', function () {
    return view('welcome');
});

Route::get('manymanypoly','ManymanypolyController@manymanypoly');
Now let us make a controller file. Trigger the below command for it
Route::get('manymanypoly','ManymanypolyController@manymanypoly');
Now go to the app->Http->Controllers directory. Here, you should find the file ManymanypolyController.php
Copy down the below source code snippet in ManymanypolyController.php
<?php

namespace App\Http\Controllers;

use Illuminate\Http\Request;
use App\Post;
use App\Video;
use App\Tag;

class ManymanypolyController extends Controller
{
    //
    public function manymanypoly()
    {

        $first_post = Post::find(1);
        $firstPost = $first_post->tags;

        $second_post = Post::find(2);
        $secondPost = $second_post->tags;

        $first_video = Video::find(1);
        $firstVideo = $first_video->tags;

        $second_video = Video::find(2);
        $secondvideo= $second_video->tags;
        //dd($firstPost);

        return view('index',compact('firstPost','secondPost','firstVideo','secondvideo'));

    }
}
First two lines are fetching the records from tags table. To fetch record from tags table, it will first traverse through taggables table. It will search for rows where taggable_id =1 and taggable_type = App\Post in taggable table. It will get the tag_id of the rows and according to that tag_id, it will fetch the records from tags table.
For first post, two rows are there in taggable table where taggable_id =1 and taggable_type = App\Post is satisfied. These two rows are tag_id =1 and tag_id = 2 is there. Thus, system will fetch two rows from tags table.
Similarly, controller file will fetch the tags for second post, first video and second video.
Then it will return to the blade index view file. Here, it will send some variables as a parameter.
Step 6. Final Thoughts with Blade
Till now, we have fetched records from tags table. Now we just need to display them.
For this, go to resources->views directory and create a new file and give it a name like index.blade.php
Below is the code writings for index.blade.php
<html>
<head>

</head>
<style>

 firstPost
</style>

<h1> Laravel Many to Many Polymorphic Example </h1>

<h3> Tags associated with First Post </h3>

@foreach ($firstPost as $firstPost_tags)
<li>

    {{ $firstPost_tags->tag_name}}

</li>
@endforeach

<h3> Tags associated with Second Post </h3>

@foreach ($secondPost as $secondPost_tags)
<li>

    {{ $secondPost_tags->tag_name}}

</li>
@endforeach

<h3> Tags associated with First Video </h3>

@foreach ($firstVideo as $firstVideo_tags)
<li>

    {{ $firstVideo_tags->tag_name}}

</li>
@endforeach

<h3> Tags associated with Second Video </h3>

@foreach ($secondvideo as $secondVideo_tags)
<li>

    {{ $secondVideo_tags->tag_name}}

</li>
@endforeach


</body>
</html>
In this file, we will use those variables which were defined in the return statement of the controller file.
Using these variables, we will print the names of the tags.
Download Code For Laravel Many to Many Polymorphic
https://github.com/demonuts/Laravel-Many-To-Many-Polymorphic-Tutorial-Example-