Today’s article is Laravel Facebook Login With Socialite Example from scratch.
Nowadays, more and more websites are providing social login options like Facebook login, google login, LinkedIn login, etc.
The social login feature helps the user to speed up the registration process and they also do not need to create separate usernames and passwords.
Users can use their social accounts and their credential to login to other sites.
So laravel also offers Facebook login integration with a socialite package.
You will learn how to add laravel socialite stateless authentication with facebook.
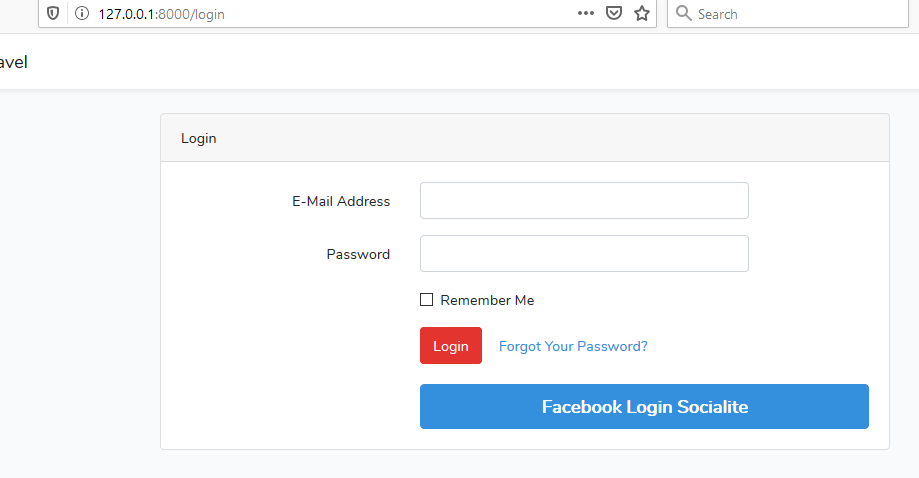
Final Look of the tutorial
See the below images for getting an idea regarding the final output.

Above is the login screen. When the user clicks “Facebook Login Socialite” button, below will be opened.
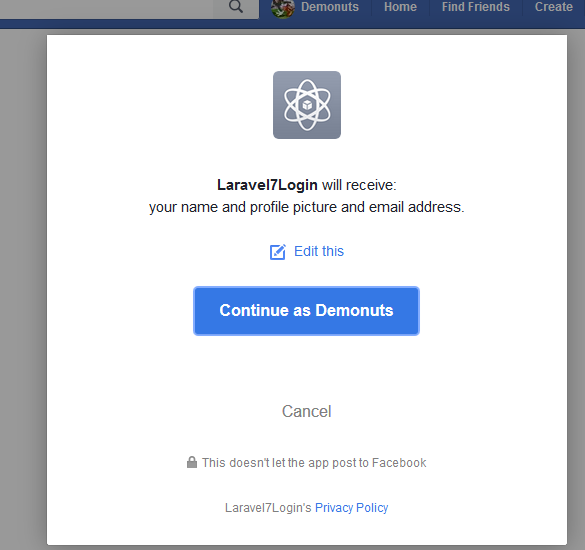
Now user needs to give permission to use his facebook account with details like name, email, and profile picture.
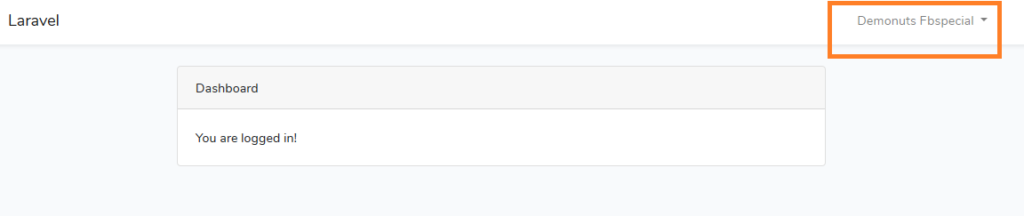
Once the user is login successfully, the system will redirect the user to the home screen. His facebook name will be shown at the upper right corner.
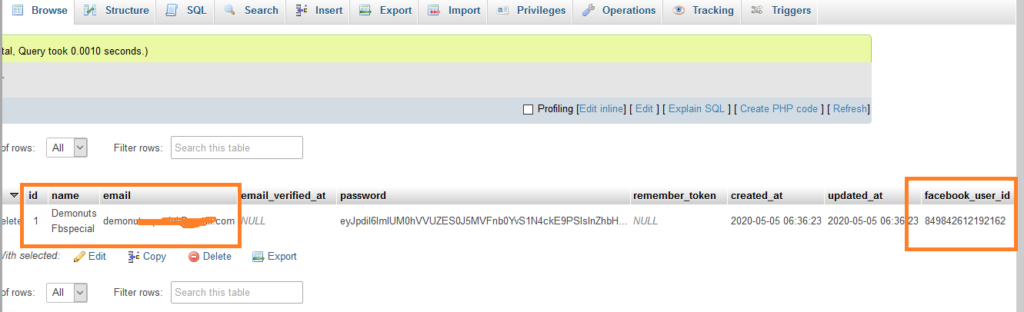
Facebook will give us one ID of the user after the successful login event. We will store this ID, name, and email address into the database similar to that we store user details in the traditional registration system.
Now let us create this example step by step.
Step 1. Laravel Project and Database Generation
First of all, run the following,
laravel new larafblogin
A new laravel project is created with the name “larafblogin”.
Now open your database administration tool like phpMyAdmin, sequel pro, etc.
Make a new database and give it a name ” larafblogin“.
After this, open your project in the code editor and go to the .env file.
See the below lines in the .env file.
DB_CONNECTION=mysql
DB_HOST=127.0.0.1
DB_PORT=3306
DB_DATABASE=larafblogin
DB_USERNAME=root
DB_PASSWORD=
After the above details, your database is connected with the laravel project.
Step 2. External Package “Socialite”
Now run the below command
composer require laravel/socialite
This command will integrate the “socialite” package in your project.
Now open the config->app.php file and add the below line in the “providers” array.
Laravel\Socialite\SocialiteServiceProvider::class,
Full code for “providers” array is as the following
 'providers' => [
        /*
         * Laravel Framework Service Providers...
         */
        Illuminate\Auth\AuthServiceProvider::class,
        Illuminate\Broadcasting\BroadcastServiceProvider::class,
        Illuminate\Bus\BusServiceProvider::class,
        Illuminate\Cache\CacheServiceProvider::class,
        Illuminate\Foundation\Providers\ConsoleSupportServiceProvider::class,
        Illuminate\Cookie\CookieServiceProvider::class,
        Illuminate\Database\DatabaseServiceProvider::class,
        Illuminate\Encryption\EncryptionServiceProvider::class,
        Illuminate\Filesystem\FilesystemServiceProvider::class,
        Illuminate\Foundation\Providers\FoundationServiceProvider::class,
        Illuminate\Hashing\HashServiceProvider::class,
        Illuminate\Mail\MailServiceProvider::class,
        Illuminate\Notifications\NotificationServiceProvider::class,
        Illuminate\Pagination\PaginationServiceProvider::class,
        Illuminate\Pipeline\PipelineServiceProvider::class,
        Illuminate\Queue\QueueServiceProvider::class,
        Illuminate\Redis\RedisServiceProvider::class,
        Illuminate\Auth\Passwords\PasswordResetServiceProvider::class,
        Illuminate\Session\SessionServiceProvider::class,
        Illuminate\Translation\TranslationServiceProvider::class,
        Illuminate\Validation\ValidationServiceProvider::class,
        Illuminate\View\ViewServiceProvider::class,
        /*
         * Package Service Providers...
         */
        /*
         * Application Service Providers...
         */
        App\Providers\AppServiceProvider::class,
        App\Providers\AuthServiceProvider::class,
        // App\Providers\BroadcastServiceProvider::class,
        App\Providers\EventServiceProvider::class,
        App\Providers\RouteServiceProvider::class,
        Laravel\Socialite\SocialiteServiceProvider::class,
    ],
In the same file, go to the “aliases” array and add the following line
'Socialite' => Laravel\Socialite\Facades\Socialite::class,
Whole coding lines for “aliases” array,
'aliases' => [
        'App' => Illuminate\Support\Facades\App::class,
        'Arr' => Illuminate\Support\Arr::class,
        'Artisan' => Illuminate\Support\Facades\Artisan::class,
        'Auth' => Illuminate\Support\Facades\Auth::class,
        'Blade' => Illuminate\Support\Facades\Blade::class,
        'Broadcast' => Illuminate\Support\Facades\Broadcast::class,
        'Bus' => Illuminate\Support\Facades\Bus::class,
        'Cache' => Illuminate\Support\Facades\Cache::class,
        'Config' => Illuminate\Support\Facades\Config::class,
        'Cookie' => Illuminate\Support\Facades\Cookie::class,
        'Crypt' => Illuminate\Support\Facades\Crypt::class,
        'DB' => Illuminate\Support\Facades\DB::class,
        'Eloquent' => Illuminate\Database\Eloquent\Model::class,
        'Event' => Illuminate\Support\Facades\Event::class,
        'File' => Illuminate\Support\Facades\File::class,
        'Gate' => Illuminate\Support\Facades\Gate::class,
        'Hash' => Illuminate\Support\Facades\Hash::class,
        'Http' => Illuminate\Support\Facades\Http::class,
        'Lang' => Illuminate\Support\Facades\Lang::class,
        'Log' => Illuminate\Support\Facades\Log::class,
        'Mail' => Illuminate\Support\Facades\Mail::class,
        'Notification' => Illuminate\Support\Facades\Notification::class,
        'Password' => Illuminate\Support\Facades\Password::class,
        'Queue' => Illuminate\Support\Facades\Queue::class,
        'Redirect' => Illuminate\Support\Facades\Redirect::class,
        'Redis' => Illuminate\Support\Facades\Redis::class,
        'Request' => Illuminate\Support\Facades\Request::class,
        'Response' => Illuminate\Support\Facades\Response::class,
        'Route' => Illuminate\Support\Facades\Route::class,
        'Schema' => Illuminate\Support\Facades\Schema::class,
        'Session' => Illuminate\Support\Facades\Session::class,
        'Storage' => Illuminate\Support\Facades\Storage::class,
        'Str' => Illuminate\Support\Str::class,
        'URL' => Illuminate\Support\Facades\URL::class,
        'Validator' => Illuminate\Support\Facades\Validator::class,
        'View' => Illuminate\Support\Facades\View::class,
        'Socialite' => Laravel\Socialite\Facades\Socialite::class,
    ],
Step 3. Generating App ID and Secret
We need to create an app ID and secret from facebook console.
So go to the https://developers.facebook.com/apps
You should see the following screen
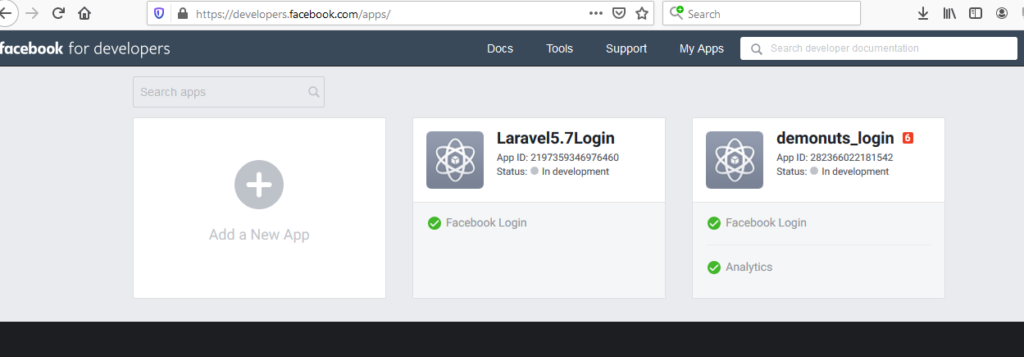
Click on the Add a New App. Following will appear.
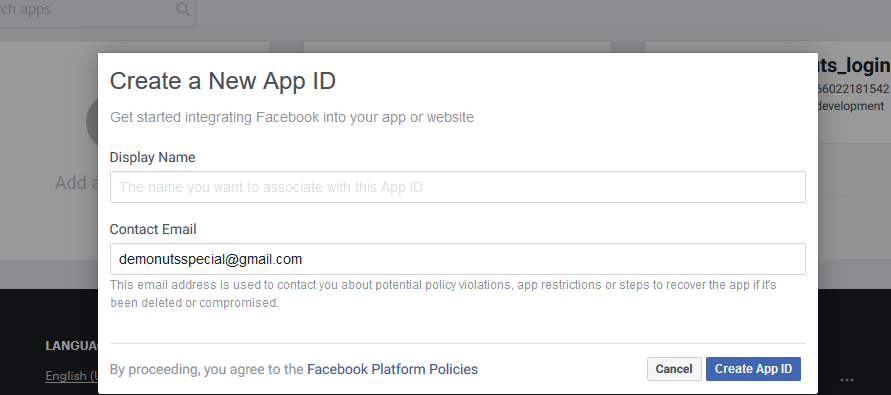
Enter the name you want to set as your app name and click on “Create APP ID” button.
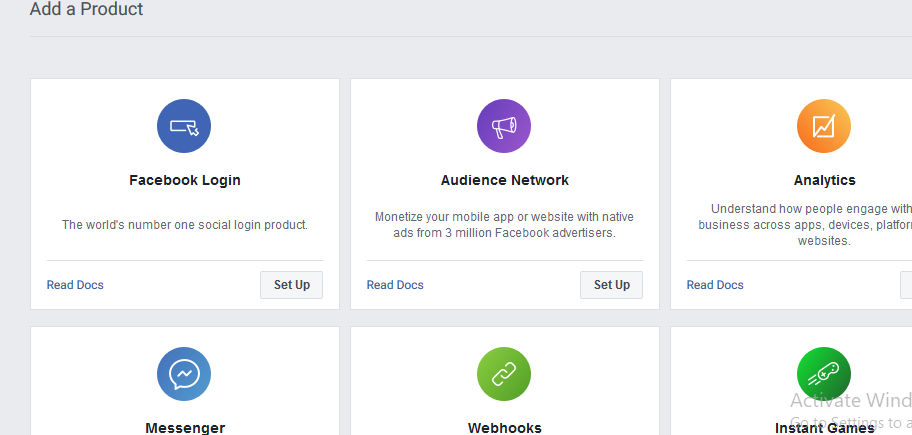
From the above screen, click on the “Facebook Login”.
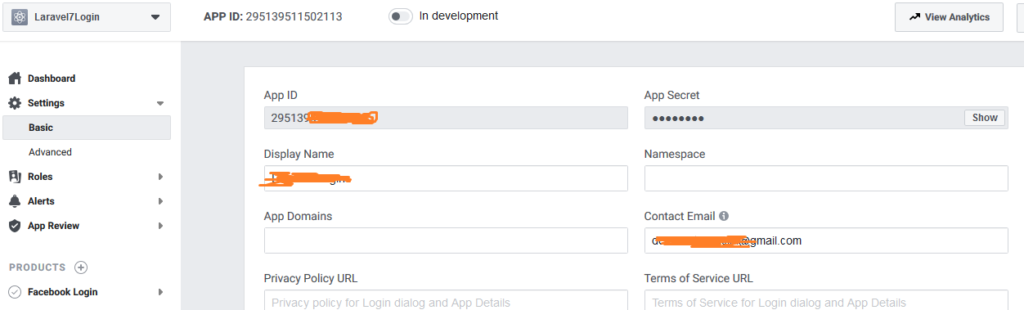
Now you can find your App ID and App Secret in the above screen. Copy them in notepad, we will use them later.
Now click on Facebook Login->Settings tab to add the callback URL.
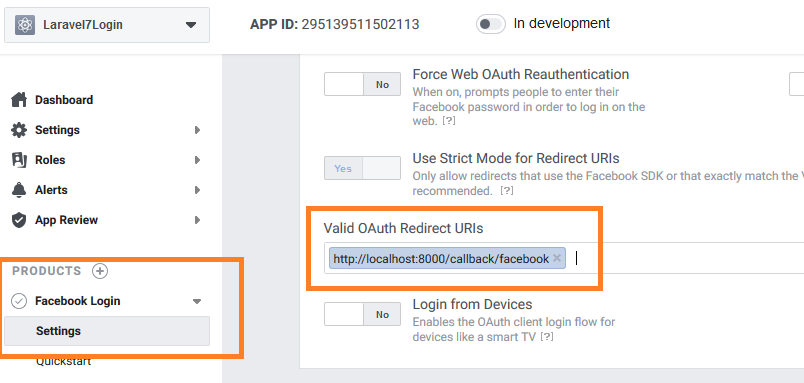
If you are using the live web server then you need to enter the callback URL.
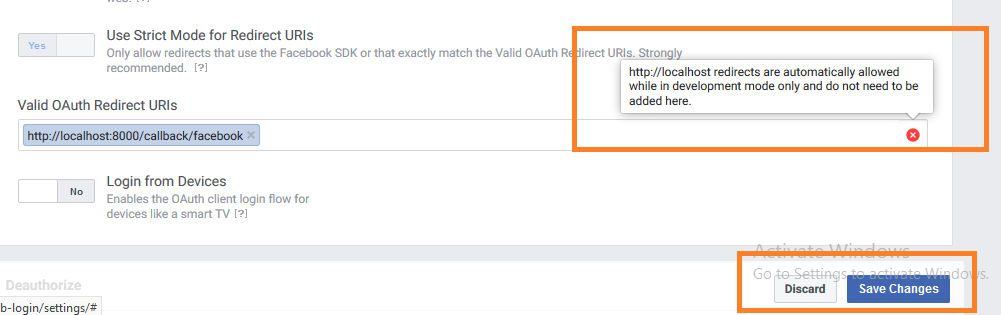
Here is the message that if you are using localhost then you do not need to enter the callback URL. Click on “Save Changes” button.
Now come to your code editor and open config->services.php file.
Add the following lines in it
  'facebook' => [
        'client_id' => '2951395.....',
        'client_secret' => 'e05bf352b6d2d4a.......',
        'redirect' => 'http://localhost:8000/callback/facebook'
    ],
You need to add your App ID as the “client_id” and App Secret as the “client_secret“.
Step 4. Making Authentication
First of all, run the following
composer require laravel/ui
This command will create some UI related files in the project.
Now run the below command
php artisan ui react --auth
Above command will implement the authentication in the project.
Now fire the following npm command,
npm install
And then run the below
npm run dev
These npm commands will help us to create a better user experience. It will improve the design of the project.
Step 5. Adding Migration File
Run the below command
php artisan make:migration Facebook_Login
This command will make a new file at database->migrations->timestamp_facebook_login.php directory.
Give the below coding lines to the timestamp_facebook_login.php file.
<?php
use Illuminate\Database\Migrations\Migration;
use Illuminate\Database\Schema\Blueprint;
use Illuminate\Support\Facades\Schema;
class FacebookLogin extends Migration
{
    /**
     * Run the migrations.
     *
     * @return void
     */
    public function up()
    {
        //
         Schema::table('users', function ($table) {
            $table->string('facebook_user_id')->nullable();
        });
    }
    /**
     * Reverse the migrations.
     *
     * @return void
     */
    public function down()
    {
        //
    }
}
Look at the up() function in the above coding.
This function is adding a column ” facebook_user_id ” to the users table.
Now open the model file app->User.php and add the ” facebook_user_id” in the $fillable variable.
<?php
namespace App;
use Illuminate\Contracts\Auth\MustVerifyEmail;
use Illuminate\Foundation\Auth\User as Authenticatable;
use Illuminate\Notifications\Notifiable;
class User extends Authenticatable
{
    use Notifiable;
    /**
     * The attributes that are mass assignable.
     *
     * @var array
     */
    protected $fillable = [
        'name', 'email', 'password','facebook_user_id',
    ];
    /**
     * The attributes that should be hidden for arrays.
     *
     * @var array
     */
    protected $hidden = [
        'password', 'remember_token',
    ];
    /**
     * The attributes that should be cast to native types.
     *
     * @var array
     */
    protected $casts = [
        'email_verified_at' => 'datetime',
    ];
}
Above is the whole source code for the User.php file.
So it is now time to run the migration command like the below
php artisan migrate
After this command, check your database, there should be some tables in it.
Step 6. Final Work
Let us define the routes. So open the file routes->web.php
Your code lines in routes->web.php file should look like the below
<?php
use Illuminate\Support\Facades\Route;
/*
|--------------------------------------------------------------------------
| Web Routes
|--------------------------------------------------------------------------
|
| Here is where you can register web routes for your application. These
| routes are loaded by the RouteServiceProvider within a group which
| contains the "web" middleware group. Now create something great!
|
*/
Route::get('/', function () {
    return view('welcome');
});
Auth::routes();
Route::get('/home', 'HomeController@index')->name('home');
Route::get('auth/{provider}', 'FacebookLoginController@redirectFacebook');
Route::get('callback/{provider}', 'FacebookLoginController@runCallback');
Among the above lines, some routes will be pre written by the system. You should add the missing route lines.
Now run the below command to make the controller,
php artisan make:controller FacebookLoginController
This command will make a new controller file at app/Http/Controllers/FacebookLoginController.php
Write down the below coding lines inside the FacebookLoginController.php file.
<?php
namespace App\Http\Controllers;
use Illuminate\Http\Request;
use Socialite;
use Auth;
use Exception;
use App\User;
class FacebookLoginController extends Controller
{
    public function redirectFacebook($provider)
    {
        //dd($provider);
        return Socialite::driver($provider)->redirect();
    }
    public function runCallback($provider)

    {
        try {

            $user = Socialite::driver($provider)->stateless()->user();

            $finduser = User::where('facebook_user_id', $user->id)->first();
            if($finduser){
                Auth::login($finduser);
                return redirect('/home');

            }else{
                $newUser = User::create([
                    'name' => $user->name,
                    'email' => $user->email,
                    'facebook_user_id'=> $user->id,
                    'password' => encrypt('123456dummy')
                ]);
                Auth::login($newUser);
                return redirect('/home');
            }
        } catch (Exception $e) {
            dd('dfdfdfdfd');
            dd($e->getMessage());
        }
    }
}
There are two functions in the above file: redirectFacebook() and runCallback()
redirectFacebook() function will initiate the facebook login process when the user clicks the button.
When the user get successful login, the compiler will call runCallback() function.
It will first fetch the user details from his facebook account.
Then it will check whether the user’s details are available in the database or not.
If not then it will add the user’s details like name, email address, facebook_user_id, etc. in the database.
Now navigate to the file resources/views/auth/login.blade.php.
You need to add the following lines into the login.blade.php file.
  <a href="{{ url('auth/facebook') }}" style="margin-top: 20px;" class="btn btn-lg btn-primary btn-block">
                                  <strong> Facebook Login Socialite</strong>
                                </a>
Full code for the file login.blade.php is like the below
@extends('layouts.app')
@section('content')
<div class="container">
    <div class="row justify-content-center">
        <div class="col-md-8">
            <div class="card">
                <div class="card-header">{{ __('Login') }}</div>
                <div class="card-body">
                    <form method="POST" action="{{ route('login') }}">
                        @csrf
                        <div class="form-group row">
                            <label for="email" class="col-md-4 col-form-label text-md-right">{{ __('E-Mail Address') }}</label>
                            <div class="col-md-6">
                                <input id="email" type="email" class="form-control @error('email') is-invalid @enderror" name="email" value="{{ old('email') }}" required autocomplete="email" autofocus>
                                @error('email')
                                    <span class="invalid-feedback" role="alert">
                                        <strong>{{ $message }}</strong>
                                    </span>
                                @enderror
                            </div>
                        </div>
                        <div class="form-group row">
                            <label for="password" class="col-md-4 col-form-label text-md-right">{{ __('Password') }}</label>
                            <div class="col-md-6">
                                <input id="password" type="password" class="form-control @error('password') is-invalid @enderror" name="password" required autocomplete="current-password">
                                @error('password')
                                    <span class="invalid-feedback" role="alert">
                                        <strong>{{ $message }}</strong>
                                    </span>
                                @enderror
                            </div>
                        </div>
                        <div class="form-group row">
                            <div class="col-md-6 offset-md-4">
                                <div class="form-check">
                                    <input class="form-check-input" type="checkbox" name="remember" id="remember" {{ old('remember') ? 'checked' : '' }}>
                                    <label class="form-check-label" for="remember">
                                        {{ __('Remember Me') }}
                                    </label>
                                </div>
                            </div>
                        </div>
                        <div class="form-group row mb-0">
                            <div class="col-md-8 offset-md-4">
                                <button type="submit" class="btn btn-danger">
                                    {{ __('Login') }}
                                </button>
                                @if (Route::has('password.request'))
                                    <a class="btn btn-link" href="{{ route('password.request') }}">
                                        {{ __('Forgot Your Password?') }}
                                    </a>
                                @endif
                                <a href="{{ url('auth/facebook') }}" style="margin-top: 20px;" class="btn btn-lg btn-primary btn-block">
                                  <strong> Facebook Login Socialite</strong>
                                </a>
                            </div>
                        </div>
                    </form>
                </div>
            </div>
        </div>
    </div>
</div>
@endsection
Now use the command “php artisan serve” to start the example.
Hit the URL “https://127.0.0.1:8000/login” in the browser.
So it was all about this laravel facebook login with socialite example.
Other useful tutorials :