Learn about Android ArrayAdapter Tutorial With Example in this article.
In android, adapter is the connector between the data source and the multi dynamic views like listview, gridview or spinner.
Adapter will fetch the data from data source like arraylist or hashmap.
Then it will provide this data to the listview, gridview or spinner using appropriate in built methods and constructors.
Adapter can be of various types as per it’s functionalities and core structure.
Arrayadapter, simple adapter, cursor adapter (for fetching data from the database) etc. are the basic adapters.
Using above adapters you can implement simple listview, spinner and gridviews.
For having complex functionalities like click events, checkbox maintenance, radio button etc. we need to make custom adapters.
Today, we will learn about basic arrayadapter and it’s functionalities.
Arrayadapter Information
Arrayadapter is one of the adapter that is used for making the simple types of multi views.
Whenever you have a list of single type of items which is backed by an array, you can use ArrayAdapter. For instance, list of phone contacts, countries or names.
Basically, arrayadapter accepts the simple row layout like single Textview for listview.
For more complex structure you need to make custom arrayadapter.
Arrayadapter can use data sets like string array or arraylist of hashmap to populate the listview.
Following is the constructor demonstration for Arrayadapter.
ArrayAdapter(Context context, int resource, int textViewResourceId, T[] objects)
Arrayadapter has also different implementation of constructor.
Above one is the basic and generally, developers prefers the above constructor for easy coding.
Now let us understand the parameters of the constructor in deep.
1. Context context
context gives the current reference of the app to the constructor.
Reference means that context will tell the compiler that through the whole android app, in which activity of fragment we are using the adapter.
Developers use Activity.this, this, getActivityContext(), getActivity() etc. options to provide the context.
2. int resource
This parameter is the reference for the XML file, which is making the layout for row items in listview or spinner.
In arrayadapter, you can make a separate XML file which a textview. Adapter will use this file for making the row layout structure.
You can change the text color, size, style etc. in the textview of this file.
While creating the constructor, second parameter need the value as this XML file.
For example, see the below code line
ArrayAdapter(Context context, R.layout.list_item, int textViewResourceId, T[] objects)
As you can see that second parameter pointing to the list_item.xml file.
3. int textViewResourceId
It is pointing to the id of the textview, in which text will be written.
If we have made a separate XML file, then we can give the id of the textview present in that separate XML file.
For example,
ArrayAdapter(Context context, R.layout.list_item, R.id.tvCars, T[] objects)
Here, our file name is list_item.xml. In this file, we have one textview.
Id of this textview is tvCars. So third parameter has the value “R.id.tvCars.”
Sometimes, we may not create separate XML file for arrayadapter.
In this case, we can use something like android.R.id.text1
ArrayAdapter(Context context, android.R.layout.simple_list_item_1, android.R.id.text1, T[] objects)
This value is the in built id of the textview.
Second parameter is also the android system generated value.
4. T[] objects
This parameter is the main data source.
Adapter will use this data source to populate the listview or spinner.
T[] means that arraylist of any objects.
For example, arraylist of string variables or arraylist of hashmaps etc.
See the below implementation
private String[] myImageNameList = new String[]{"Benz", "Bike","Car","Carrera","Ferrari","Harly"};

ArrayAdapter(Context context, R.layout.list_item, R.id.tvCars, myImageNameList);
First line is the string array. This array includes the names of the vehicle company in the string format.
Now you can directly write the name of the string array as the fourth parameter of the constructor as per the second line.
String array is the primary data source in this example.
Examples of Arrayadapters
We will develop two examples using array adapter : with separate XML file for listview and without separate file.
First let us create the listview with separate file.
Step 1. XML writings
In the activity_main.xml file, add the following
<?xml version="1.0" encoding="utf-8"?>
<android.support.constraint.ConstraintLayout xmlns:android="http://schemas.android.com/apk/res/android"
    xmlns:app="http://schemas.android.com/apk/res-auto"
    xmlns:tools="http://schemas.android.com/tools"
    android:layout_width="match_parent"
    android:layout_height="match_parent"
    tools:context=".MainActivity">

    <ListView
        android:id="@+id/listview"
        android:layout_width="match_parent"
        android:layout_height="match_parent"
        android:divider="#e2d70f"
        android:dividerHeight="3dp" />

</android.support.constraint.ConstraintLayout>
Just one listview in the main layout file.
Now create a new XML layout resource file in res->layout directory.
Name of this file should be array_list_item.xml
Write the below source code in array_list_item.xml file
<?xml version="1.0" encoding="utf-8"?>
<LinearLayout
    xmlns:android="http://schemas.android.com/apk/res/android"
    android:orientation="vertical"
    android:layout_width="match_parent"
    android:layout_height="match_parent">

    <TextView
        android:layout_width="match_parent"
        android:layout_height="50dp"
        android:id="@+id/tv"
        android:textColor="#fff"
        android:paddingLeft="15dp"
        android:gravity="center_vertical"
        android:background="@color/colorAccent"
        android:textSize="20sp"
        android:text="hwllo"/>

    <View
        android:layout_width="match_parent"
        android:layout_height="10dp"
        android:background="#000"/>

</LinearLayout>
There is one textview and one simple view is there.
Textview will get the names from the data source while simple view will work as the divider of listview.
Step 2. Code for Main file
In the MainActivity.java file, add the below code
import android.support.v7.app.AppCompatActivity;
import android.os.Bundle;
import android.widget.ArrayAdapter;
import android.widget.ListView;

public class MainActivity extends AppCompatActivity {

    private ListView listView;
    private String[] myImageNameList = new String[]{"Benz", "Bike",
            "Car","Carrera"
            ,"Ferrari","Harly",
            "Lamborghini","Silver"};

    @Override
    protected void onCreate(Bundle savedInstanceState) {
        super.onCreate(savedInstanceState);
        setContentView(R.layout.activity_main);

        listView=(ListView)findViewById(R.id.listview);

        ArrayAdapter arrayAdapter = new ArrayAdapter(this,R.layout.array_list_item, R.id.tv, myImageNameList);
        listView.setAdapter(arrayAdapter);

    }
}
I have written one string array “myImageNameList.”
This string array includes the names of the vehicle companies.
Now let us see the arrayadapter code.
I have make a new object of array adapter. First parameter is context.
Second is the reference to the array_list_item.xml file.
Third parameter holds the id of the textview and last one is the data source which is our string array.
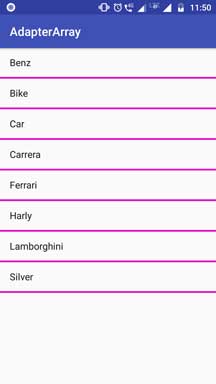
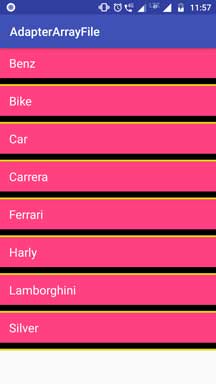
Following images are the output of this example.
Second Example
We will make this example with any new XML file.
So make a new project in the android studio with empty activity.
In the activity_main.xml file, add the following
<?xml version="1.0" encoding="utf-8"?>
<android.support.constraint.ConstraintLayout xmlns:android="http://schemas.android.com/apk/res/android"
    xmlns:app="http://schemas.android.com/apk/res-auto"
    xmlns:tools="http://schemas.android.com/tools"
    android:layout_width="match_parent"
    android:layout_height="match_parent"
    tools:context=".MainActivity">

    <ListView
        android:id="@+id/listview"
        android:layout_width="match_parent"
        android:layout_height="match_parent"
        android:divider="#e20fc6"
        android:dividerHeight="3dp"        />

</android.support.constraint.ConstraintLayout>
Again, just one listview in the main xml file.
In the MainActivity.java file, write the below lines
import android.support.v7.app.AppCompatActivity;
import android.os.Bundle;
import android.widget.ArrayAdapter;
import android.widget.ListView;

public class MainActivity extends AppCompatActivity {

    private ListView listView;
    private String[] myImageNameList = new String[]{"Benz", "Bike",
            "Car","Carrera"
            ,"Ferrari","Harly",
            "Lamborghini","Silver"};

    @Override
    protected void onCreate(Bundle savedInstanceState) {
        super.onCreate(savedInstanceState);
        setContentView(R.layout.activity_main);

        listView=(ListView)findViewById(R.id.listview);

        ArrayAdapter arrayAdapter = new ArrayAdapter(this,android.R.layout.simple_list_item_1, android.R.id.text1, myImageNameList);
        listView.setAdapter(arrayAdapter);

    }
}
As you can see that it is the same as the above example.
Just one change is there in the arrayadapter object creation.
In the second and third parameter, android’s in built resources are used instead of separate XML file and textview.
Output of above example